
If you are trying to figure out how to transfer photos from iPhone to computer, you have reliable options on both Windows and macOS. You can move photos quickly with a USB cable or wirelessly for backup and storage management. This guide covers step-by-step methods for PC and Mac, plus quick fixes when imports fail.
How to Transfer Photos from iPhone to PC (Windows 10/11)
If your goal is to transfer photos from iPhone to PC, start with the built-in Windows tools. These methods also cover searches like how to transfer pictures from iPhone to computer.
Method 1. Import with the Windows Photos App (USB)
How to import photos from iPhone to PC? If you want a simple way to move photos from your iPhone to your PC, the Windows Photos app is usually the easiest option. Once you connect your device, the app detects your iPhone and lets you quickly choose and import the photos you need.
Step 1. Unlock your iPhone and connect it to your PC with a USB cable.

Step 2. If a message appears on your iPhone, tap Trust and enter your passcode to allow the computer to access your photos.
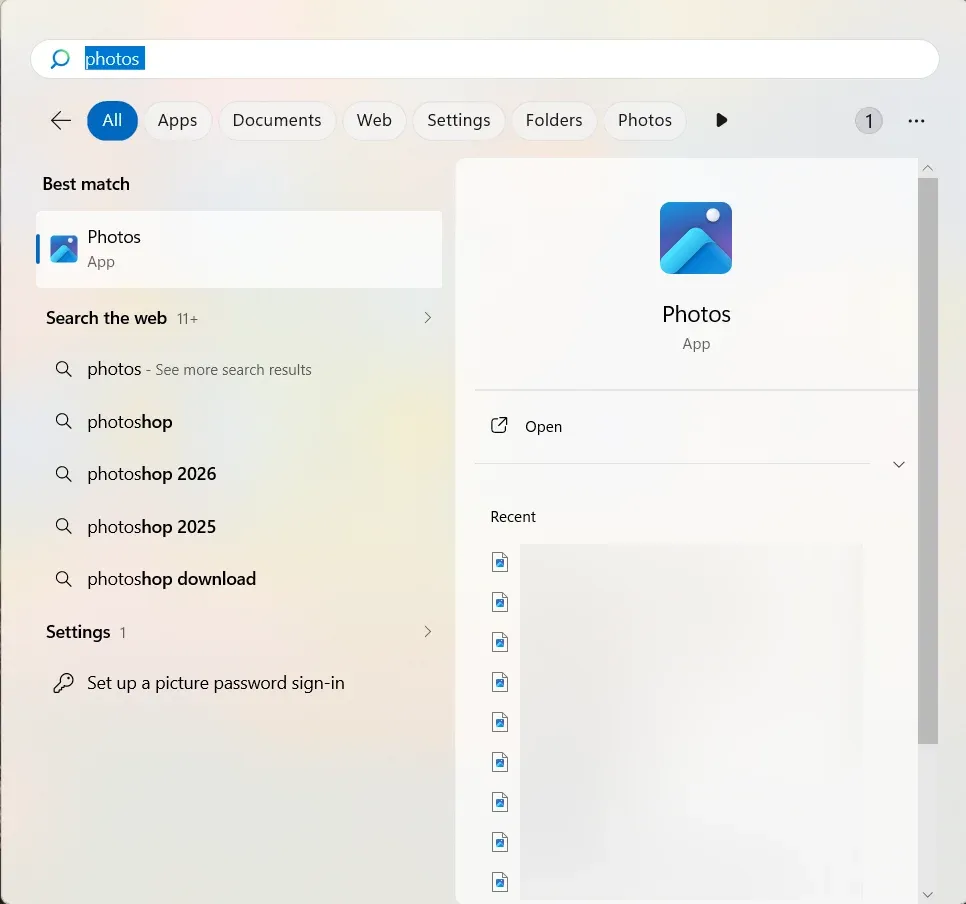
Step 3. On your PC, open the Photos app from the Start menu.

Step 4. In the Photos app, click Import in the top-right corner, then select From a connected device.
Step 5. Wait while the app scans your iPhone for photos and videos. Select the photos you want to import, choose the destination folder, and click Import to move photos from iPhone to PC.
Method 2. Copy Files from DCIM with File Explorer (USB)
How to upload photos from iPhone to computer? If you need more control over file organization, this method lets you transfer photos from your iPhone to your PC and store them in specific folders. This is helpful when you want to keep your photos neatly organized instead of using the default import location.
Step 1. Connect your iPhone to your PC using a USB cable and unlock the device. If prompted, tap the Trust option.
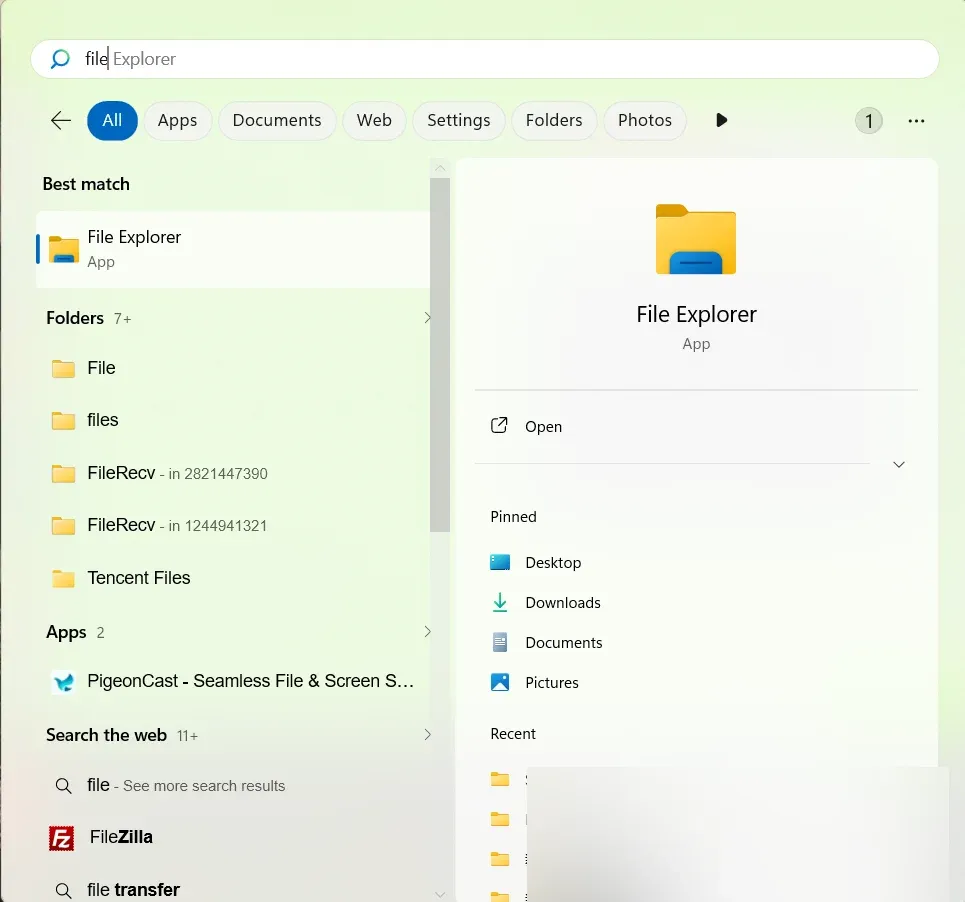
Step 2. Open File Explorer on your PC and go to This PC > Apple iPhone > Internal Storage > DCIM.
Step 3. Open the folders inside DCIM, select the photos or videos you want, then copy photos from iPhone to PC.
Step 4. After copying, you can organize the files on your PC by date, event, or project.
Method 3. Use iCloud Photos for Wireless Transfer
If you don't want to connect a cable every time, iCloud provides a simple wireless way to upload photos from your iPhone and access them on your Windows PC. Here's how to transfer photos from iPhone to PC Windows 10 via iCloud:
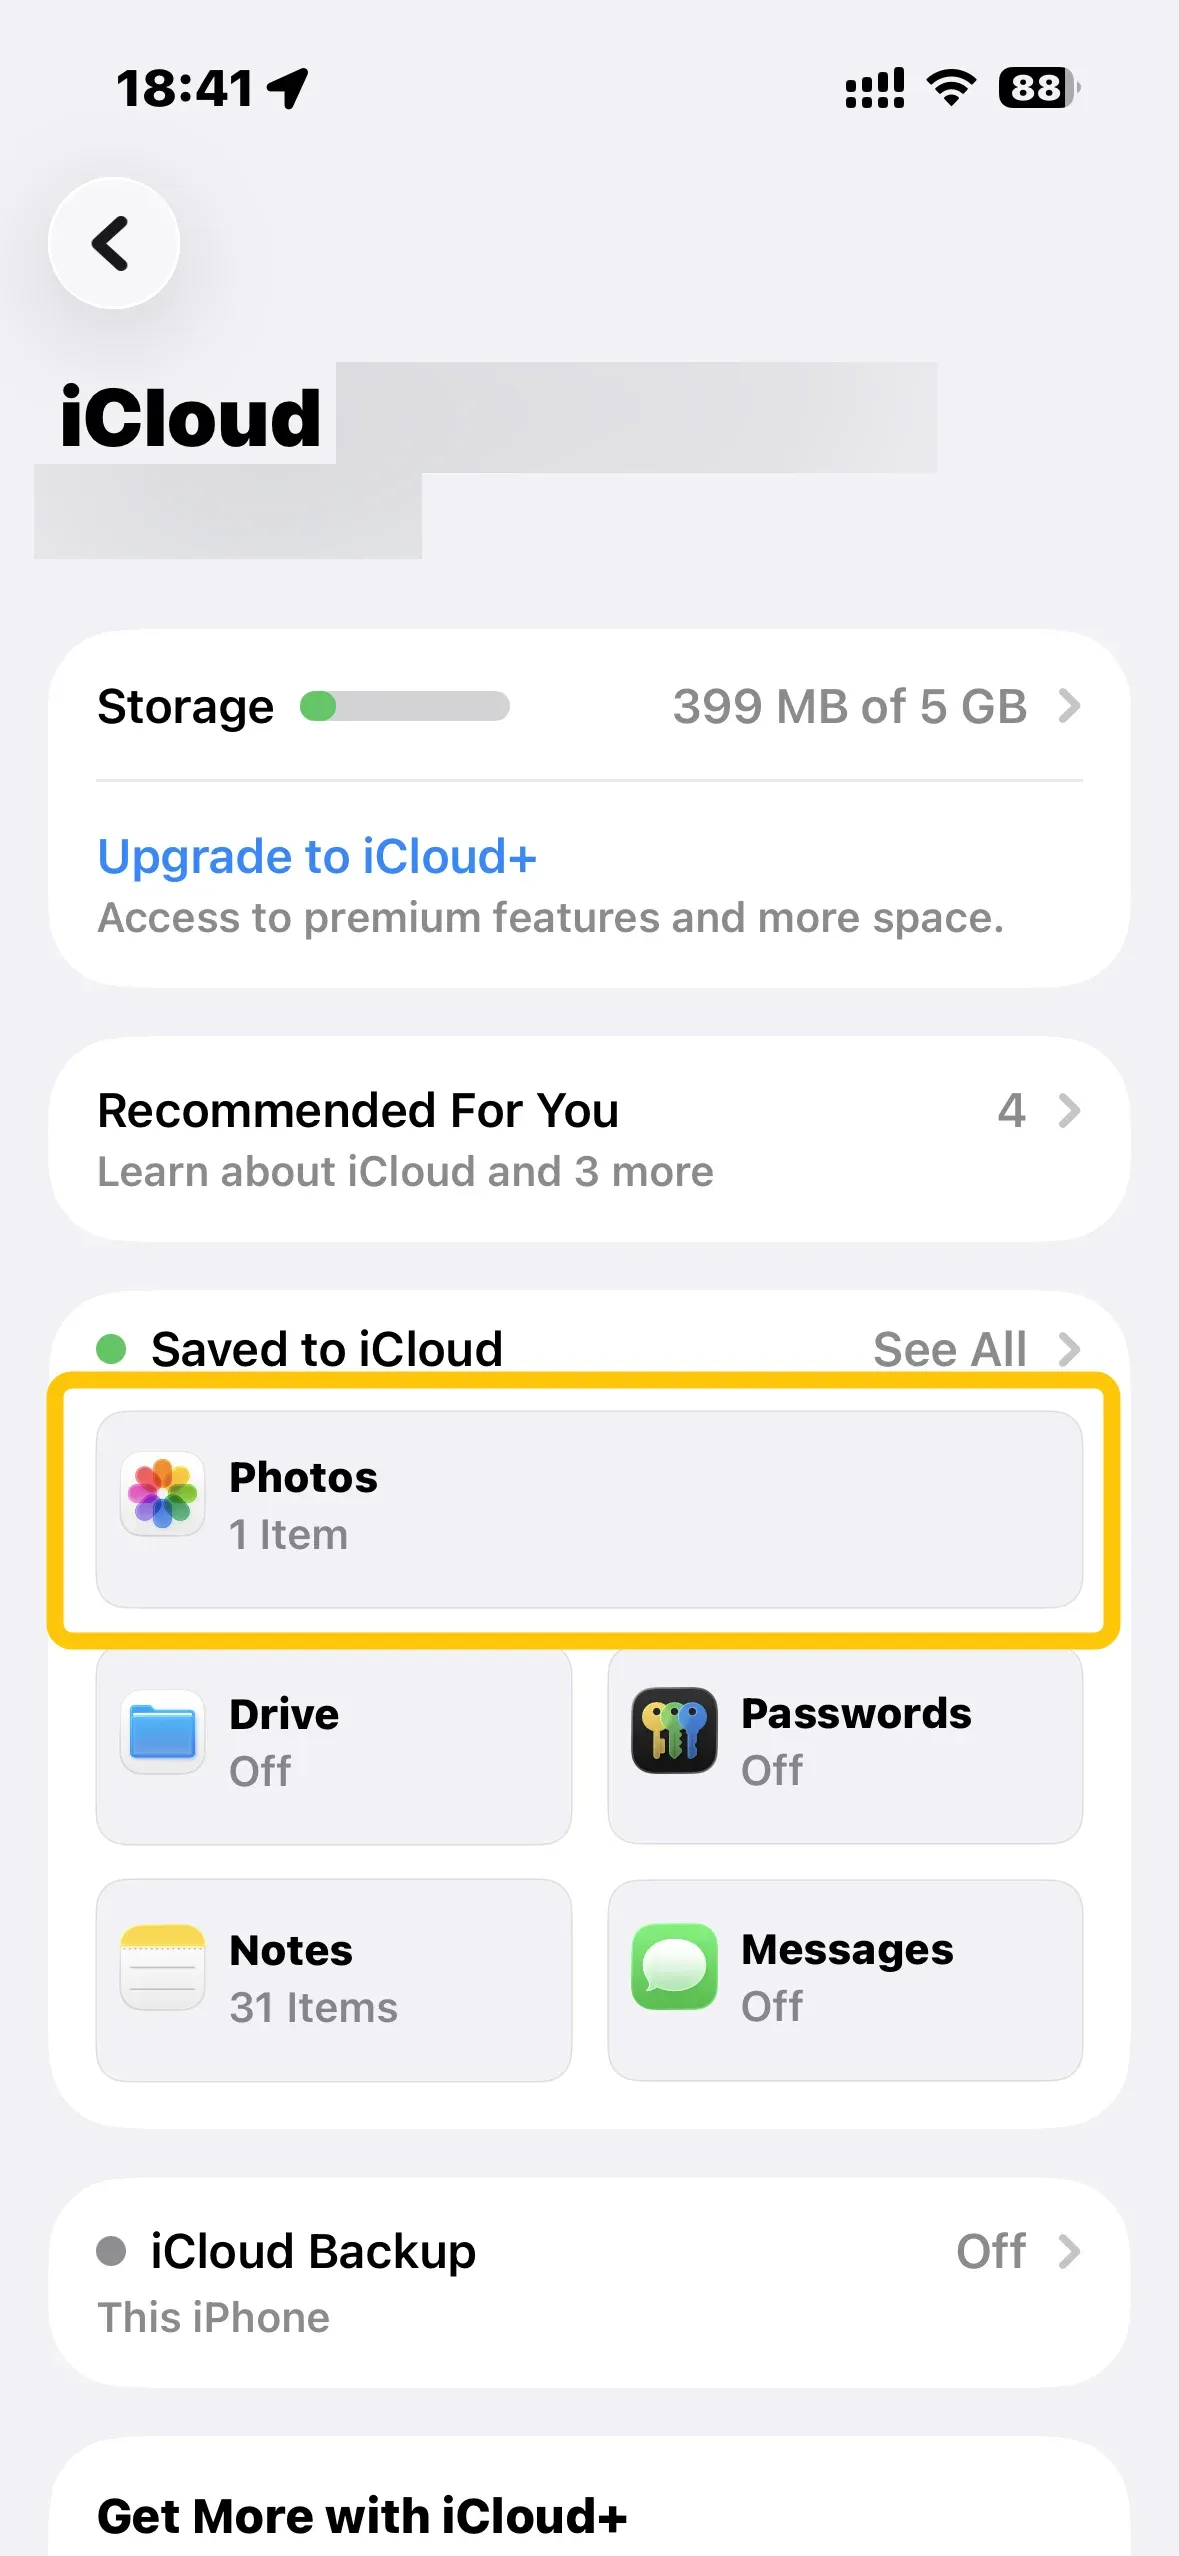
Step 1. On iPhone, go to Settings > [your name] > iCloud > Photos.
Step 2. Turn on iCloud Photos to automatically upload your photos to iCloud.
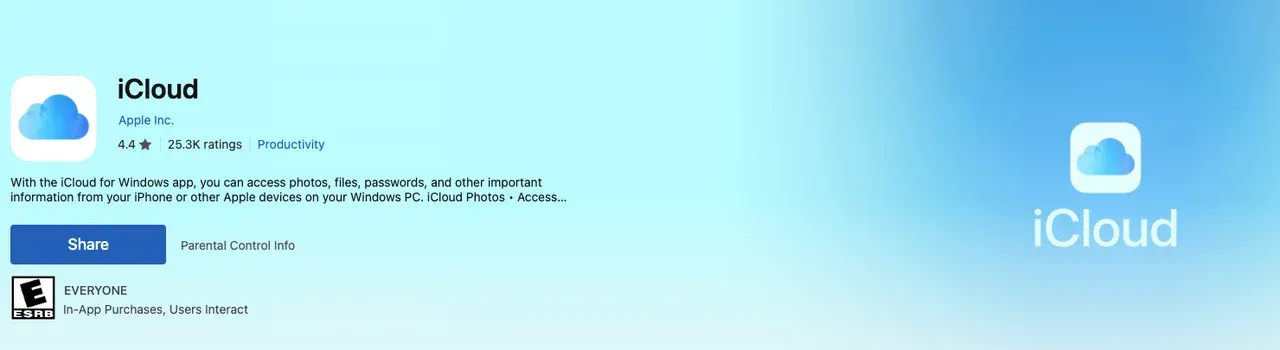
Step 3. On PC, download and install iCloud for Windows from the Microsoft Store, then sign in with your Apple ID.
Step 4. In the iCloud app, enable Photos, then turn on iCloud Photos. Your photos will begin syncing and will appear in the iCloud Photos folder on your PC.
How to Transfer Photos from iPhone to Mac
If you want to transfer photos from your iPhone to your Mac, macOS also gives you a few convenient options. You can connect your iPhone with a USB cable for a quick import, or use wireless syncing to keep your photos available across devices. Let's read on to check how to get photos from iPhone to computer Mac:
Method 1. Import with Photos App on Mac (USB)
How to sync photos from iPhone to Mac? If you want a quick way, you can use Mac's Photos app with a USB cable. This is the default method on macOS and lets you easily import photos directly from your iPhone.
Step 1. Connect your iPhone to your Mac using a USB cable.

Step 2. Unlock your iPhone. If prompted, tap Trust and enter your passcode to allow the Mac to access your photos.
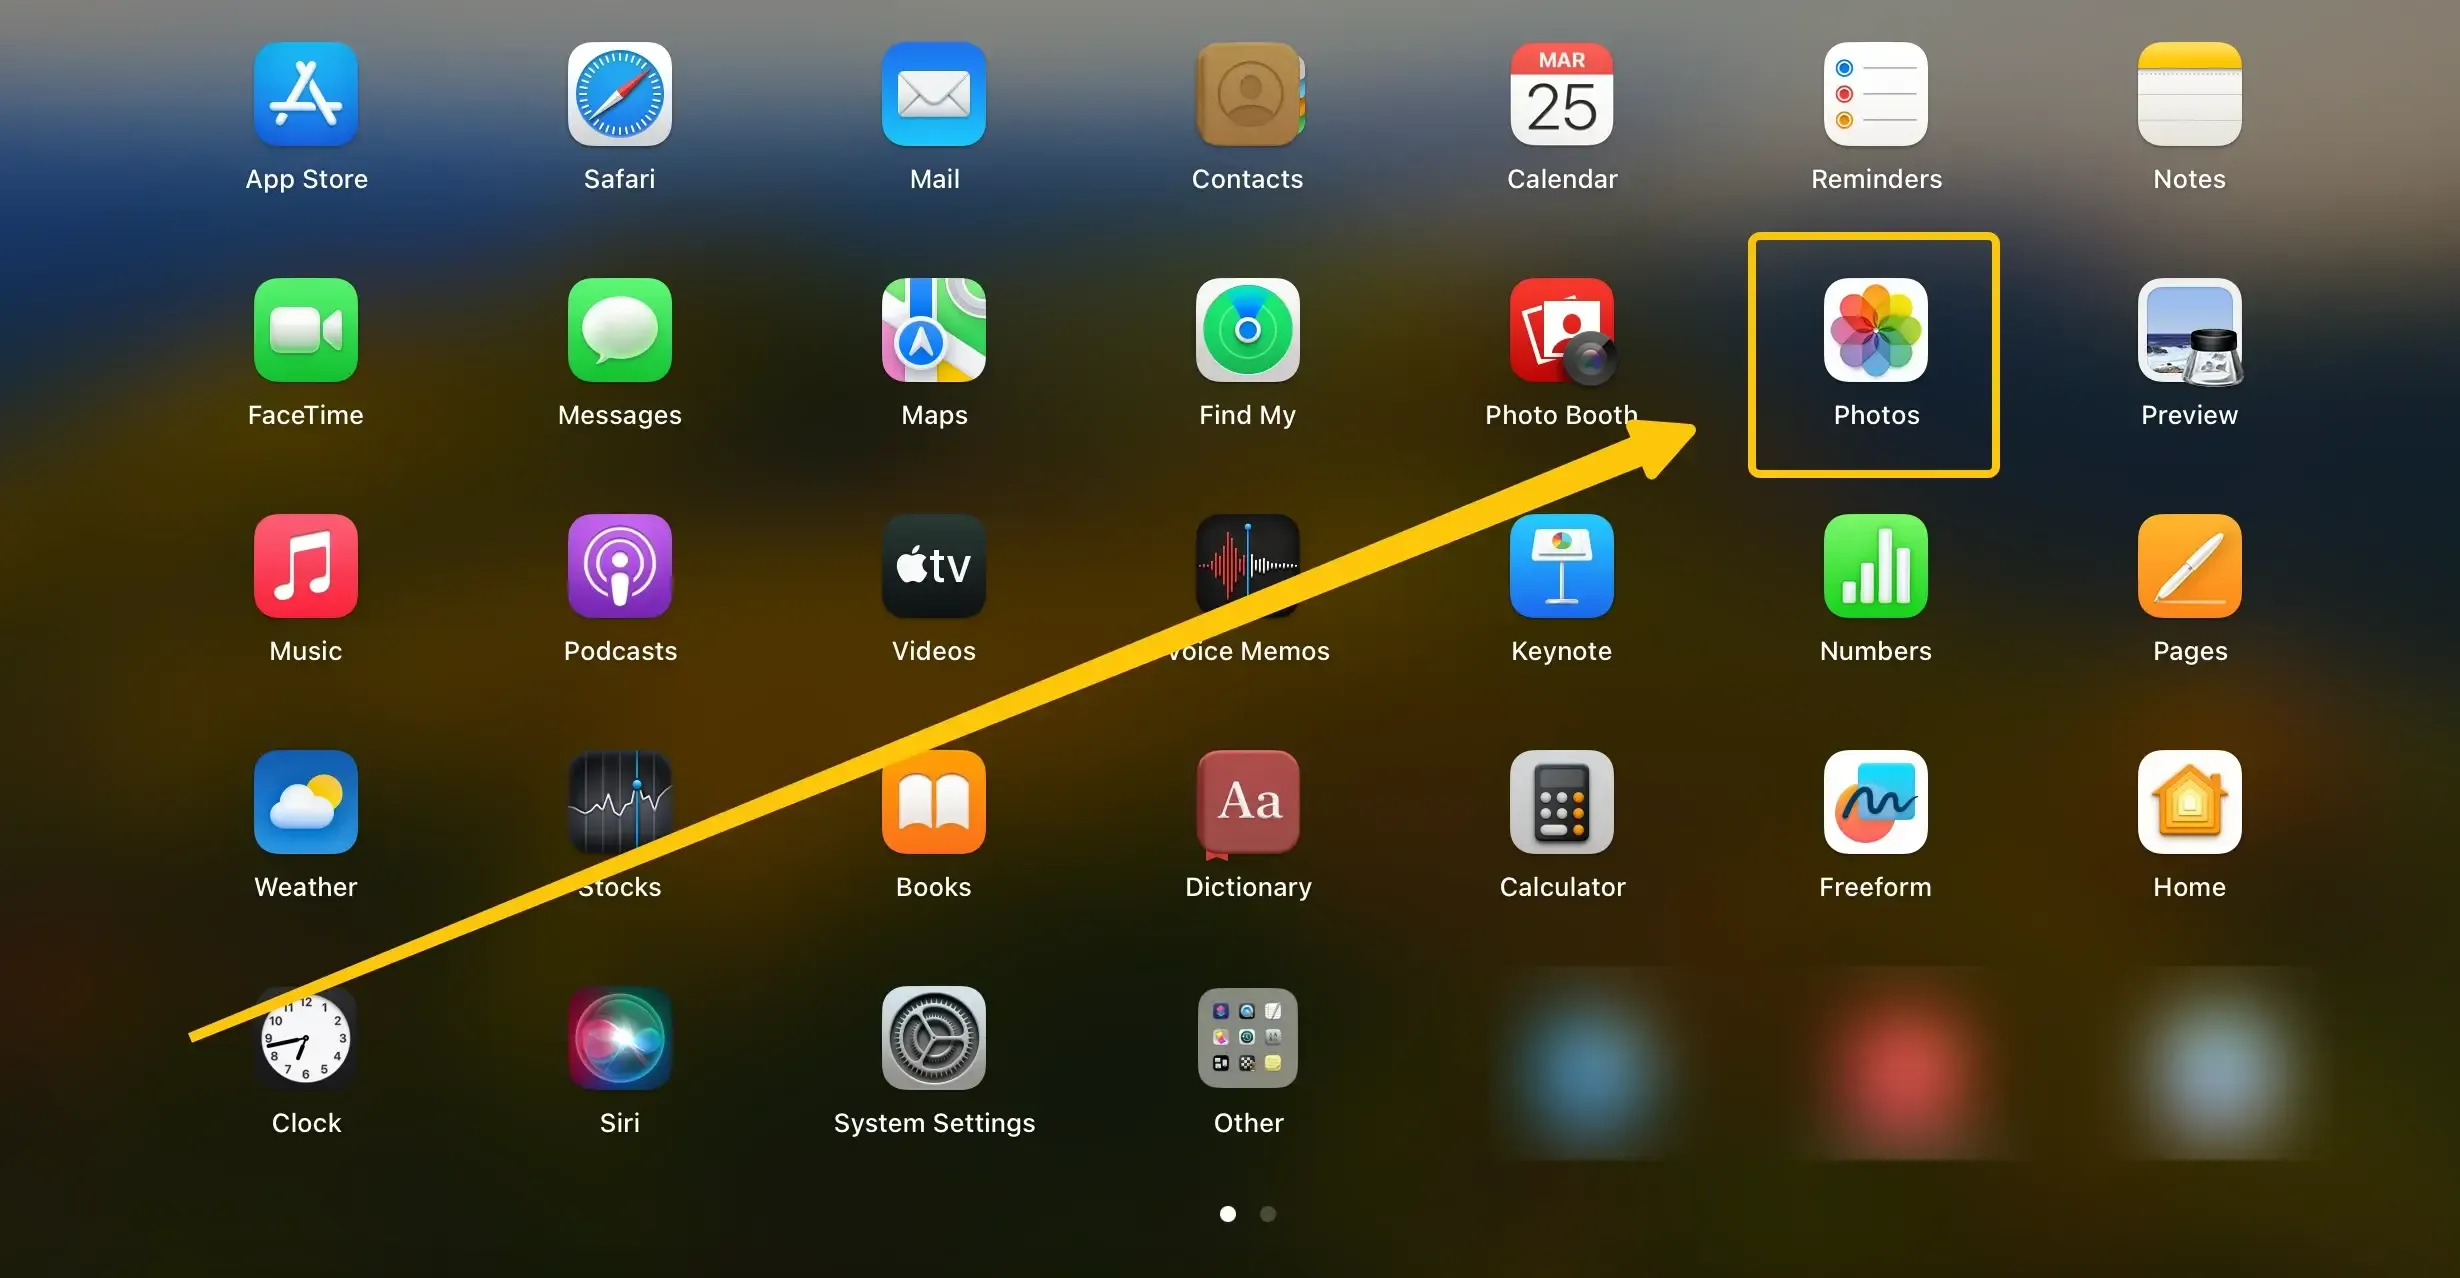
Step 3. Open the Photos app on your Mac (it may open automatically when your iPhone is connected).
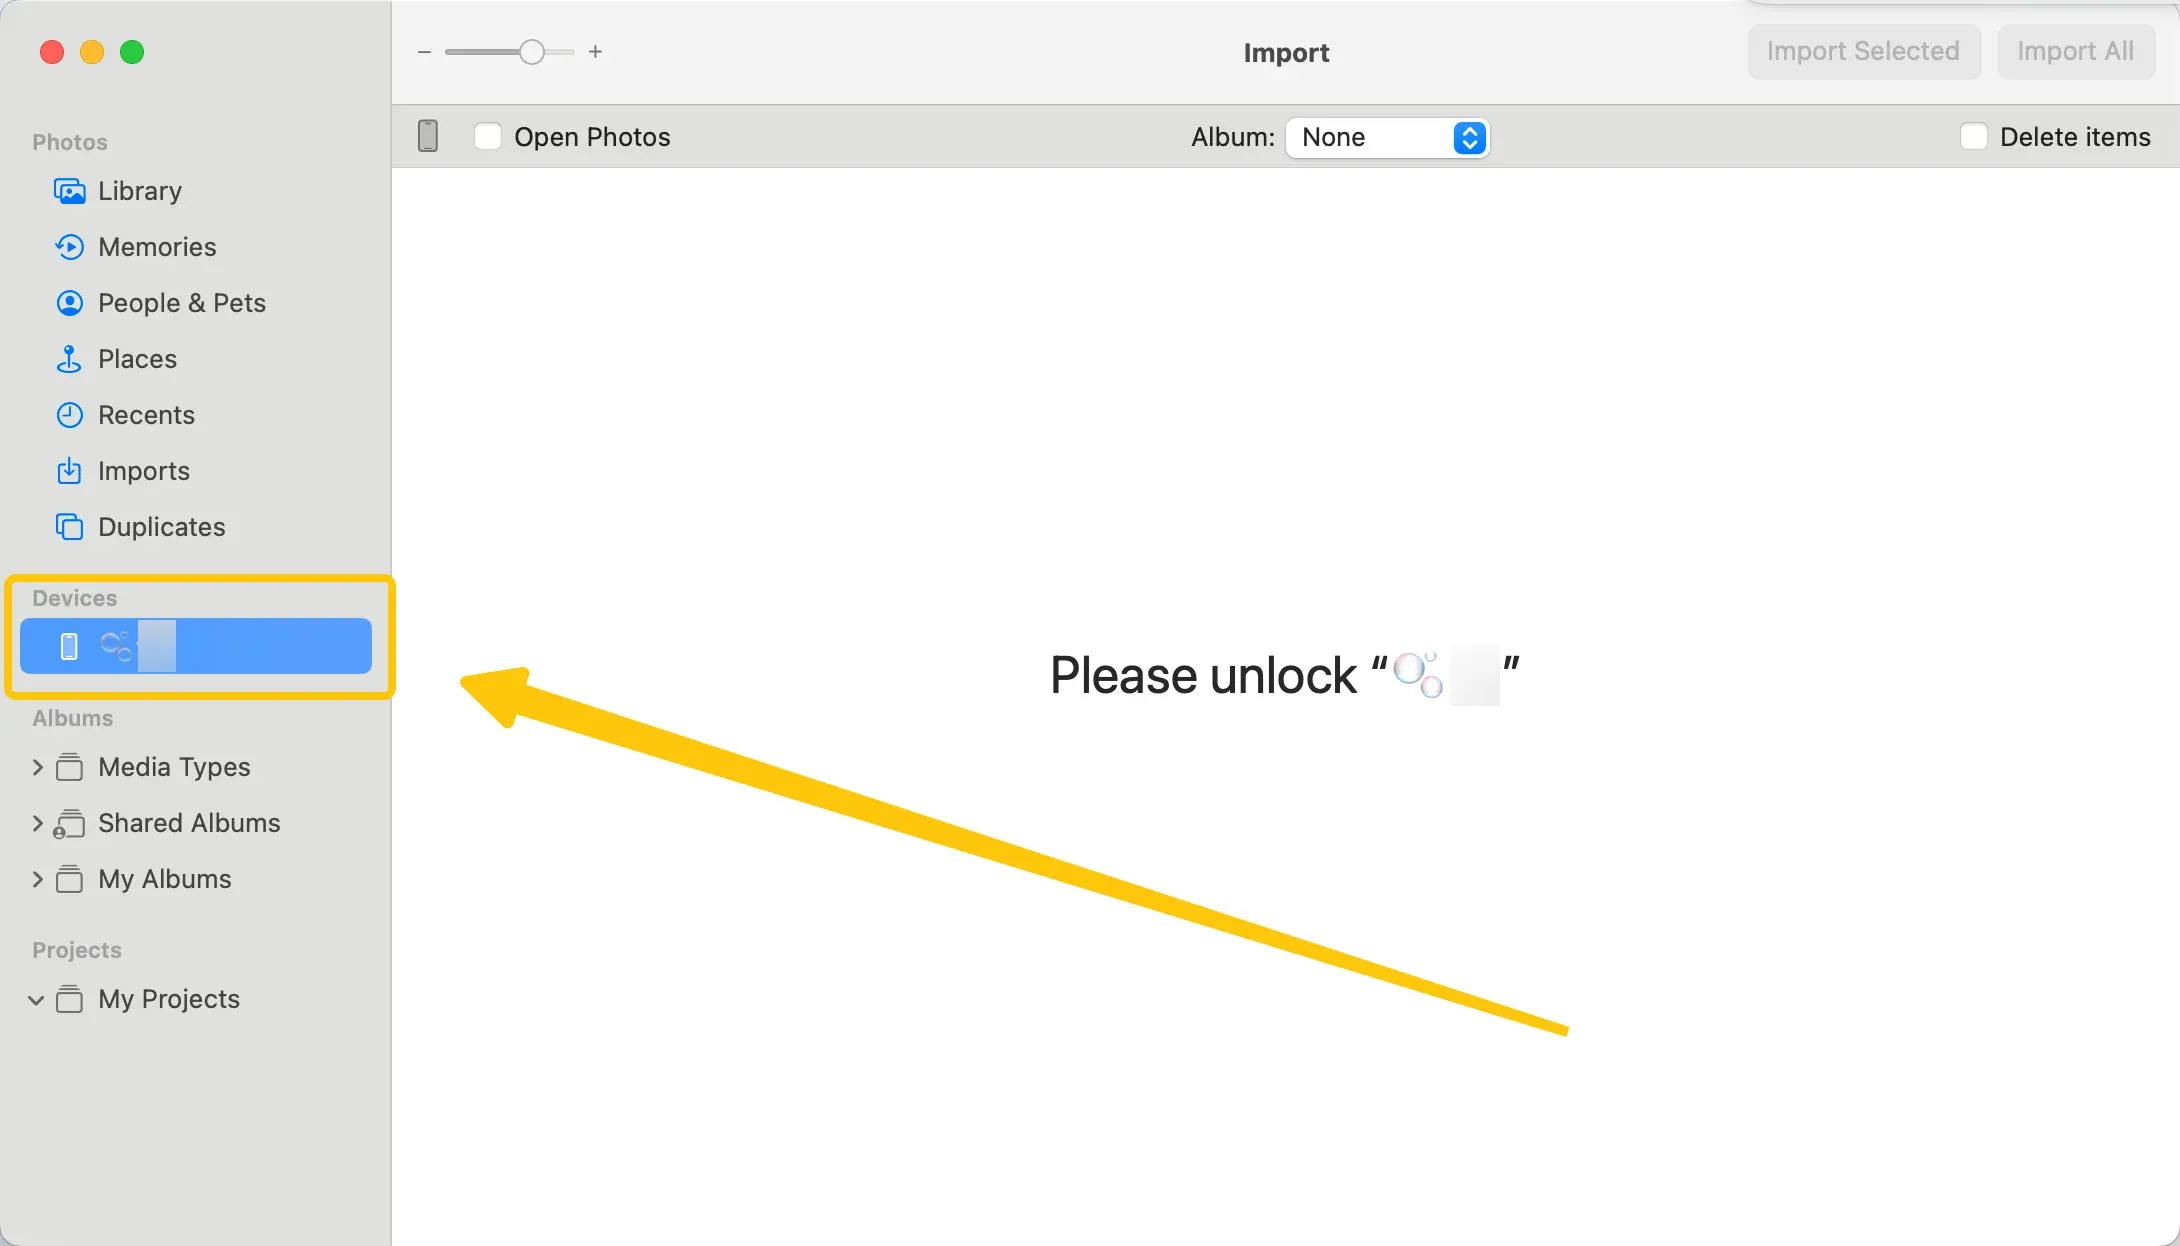
Step 4. In the Photos app sidebar, select your iPhone under Devices.
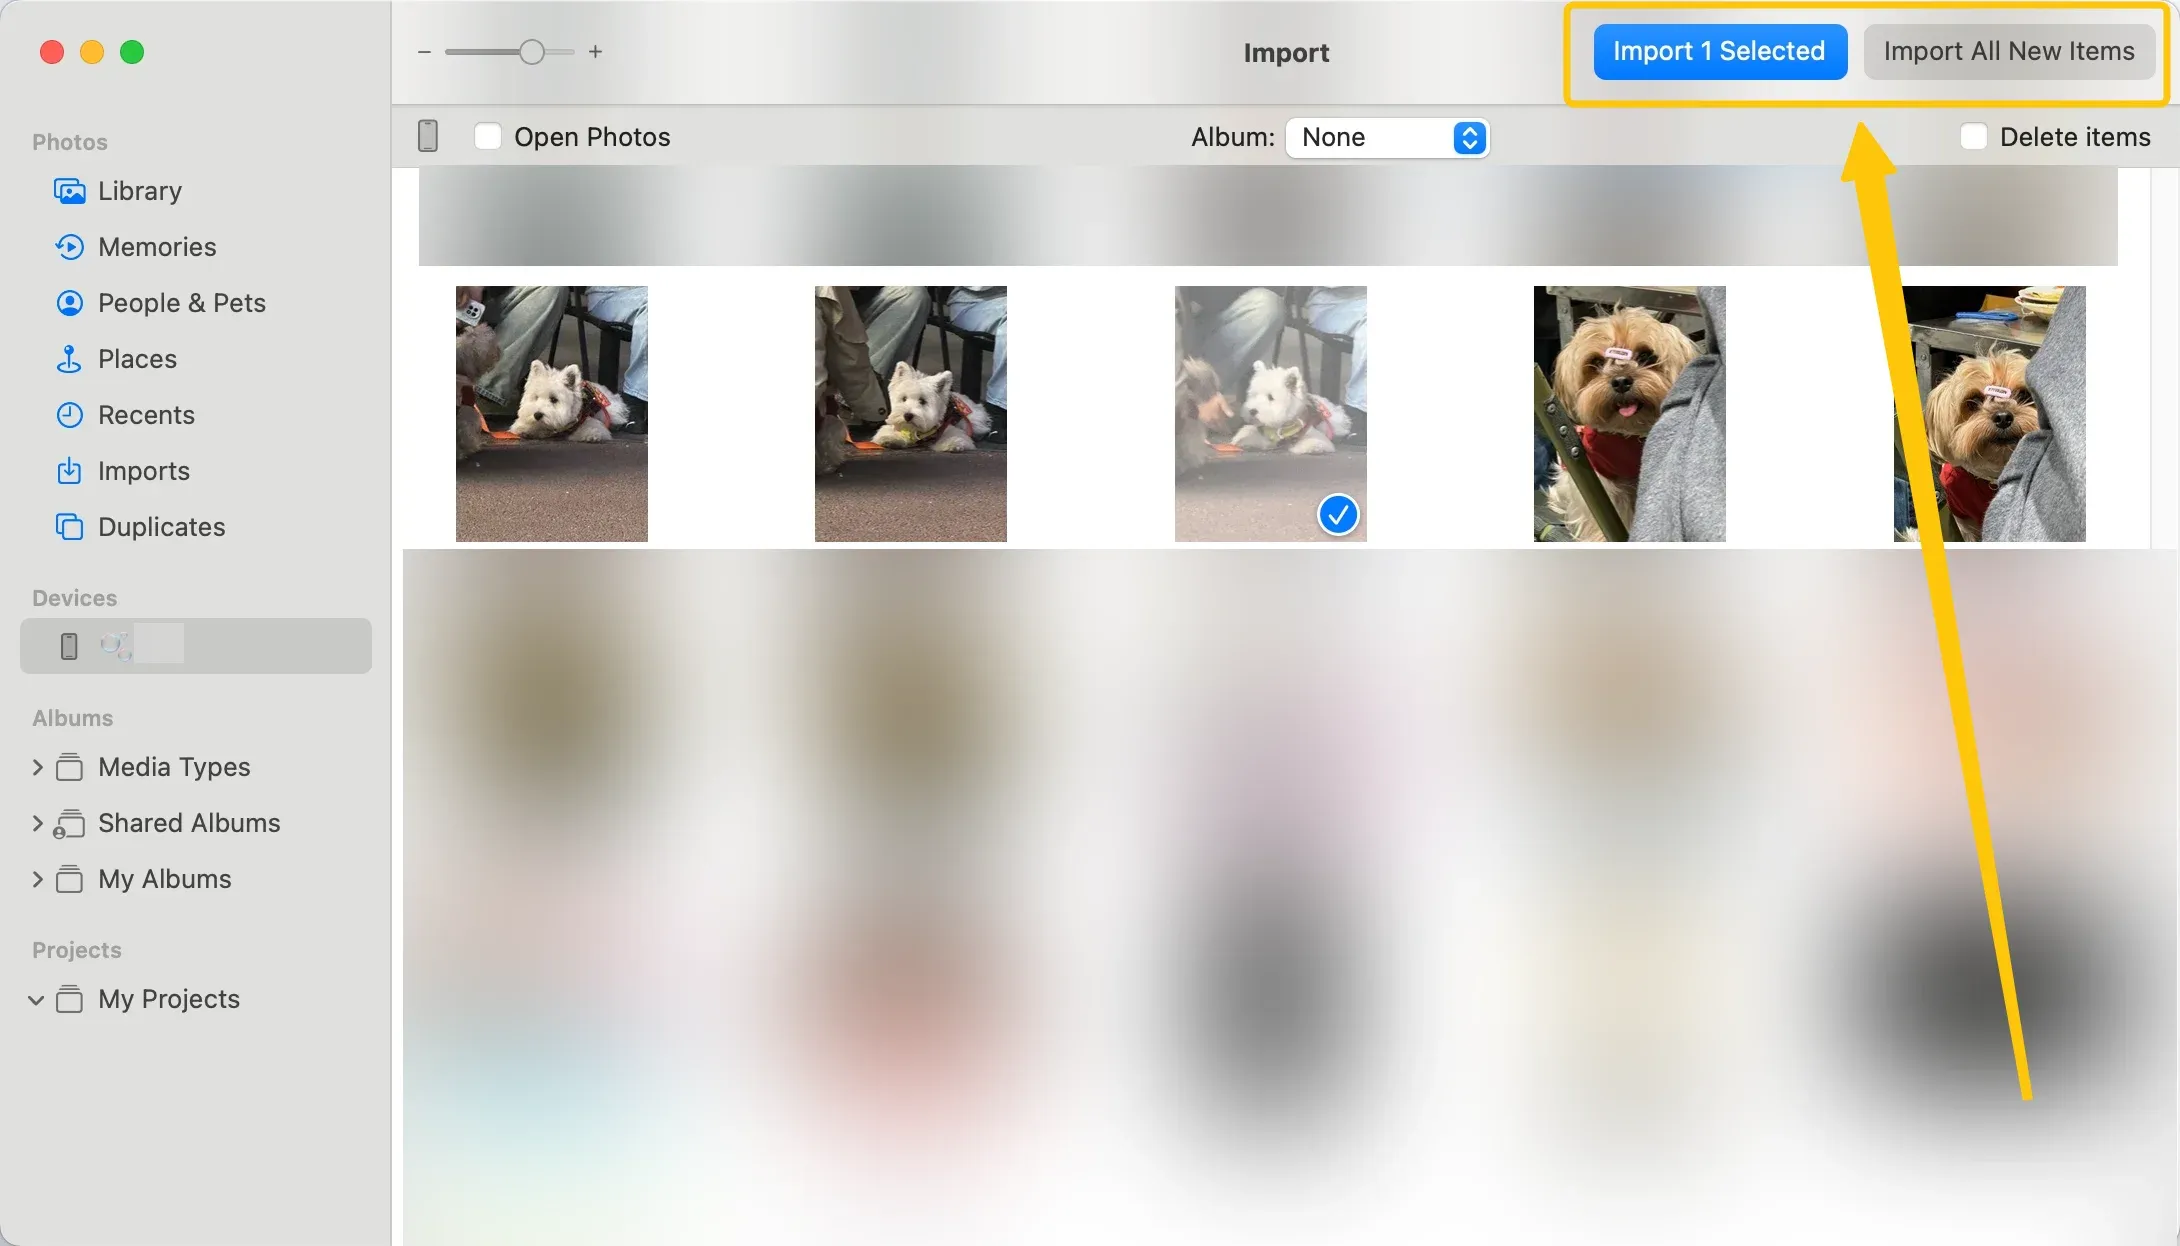
Step 5. Select the photos you want to transfer, then click Import Selected, or click Import All New Items to import all new photos.
Method 2. Import with Image Capture (USB)
Image Capture is a handy option if the Photos app is slow or if you prefer saving files to a regular folder. Simply connect your device via USB, open Image Capture, and select the files you want to import. This method gives you more control over where the files are stored. Here are the specific steps on how to send photos from iPhone to computer via Image Capture:
Step 1. Connect your iPhone to your Mac using a USB cable and unlock the device. If prompted, tap Trust on your iPhone and enter your passcode.
Step 2. Open Image Capture on your Mac. You can find it in Finder > Applications.
Step 3. In the device list on the left, select your iPhone.
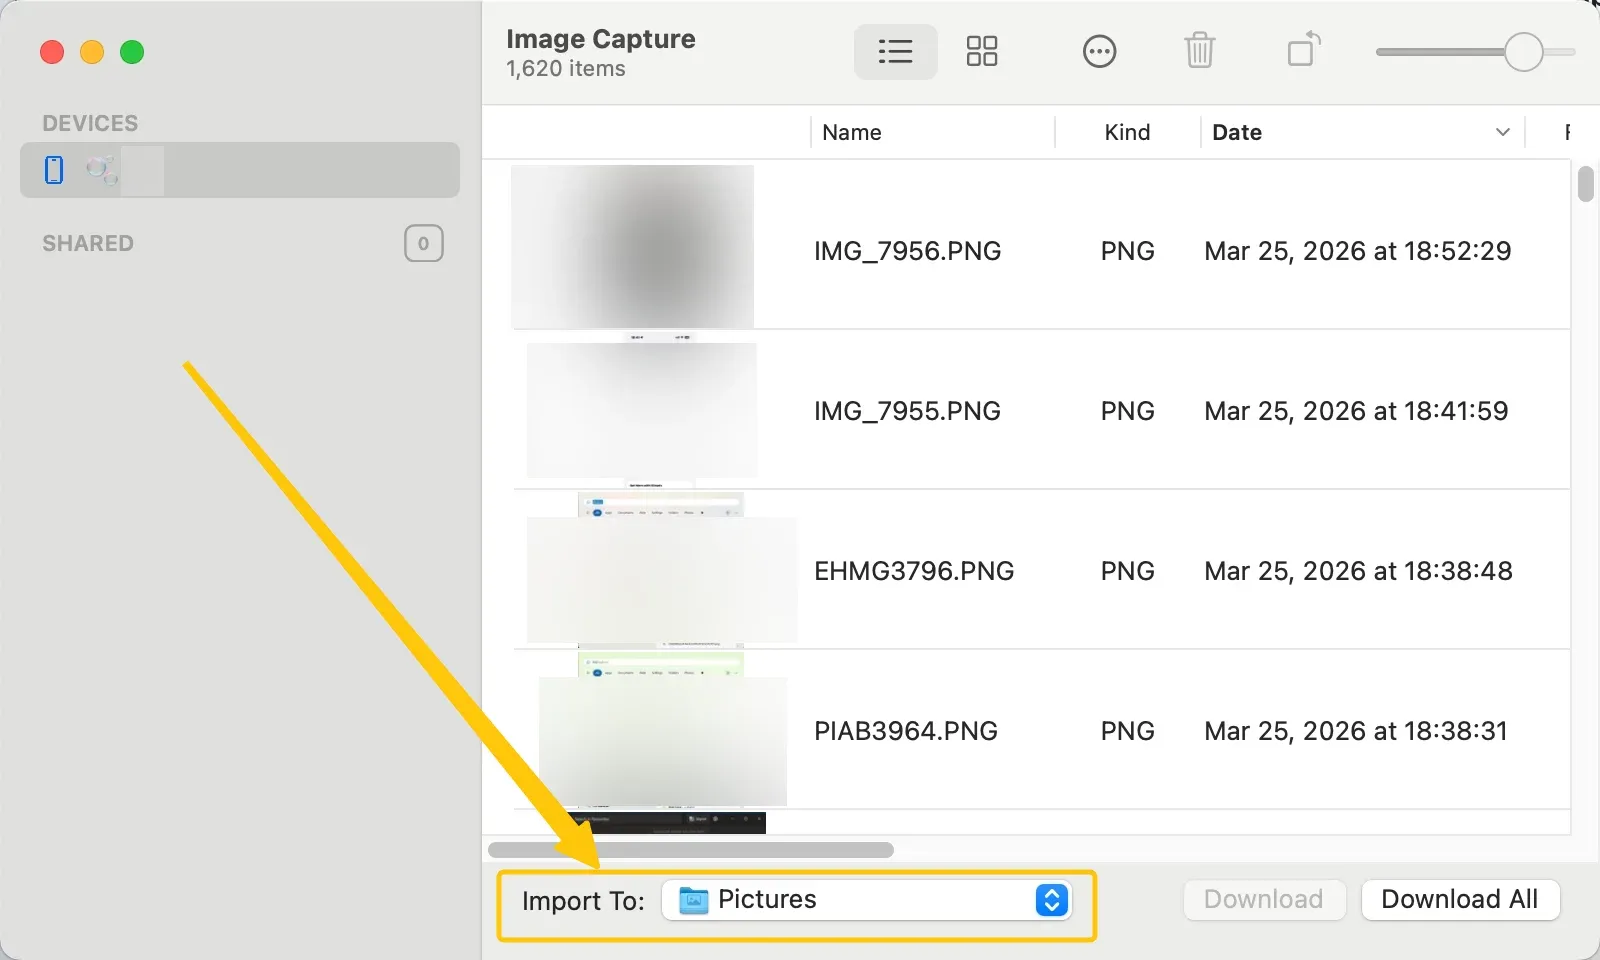
Step 4. Choose a destination folder using the Import To dropdown (for example, Desktop, Downloads, or an external drive).
Step 5. Select the photos you want and click Import, or click Import All to transfer all photos from your iPhone.
Method 3. AirDrop or iCloud (No USB)
How to import photos from iPhone to Mac without USB? If you prefer not to use a USB cable, you can transfer photos from your iPhone to your Mac wirelessly using AirDrop or iCloud. AirDrop works best for quickly sending selected photos, while iCloud keeps your photo library synced automatically across devices.
- AirDrop (Fast for Selected Files)
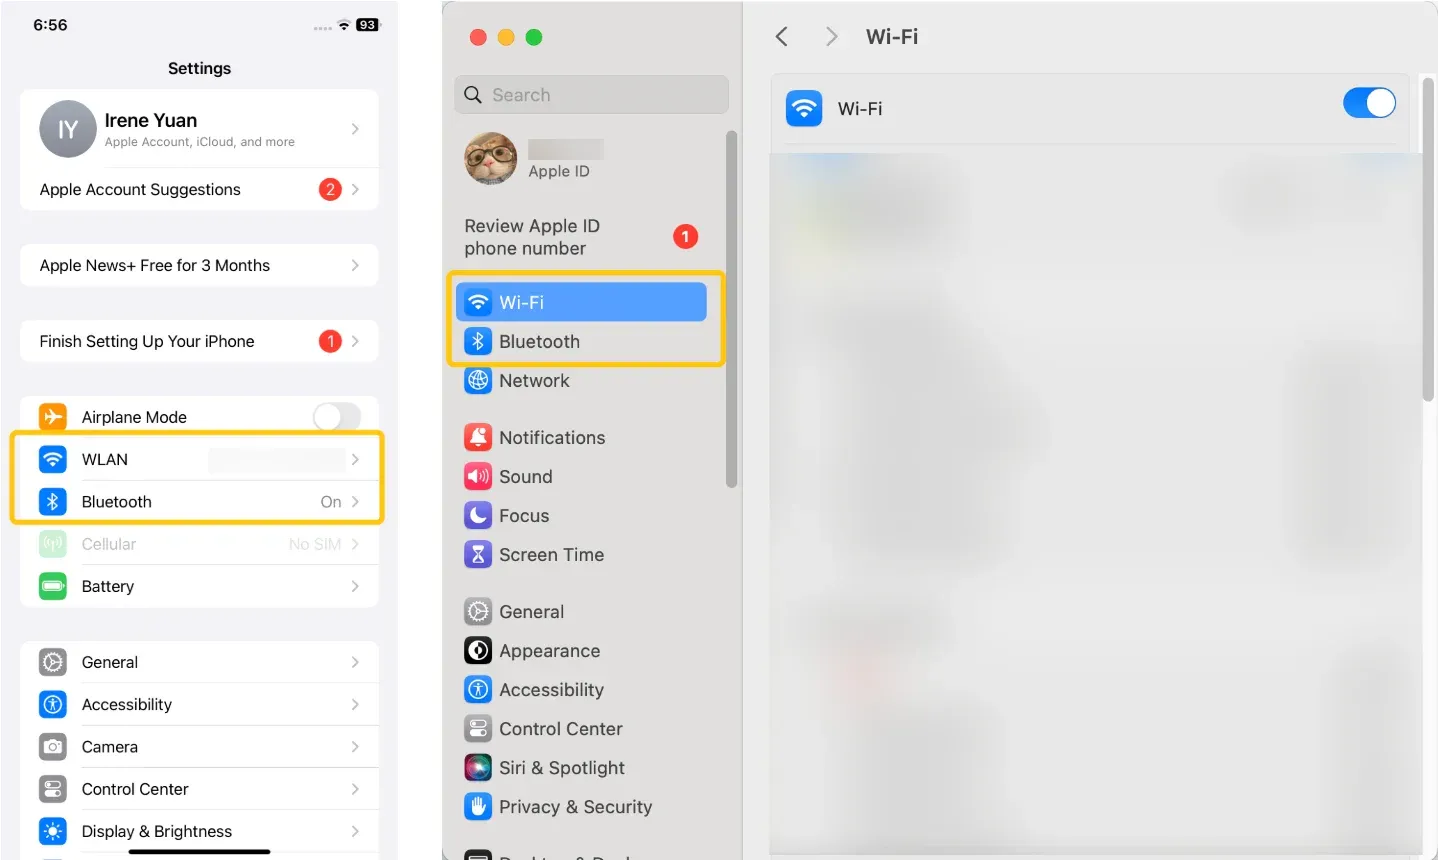
Step 1. Turn on Wi-Fi and Bluetooth on both your iPhone and Mac.
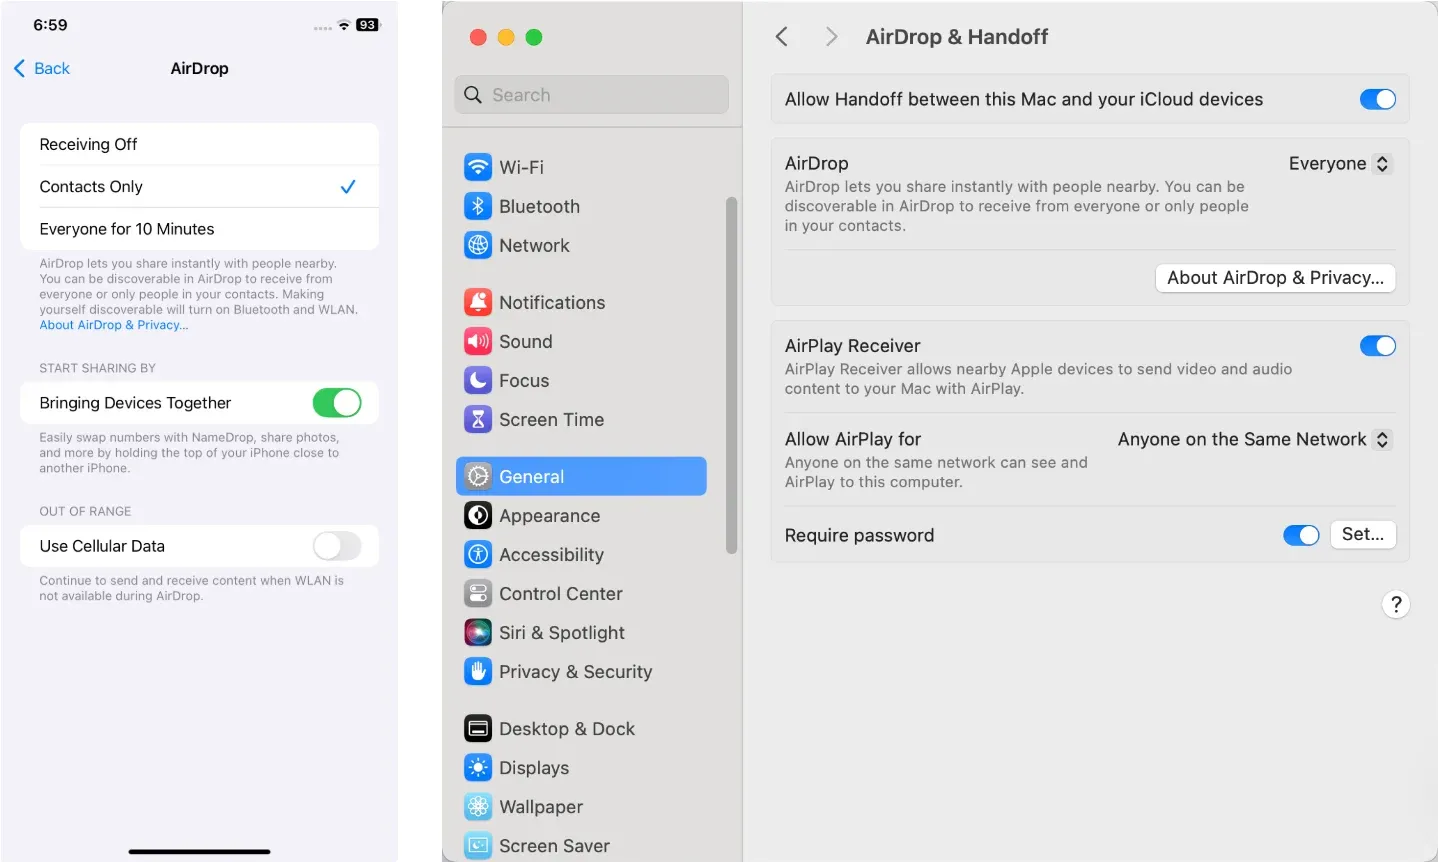
Step 2. Enable AirDrop on both devices and set visibility to Contacts Only or Everyone.
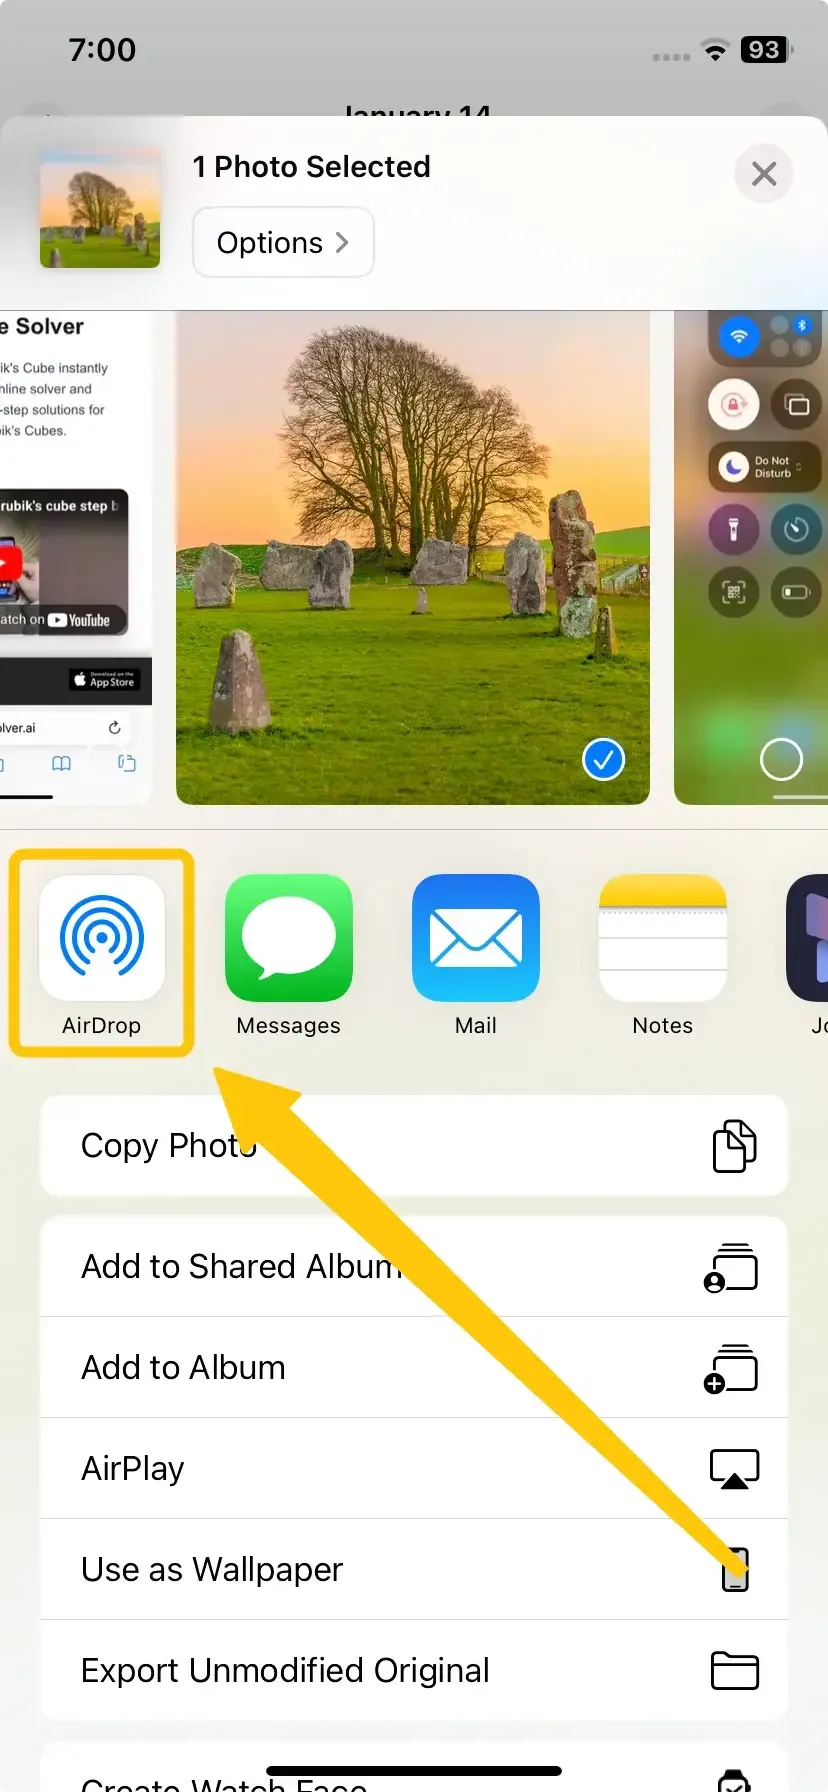
Step 3. On your iPhone, open the Photos app, select the photos you want to send, then tap Share > AirDrop.
Step 4. Select your Mac from the AirDrop list.
Step 5. Accept the transfer on your Mac and save the photos.
- iCloud Photos (Best for Ongoing Library Sync)
Step 1. On your iPhone, go to Settings > [your name] > iCloud > Photos and turn on iCloud Photos.
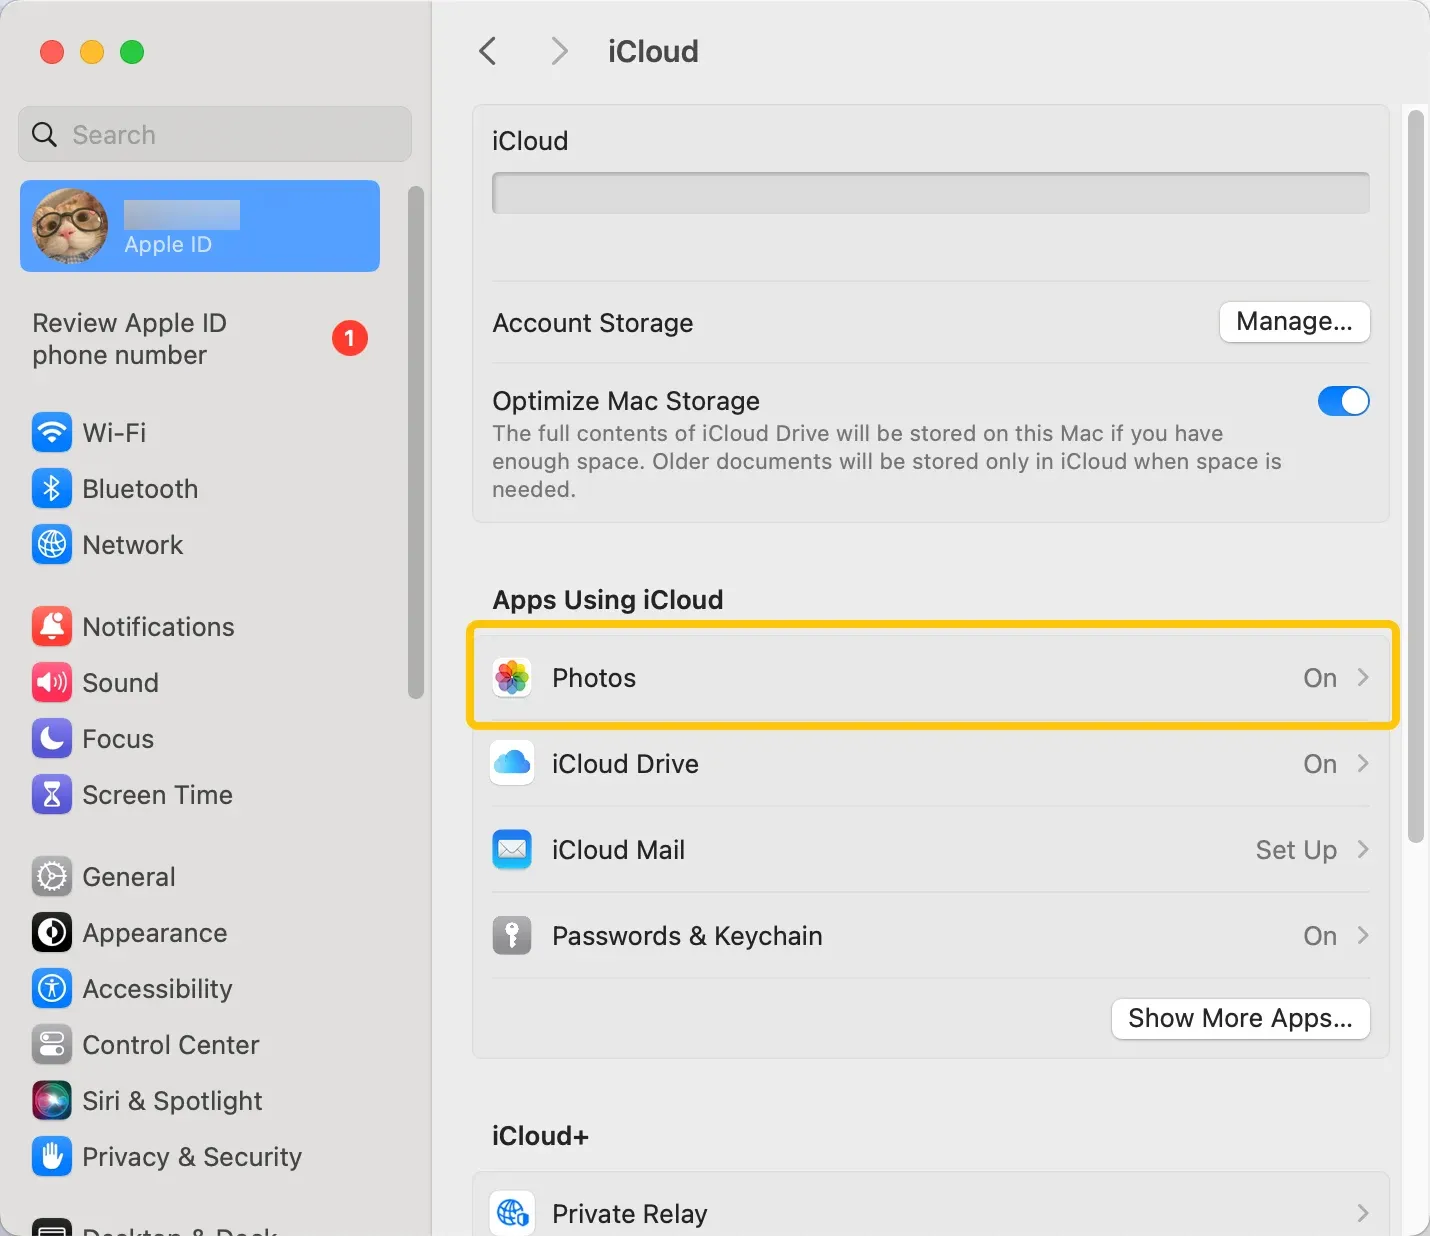
Step 2. On your Mac, open System Settings > Apple ID > iCloud > Photos.
Step 3. Turn on Sync this Mac (or iCloud Photos on older macOS versions).
Step 4. Wait for your photos to upload and sync across devices.
Alternative Path: Cast iPhone to Laptop via PigeonCast
If you do not have a USB cable on hand, or you run into device compatibility issues, screen mirroring can be a practical fallback. Instead of importing files right away, you can cast photos from your iPhone to a Windows PC or Mac for quick viewing, sharing, or presentation.
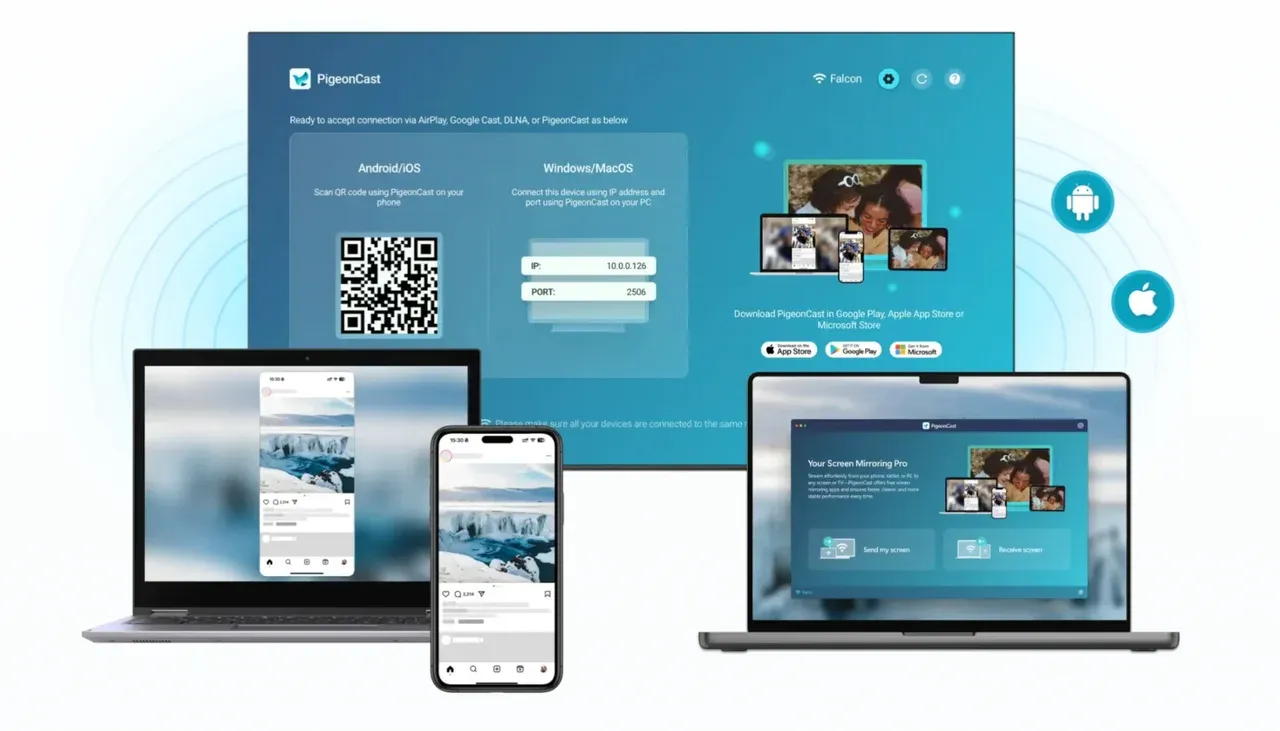
PigeonCast is a screen-mirroring app designed for this use case. It helps you display iPhone photos on a larger screen with minimal setup, which is useful when your immediate goal is to show images rather than manage local file storage.
Step 1. Ensure your iPhone and laptop (Windows or Mac) are covered by the same wireless network.


Overall Rating:



Step 2. Install PigeonCast on both your iPhone and laptop from the corresponding App Store, and launch it.

Step 3. On your iPhone, tap Select device to select your targeted laptop from the available list.
Step 4. Enter the onscreen PIN code to confirm the pairing performance.

Step 5. When you complete the connection, click Start Mirror to mirror your photo on the laptop screen.
Common Problems and Fixes
If your photo transfer doesn't work, the issue is often caused by trust settings, cable problems, or format mismatches. Use the checklist below to quickly identify and fix the problem before trying again.
- iPhone Not Showing on Computer
- Reconnect with a certified cable.
- Unlock iPhone and keep the screen awake.
- Tap Trust This Computer and enter passcode.
- Restart iPhone and computer.
- Import Starts But Fails Halfway
- Free up storage on the destination drive.
- Import in smaller batches (for example, by month).
- Disable battery saver and keep devices plugged in.
- HEIC Files Open Poorly on Windows
- On iPhone: Settings > Camera > Formats > choose Most Compatible for future photos.
- Or install HEIF/HEVC extensions on Windows.
- Or convert files after import.
- The Photos app cannot find all recent images
- Wait for iPhone indexing and iCloud upload to finish.
- Check if images are in iCloud-only state and not downloaded locally.
- Toggle airplane mode off/on, then retry import.
Conclusion
How to transfer photos from iPhone to laptop? The best method depends on your needs. Use the Photos app with a USB cable if you want the fastest way to move a large photo library. For wireless transfers, choose iCloud for automatic syncing or AirDrop for sending smaller batches to a Mac. If the transfer fails, check trust settings, cable quality, storage space, file formats, and try PigeonCast for screen mirroring activities.
How to Transfer Photos from iPhone to Computer FAQ
What is the easiest way to transfer photos from iPhone to PC?
The easiest way to transfer photos from an iPhone to a PC is by using the built-in Windows Photos app with a USB cable.
- Simply connect your iPhone to your PC, unlock the device, and tap Trust if prompted.
- Then open the Photos app on Windows, click Import > From a connected device.
- Select the photos you want, and import them to your computer.
This method is fast, requires no extra software, and works well for transferring large photo libraries.
How to import photos from iPhone to iCloud on Mac?
To import photos from your iPhone to iCloud on a Mac, you simply enable iCloud Photos so your images sync automatically.
- On your iPhone, go to Settings > [your name] > iCloud > Photos, then turn on iCloud Photos.
- On your Mac, open System Settings > Apple ID > iCloud > Photos.
- Turn on Sync this Mac (or iCloud Photos on older macOS versions).
- Open the Photos app on your Mac and wait for your photos to upload and sync automatically through iCloud.
How to import photos from iPhone to Mac Bluetooth?
You can't import photos directly from an iPhone to a Mac using Bluetooth. Bluetooth on Apple devices is mainly used for accessories (like keyboards or headphones), not for transferring photos. Instead, Apple recommends using AirDrop, which uses Bluetooth to discover nearby devices and Wi-Fi to transfer files quickly.
Why can't I transfer iPhone photos to a computer?
Here are the common reasons why you can't transfer photos from your iPhone to a computer:
- The iPhone is locked when connected to the computer.
- "Trust This Computer" permission was not approved on the iPhone.
- USB cable or USB port connection problems.
- Outdated system software or drivers on the computer.
- iCloud Photos is enabled, and some photos are stored only in iCloud instead of the device.
- Insufficient storage space on the computer.
- Unsupported photo formats (such as HEIC on older systems).
- The computer does not properly recognize the iPhone device.
- The Photos app or file transfer tool fails to detect the device.
- Temporary connection or system glitches during the transfer process.
How to import hidden photos from iPhone to Mac?
To import hidden photos from your iPhone to a Mac, you first need to make sure the Hidden album is visible on your iPhone, since hidden photos are stored in a separate album.
- Show the Hidden album on your iPhone: Go to Settings > Photos, then turn on Show Hidden Album.
- Unlock the Hidden album: Open the Photos app on your iPhone, go to Albums > Hidden, and unlock it with Face ID, Touch ID, or passcode if required.
- Connect your iPhone to your Mac: Use a USB cable and unlock your iPhone. Tap Trust if prompted.
- Open the Photos app on your Mac and select your iPhone under Devices in the sidebar.
- Hidden photos will appear with other images in the import view. Select them and click Import Selected or Import All New Items.
Clara Rossi is an experienced technology editor and a seasoned expert in screen mirroring and casting technologies. With a keen eye for detail and a deep understanding of how to seamlessly connect devices, Clara excels at optimizing user experiences for effortless sharing and streaming. Whether you're seeking quick fixes or advanced tips, her expertise and responsiveness ensure that every query is met with a well-informed and efficient solution.