
Learning how to connect laptop to projector has become essential for classrooms, business meetings, and home entertainment. Whether you need a wired option, such as HDMI or USB, or you prefer connecting through WiFi, this guide walks you through every method in a clear and practical way. By the end, you will understand how to connect projector to laptop with different cables or wireless solutions, and how to choose the best projector for laptop use.
Understanding How Projectors Connect to Laptops
Understanding the different ways a projector communicates with your laptop makes every connection method easier to use. Modern projectors usually support digital inputs such as HDMI, USB-C, and wireless casting, while older or business-oriented models may rely on VGA. Once you recognise these options, it becomes much simpler to decide how to connect a laptop to a projector in a reliable way.
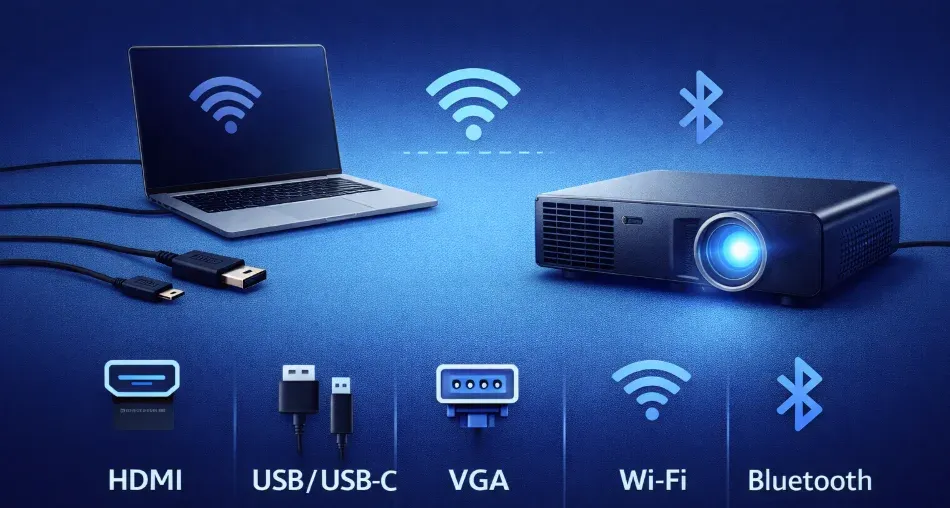
Wired and wireless connection between the laptop and the projector:
- HDMI: The most common and stable option. HDMI carries both video and audio, which makes it ideal when learning how to connect laptop to projector with HDMI for classrooms, movies, or business presentations.
- USB or USB-C: Many portable models allow USB or USB-C projection directly from a newer laptop. This is useful when you want to connect projector to laptop without HDMI ports.
- VGA: An older analog connector still found in conference rooms and older projectors.
- Wi-Fi or wireless casting: With a tool such as PigeonCast on your laptop, you can connect your laptop to TV or a smart projector wirelessly.
- Bluetooth: Bluetooth is available on some portable projectors but works mainly for audio.
How to Connect a Laptop to a Projector: Step-by-Step Methods
Now that you understand the main connection types, the next step is learning how each method works in real situations. The following tutorials explain how to connect laptop to projector with HDMI, USB, WiFi, Bluetooth, and more. Each section includes beginner-friendly steps and practical tips, making the process simple even if it is your first time using a projector for laptop presentations or entertainment.
Method 1: Connect Laptop to Projector with HDMI
HDMI remains the most widely supported option among modern projectors, making it the first method many people consider when learning how to connect a laptop to a projector with HDMI.
Nearly every home theater and office projector includes at least one HDMI port, and because the signal carries both audio and video, the setup process is usually trouble-free. Even if your laptop lacks a full-size HDMI port, simple adapters such as USB-C to HDMI make the connection possible on most Windows laptops and newer MacBooks.
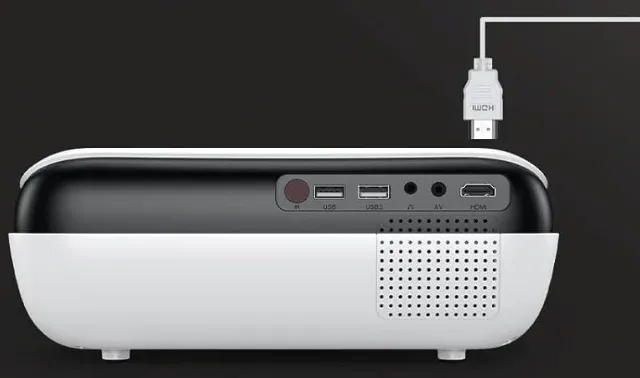
HDMI is especially helpful when you need stable playback during presentations, movies, or long classroom sessions where wireless lag can be distracting.
How to connect laptop to projector with HDMI:
Step 1. Turn off your projector and place it near your laptop.
Step 2. Plug one end of the HDMI cable into the HDMI port on your laptop.
Tip: Use a high-quality HDMI cable if you need a long connection distance.
Step 3. Connect the other end to the HDMI input on your projector.
Step 4. Power on the projector and switch the input source to HDMI,
Step 5. Turn on your laptop and wait a few seconds for the projector to detect the signal.
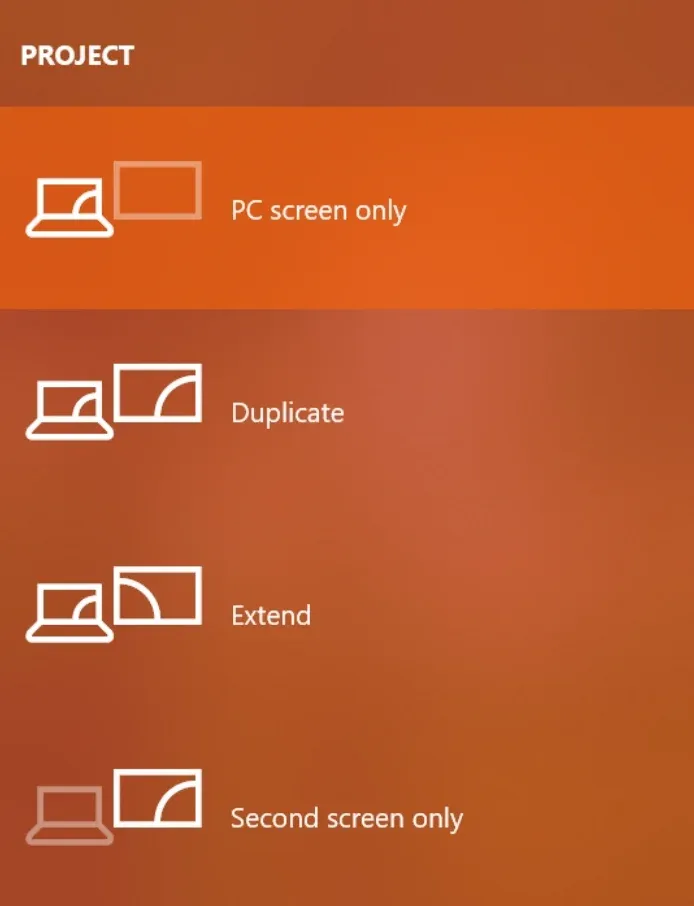
Step 6. Open your display settings and select Duplicate, Extend, or Second Screen, depending on what you want to display.
Method 2: Connect Laptop to Projector with USB
Some newer projectors accept video input directly through USB or USB-C ports. This method is useful when you want to learn how to connect laptop to projector without HDMI or when using an ultra-portable model designed for travel.
While not every projector supports true USB video, many compact LED projectors or business-focused models include USB display modes or USB-C Alt Mode compatibility. This method appears to users who prefer a single cable setup or who rely on slimmer laptops with limited ports. You may still need a USB-C to USB-A adapter, depending on your laptop depending on your laptop, but the connection process remains straightforward.
How to connect laptop to projector with USB:
Step 1. Check whether your projector supports USB or USB-C video input.
Step 2. Connect the USB or USB-C cable from your laptop to the matching port on the projector.
Step 3. Turn on the projector and select the USB input from the source menu.
Step 4. Your laptop may show a prompt asking for projection mode. Choose Duplicate or Extend.
Step 5. Wait for the projector to process the video signal.
Method 3: Connect Laptop to Projector with VGA
Although VGA is an older analog standard, it remains common in older conference rooms, schools, and businesses. If you need to learn how to connect projector to computer in environments that still rely on legacy equipment, VGA may be the only available port. VGA transmits video only, so a separate audio cable is required if your presentation or movie includes sound.
Many laptops no longer include VGA ports, but simple USB-C to VGA or HDMI to VGA adapters allow you to bridge the gap. Despite its limitations, VGA can be surprisingly reliable when you simply need a basic picture on screen.
How to connect PC to projector? Follow the guide:
Step 1. Connect the VGA cable to your laptop's VGA port.
Step 2. Attach the other end to the projector's VGA input.
Step 3. Tighten the screws so the connection stays stable.
Step 4. Switch the projector source to VGA.
Step 5. Open your display settings on your laptop and choose how the projector should display your screen.
Method 4: Connect Laptop to Projector via WiFi (Free PigeonCast App)
Wireless projection has become increasingly popular, especially for users searching for how to connect laptop to projector wirelessly or how to connect laptop to projector via WiFi. Many smart projectors now support wireless protocols such as AirPlay or Google Cast. With a free screen mirroring app like PigeonCast installed on your laptop, you can mirror your screen to almost any projector that supports these standards.

This wireless connection is convenient, but keep in mind that wireless performance depends heavily on WiFi strength, and a 5 GHz network usually offers the best stability.
To connect your laptop to a projector, you just need to:
Step 1. Make sure your laptop and projector are on the same WiFi network.
Step 2. Open PigeonCast on your Windows PC or MacBook and click Send my screen.


Overall Rating:



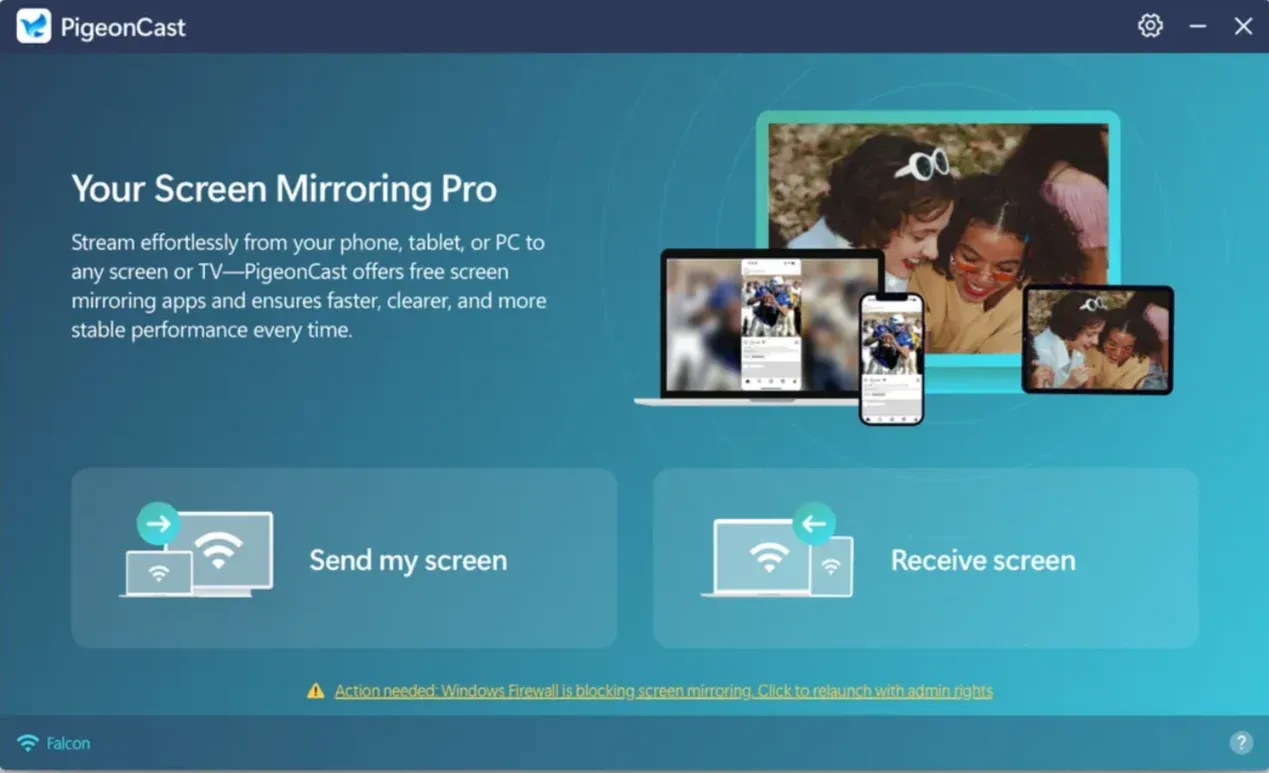
Step 3. Choose your projector from the device list.
Step 4. Click Start mirror and wait for the projector to display your screen.
Method 5: Connect Laptop to Projector via Bluetooth
Bluetooth is designed for audio, not video transmission, meaning the delay is too high for screen mirroring or presentations. Instead, Bluetooth works best when you want to pair external speakers or send audio from your laptop to the projector while relying on HDMI, WiFi, or USB for the actual video. It can still be part of your setup, but not the main display method.
See how to connect laptop to projector via Bluetooth:
Step 1. Turn on Bluetooth on your laptop.
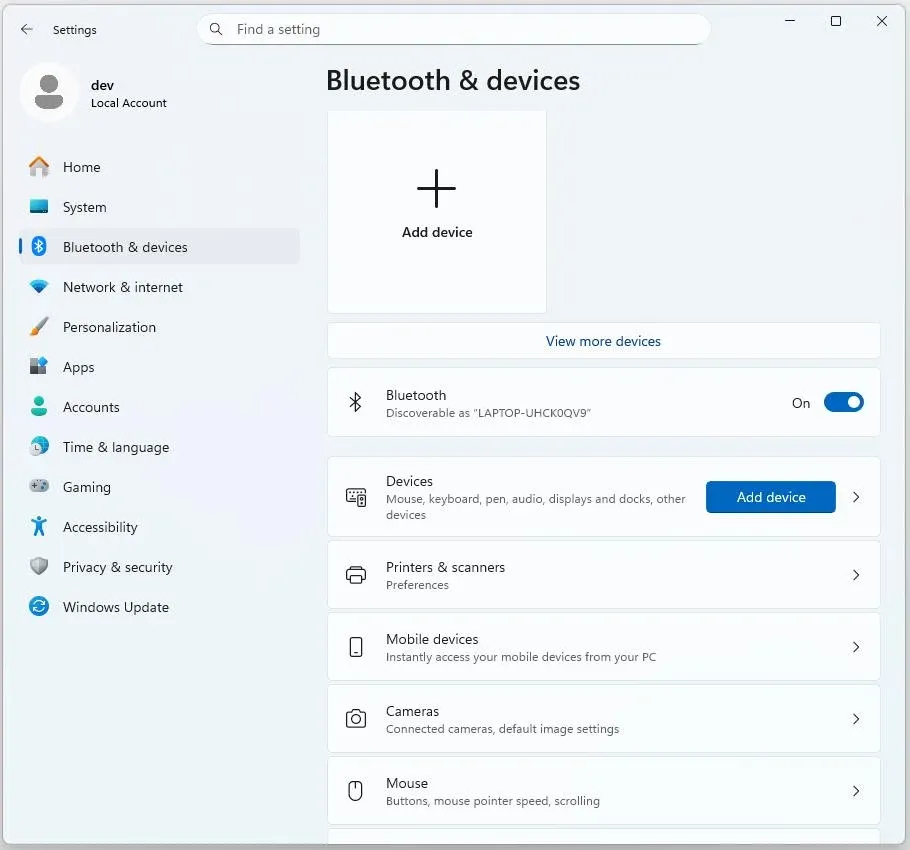
Step 2. Enable Bluetooth mode on your projector.
Step 3. Pair the laptop with the projector from the Bluetooth device list.
Step 4. When connected, you're ready to project your laptop screen.
How to Adjust Your Projector Display from Your Laptop
Once you've successfully connected your laptop to the projector, it's time to ensure the display looks just right for your needs. Customizing your projector's display from your laptop can greatly improve the clarity and quality of your presentation, movie, or gameplay experience.
Understanding how to use projector with laptop effectively is crucial, as adjusting key display settings will enhance the overall experience. Here are some essential display adjustments you can make after connecting your laptop to projector, whether using HDMI, USB, or wireless methods.
Tip 1: Adjust the Display Resolution
If your laptop's resolution doesn't match the projector's native display, the image could look blurry or pixelated. To ensure that your projector displays the sharpest image possible, adjusting the resolution is often the first step. Here's how to make sure your projector and laptop are perfectly synced:
- On a Windows laptop:
Step 1. Right-click on the desktop and choose Display Settings.
Step 2. Scroll down to the Display Resolution section and choose the resolution that matches your projector's native resolution (typically 1920x1080 for most modern projectors).
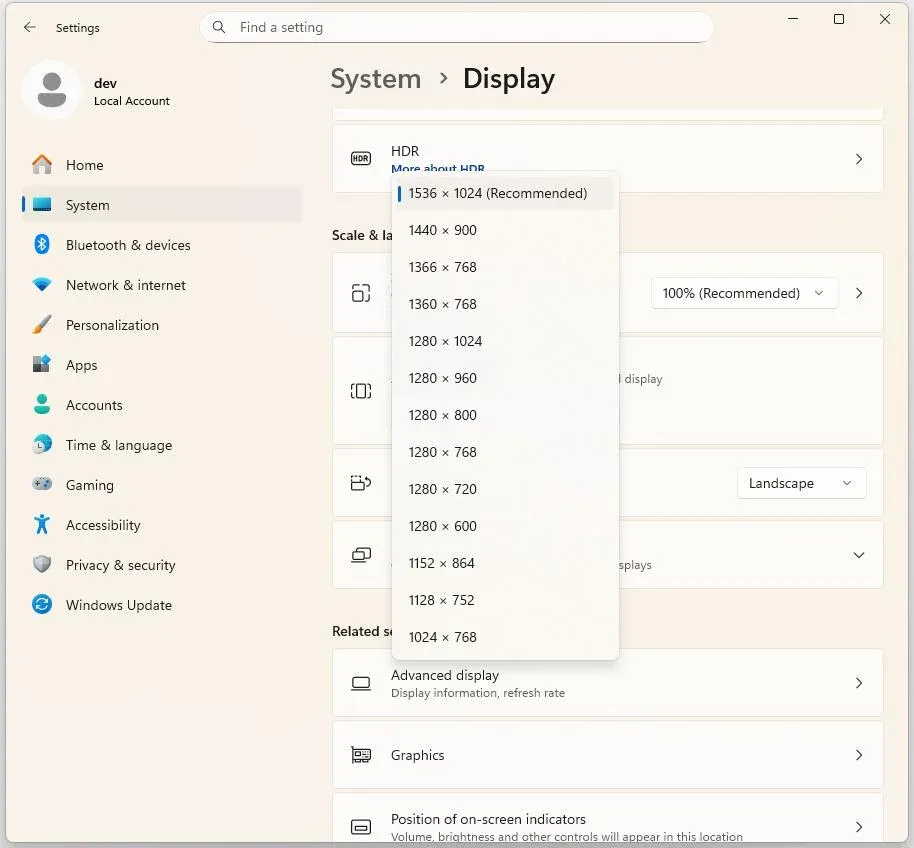
Step 3. Click Apply and check if the image quality improves. If the projector is 4K capable, ensure your laptop supports 4K and set the resolution accordingly.
- On a MacBook:
Step 1. Open Settings and choose Displays.
Step 2. Under the Display tab, choose the resolution that best fits the projector's capabilities (again, 1080p or 4K).
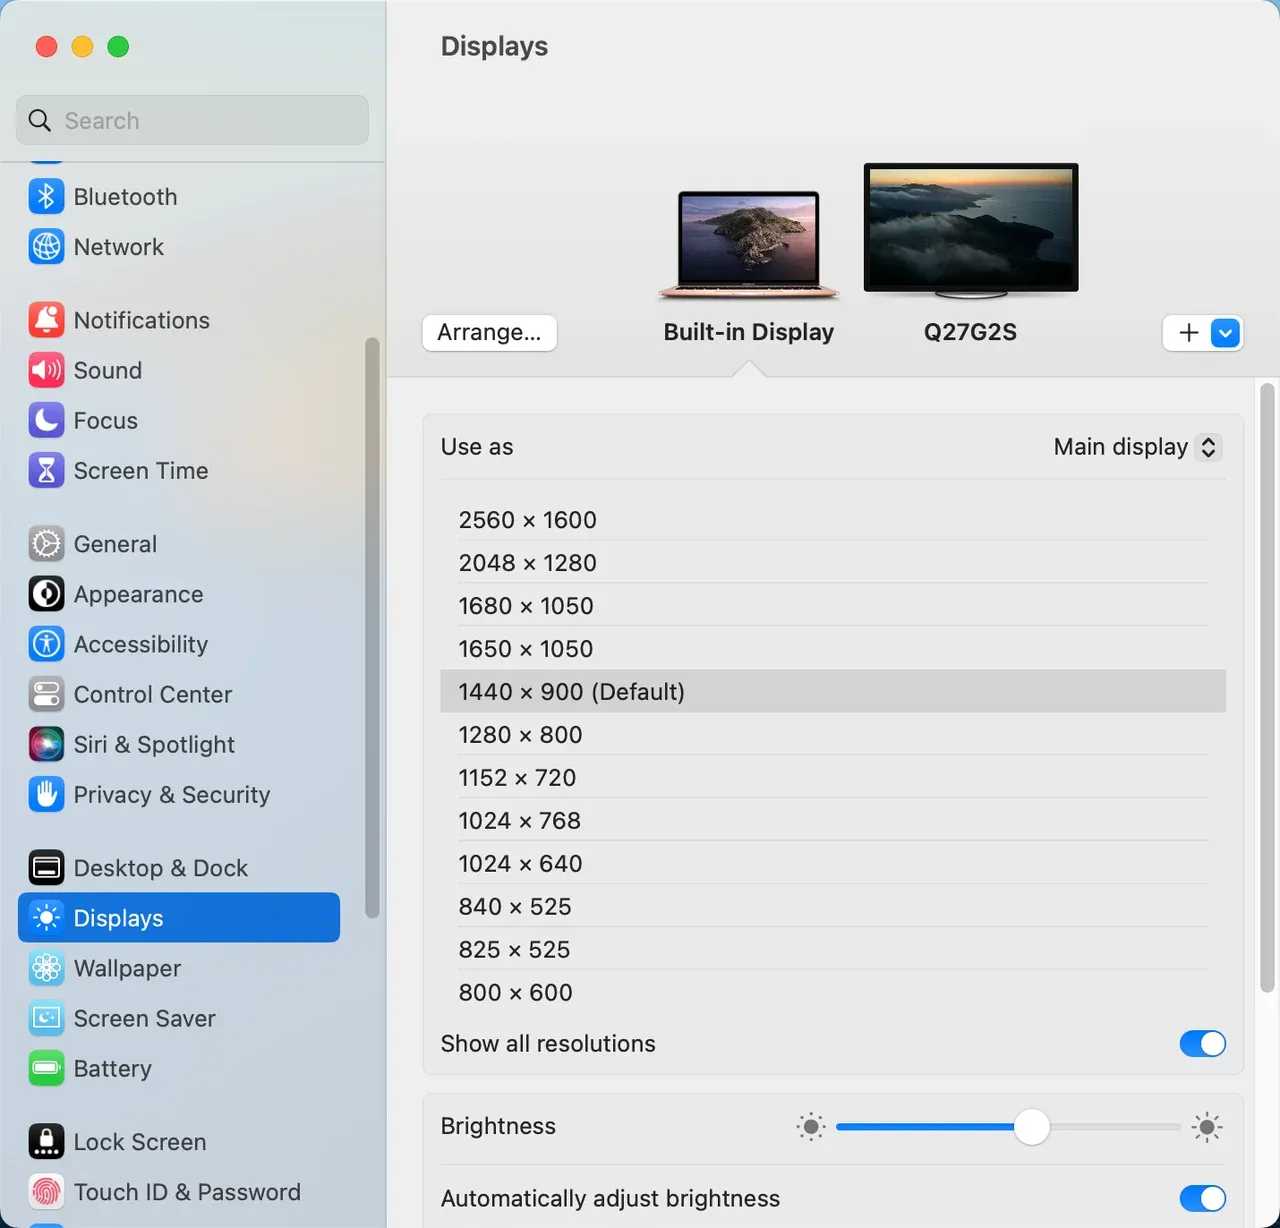 Step 3. You may also need to use the Scaled option if the default resolution doesn't appear clearly on the projector.
Tip 2: Set the Screen Display Mode
Once connected, you can select the screen mode that best suits your needs. This is particularly helpful if you are giving a presentation or using the projector for other tasks. Depending on the software you're using and your laptop's settings, here are a few options for adjusting how you use your projector with laptop:
- Duplicate: This mode mirrors your laptop's screen onto the projector. It's ideal for presentations, meetings, or when you want to share exactly what's on your laptop with others.
- Extend: This option expands the display on your Mac or Windows PC onto the projector, essentially giving you an extended desktop. This is great for multitasking, such as when you want to display slides on the projector while keeping your notes on your laptop.
- Second Screen Only: This turns off your laptop's screen entirely and uses only the projector. It's perfect when you want to focus all attention on the projector without being distracted by your laptop screen.
- For Windows:
Right-click the desktop, select Display Settings, and under Multiple Displays, choose the display mode you want.
- For Mac:
Go to System Preferences > Displays, and in the Arrangement tab, drag the display icons to match the physical layout and choose your preferred display mode.
Tip 3: Adjust the Aspect Ratio and Screen Size
Sometimes, the image might not properly fill the screen, or it may appear stretched. Adjusting the aspect ratio or screen size can help correct this. Here's how you can customize your display:
- Aspect Ratio: Most projectors default to a 16:9 aspect ratio, which works well for widescreen content. If your projector supports a 4:3 aspect ratio, you may need to adjust the projector settings to avoid stretching the image, especially when using older projectors or if you're viewing non-widescreen content. Most projectors will allow you to adjust this directly in the settings menu.
- Screen Size: To ensure the image fits well on the screen, adjust the distance between the projector and the screen. Many projectors also include a zoom feature that can further refine the size of the image. Check if your projector has this option, as well as any keystone correction settings to fix distortion.
Tip 4: Calibrate the Color and Brightness Settings
A projector's image may appear washed out or too dark, especially in well-lit environments. Adjusting the brightness, contrast, and color settings will improve the visual quality, ensuring your images are vibrant and easy to see.
- Brightness: If your projector is too dim, you can increase the brightness in the projector's settings or through your laptop. Be mindful that increasing brightness can sometimes affect the contrast, so it's important to find a balance.
- Contrast: Enhancing the contrast helps make text and images more distinguishable, which is particularly helpful for presentations. Try adjusting this on both the projector and laptop to get optimal clarity.
- Color Calibration: Most laptops and projectors allow you to adjust the color temperature. You can use the built-in color calibration tools available in Windows or Mac settings for a more accurate color representation. For a professional presentation, you may also want to use a color calibration tool to fine-tune the image.
Tip 5: Adjust Audio Settings
When using HDMI or USB to connect your laptop to the projector, audio typically plays through the projector's speakers. However, you may want to adjust the audio output if you are using external speakers or if the projector's built-in speakers are inadequate.
- On Windows:
- Right-click on the sound icon in the taskbar and select Playback Devices.
- Choose the output device you want to use (such as external speakers or Bluetooth audio devices).
- Test the audio output to make sure it's routed correctly.
On Mac:
- Go to System Preferences > Sound.
- Under the Output tab, select the appropriate speaker device.
5 Best Projectors for Laptops in 2025
The ideal projector should offer excellent clarity, brightness, and ease of connectivity, especially when pairing with laptops. Below are five of the best projectors for laptops in 2025, highly regarded for their performance, reliability, and wireless functionality across North America and Europe.
Option 1: Epson Home Cinema 2350
The Espon Home Cinema 2360 is a bright and sharp projector that excels in a variety of settings, from living rooms to home theaters. With a high brightness rating of 2,800 lumens, it performs well in rooms with ambient light, making it ideal for daytime use. It also boasts impressive color accuracy and clarity, making it great for watching movies or presentations on a larger screen.
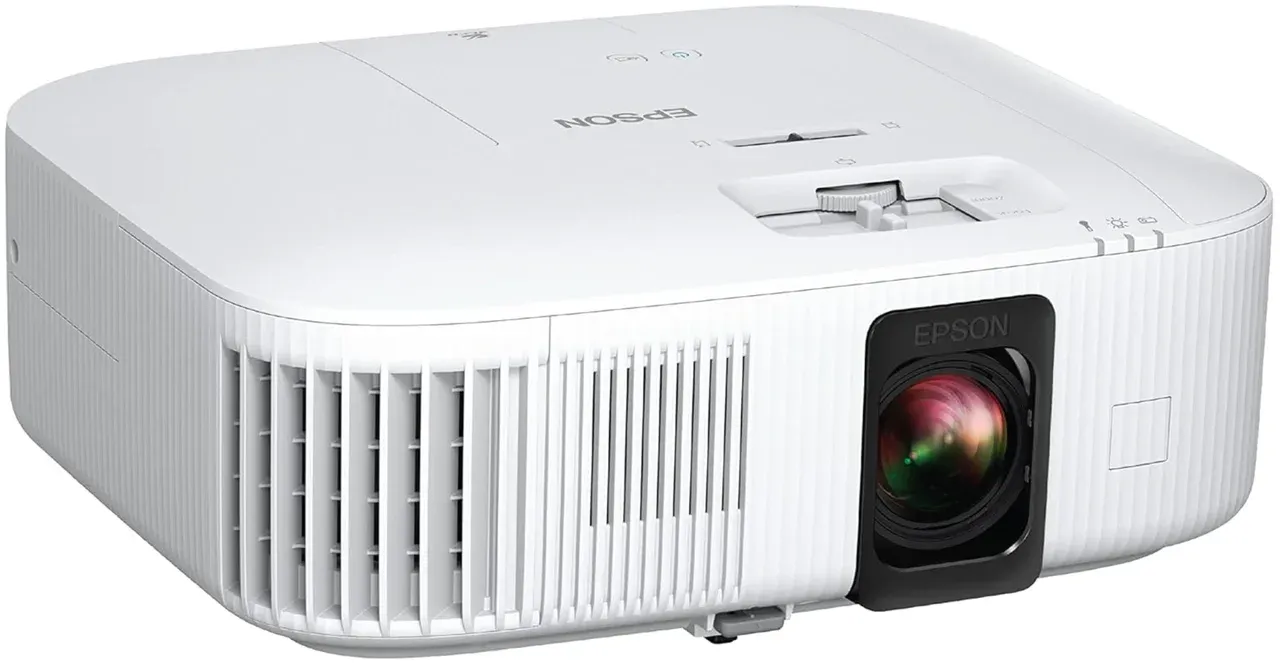
Key features of this projector:
- High Brightness: 2,800 lumens ensure visibility even in well-lit rooms.
- Support for High Refresh Rates: ideal for gaming and fast-moving video.
- Built-in Android TV & Google Cast: directly stream content and cast from your laptop or mobile device without additional hardware.
Why this projector is ideal for laptops:
The Epson Home Cinema 2350's versatility allows for easy connectivity with laptops using HDMI or wireless options, making it perfect for both professional and home entertainment use. The built-in Android TV feature ensures you can seamlessly stream content from your laptop, especially useful for presentations or casual media viewing.
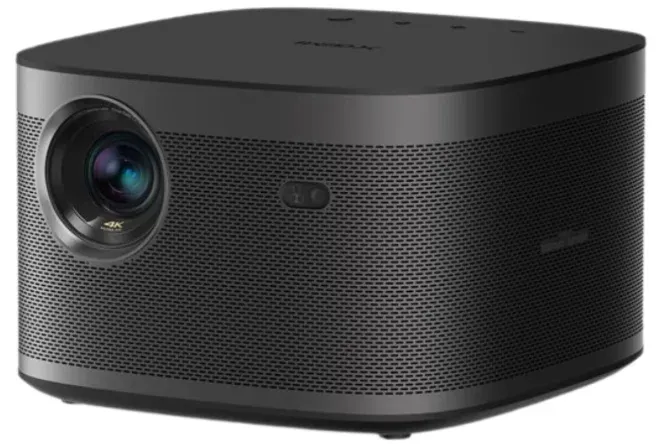
Option 2: XGIMI Horizon Pro
The XGIMI Horizon Pro is a premium smart projector that offers stunning 4K resolution and a high level of brightness. It's ideal for users who need excellent visual performance for presentations, movies, or casual gaming. With its autofocus and sharp image quality, it can automatically adjust the focus based on the content you're displaying, ensuring that every image looks perfect.
Key features of this projector:
- 4K Resolution: crisp and clear images with 8.3 million pixels for ultra-high-definition viewing.
- Autofocus Technology: automatically adjusts the focus for optimal sharpness.
- Built-in Google Cast: wireless connectivity for easy screen mirroring from your laptop or mobile device.
Why this projector is ideal for laptops:
The XGIMI Horizon Pro is equipped with Chromecast, making it perfect for wirelessly connecting your laptop to the projector. Whether you're presenting in a meeting or streaming content for leisure, its high brightness and 4K support ensure stunning visuals and smooth performance.
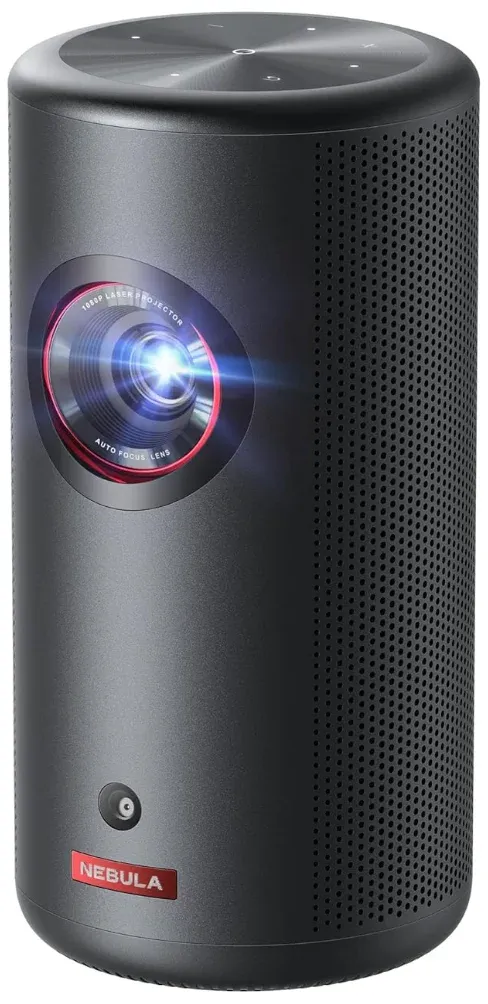
Option 3: Nebula Capsule 3 Laser
The Nebula Capsule 3 Laser is a compact yet powerful projector with a laser engine that delivers sharp results in dark rooms. Its portability makes it ideal for travelers or anyone in need of a portable projector for laptop presentations. Despite its small size, it offers excellent image quality, making it a standout in the mini-projector category.
Key features of this projector:
- Laser Technology: Produces crisp, high-contrast images even in low-light settings.
- Portable Design: Small and lightweight, perfect for easy transport.
- Wi-Fi Connectivity: Wirelessly connect to your laptop for seamless screen mirroring without the need for cables.
Why this projector is ideal for laptops:
The Nebula Capsule 3 Laser is ideal for those who need a portable and reliable projector that pairs effortlessly with laptops via Wi-Fi. Its small size doesn't compromise its power, offering a full-featured projection experience, especially for business travelers or students on the go.
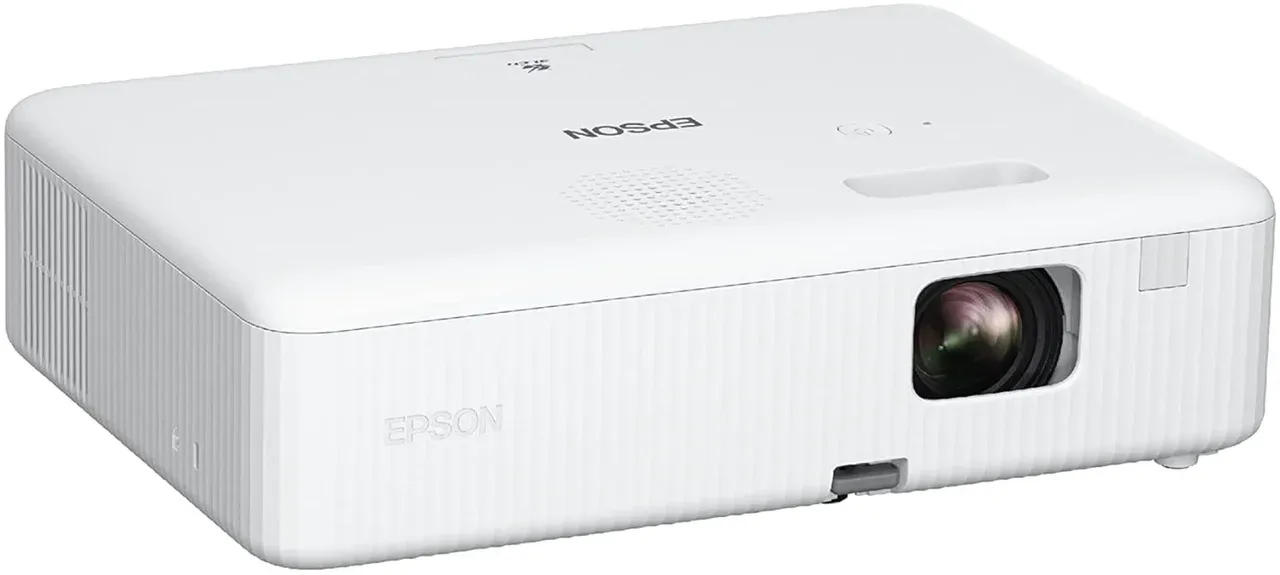
Option 4: Epson EpiqVision Flex CO W01
The Epson EpiqVision Flex CO W01 is a highly reliable and versatile projector, designed for quick setup and consistent performance. Its compact design and ability to project up to 150 inches of display make it a great choice for classrooms, home offices, or small conference rooms. It's especially useful for those who need to frequently connect a laptop or mobile device in a professional setting.
Key features of this projector:
- Fast Setup: Easy to set up and ready to use in minutes, saving valuable time in busy environments.
- Excellent Brightness: Ideal for rooms with light, projecting bright and vivid images.
- Wireless & HDMI Options: Offers both wired and wireless connections for flexible laptop compatibility.
Why this projector is ideal for laptops:
This projector's combination of easy HDMI connection and Wi-Fi capabilities ensures smooth and convenient laptop connectivity. Whether you're in a classroom or an office, it offers a seamless and hassle-free projection experience.
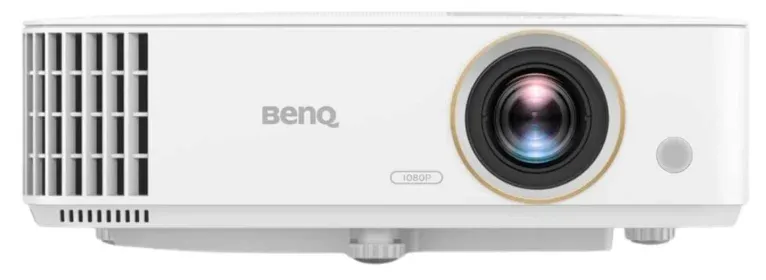
Option 5: BenQ TH585P
The BenQ TH585P is an affordable projector that punches well above its weight, offering impressive performance at a budget-friendly price. It's known for its low input delay, making it ideal for watching movies or playing casual games without noticeable lag. The TH585P's 1080p resolution ensures a crisp and vibrant image, making it a top choice for those looking for a solid projector without breaking the bank.
Key features of this projector:
- Low Input Delay: Perfect for gaming and video watching, minimizing lag.
- 1080p Full HD: Crisp and clear visuals with a sharp resolution.
- Multiple Connectivity Options: HDMI and wireless support for easy laptop connection.
Why this projector is ideal for laptops:
The BenQ TH585P's low input delay is a significant benefit when using it for presentations or gaming. Its reliable HDMI connection ensures that you can easily connect your laptop, while its wireless casting support gives you the option to mirror content from your laptop wirelessly. This combination of affordability and functionality makes it a great choice for users seeking high-quality performance on a budget.
No matter which you pick up, remember that the quality of your projector display is not only dependent on the hardware, but also on how well you customize the settings to meet your needs. Fine-tuning these elements will ensure that your content appears as clear, vibrant, and immersive as possible.
Conclusion
Learning how to connect your laptop to a projector unlocks endless possibilities for presentations, movies, and gaming. Whether you prefer a wired connection like HDMI or USB, or the flexibility of wireless options like Wi-Fi or Bluetooth, this guide provides the essential steps to ensure a seamless connection. HDMI remains the most reliable for most users, but wireless solutions like PigeonCast offer enhanced convenience, especially with modern smart projectors.
Customizing your projector's display settings, such as adjusting resolution, brightness, and color, can further enhance the experience. Pairing the right projector with your laptop is key to ensuring optimal performance, whether in a professional setting or for personal entertainment. Our recommended projectors, like the Epson Home Cinema 2350, XGIMI Horizon Pro, and BenQ TH585P, deliver excellent connectivity and quality for both budget and premium needs.
Understanding how to connect and adjust your laptop's display to a projector guarantees an exceptional viewing experience, whether for work or leisure.
How to Connect Laptop to Projector FAQs
How to connect Epson projector to laptop?
To connect your Epson projector to your laptop, follow these steps:
- Wired (HDMI): Simply plug one end of an HDMI cable into your laptop's HDMI port and the other into the Epson projector's HDMI input. Switch the projector's input to HDMI and adjust display settings on your laptop.
- Wireless (Wi-Fi): If your Epson projector supports wireless connections, ensure both your laptop and the projector are connected to the same Wi-Fi network. Then, use tools like PigeonCast to mirror your laptop's screen onto the projector wirelessly.
- USB or USB-C: Some Epson projectors support USB connections for video input. If your projector supports this feature, just connect your laptop via USB or USB-C, select the appropriate input on the projector, and follow the display settings.
Why is my projector not displaying my laptop?
- Connection Issues: Make sure all cables are securely connected, and the projector's input is set correctly (HDMI, VGA, USB, etc.).
- Display Settings: Ensure your laptop is set to the correct display mode. For Windows, right-click on the desktop, select Display Settings, and choose the correct mode (Duplicate, Extend, or Second Screen Only). For Mac, go to System Preferences > Displays and adjust the settings.
- Projector Input: Verify that your projector is set to the correct input source. If you're using HDMI, the input should be set to HDMI. If you're using Wi-Fi, ensure both devices are on the same network.
What to do if my projector is not detecting HDMI?
- Check the HDMI Cable: Ensure the cable is properly connected and isn't damaged.
- Test with a Different Cable: If possible, test with a different HDMI cable to rule out any issues with the cable.
- Verify the Input Source: Make sure your projector is set to the HDMI input.
- Update Graphics Drivers: Outdated graphics drivers on your laptop may prevent the signal from transmitting correctly. Update your laptop's drivers and restart both the laptop and projector.
What is the most common way to connect to a projector?
The most common method to connect to a projector is using HDMI. HDMI supports both audio and video signals, making it the most reliable and straightforward option. It's widely used for presentations, movies, gaming, and business meetings. Additionally, HDMI provides a stable connection with minimal risk of lag, ensuring smooth playback for various content types. While HDMI remains the preferred option for many users, wireless options like Google Cast are gaining popularity due to their convenience.
Mia Clarke is a technology editor specializing in screen mirroring and casting solutions across multiple platforms. Mia provides clear, practical guides and in-depth insights to help users seamlessly connect their devices. Passionate about enhancing digital experiences, Mia is dedicated to keeping readers updated on the latest trends and tools in cross-platform screen sharing. Whether you’re looking to mirror your smartphone, laptop, or smart TV, Mia’s content delivers reliable, user-friendly advice to simplify your tech setup.