
AirPlay Mac to Mac works, but not on every Mac in every setup. If you want to mirror Mac screen to another Mac, the target Mac must support AirPlay Receiver, both Macs should have Wi-Fi turned on, and the receiver must be visible to the sender on the same local network.
Most failed attempts come from setup limits, not from a hidden advanced bug. The receiving Mac may be too old, AirPlay Receiver may be turned off, or local discovery may be blocked by guest Wi-Fi, VPN rules, or device isolation. If you check those conditions first, you can usually tell in a minute whether AirPlay from Mac to Mac is the right tool for the job.
What AirPlay Mac to Mac Means
AirPlay Mac to Mac is a wireless display or media workflow between two Macs:
- One Mac sends the stream.
- The other Mac receives it through AirPlay Receiver.
In practical terms, you can use it to:
- mirror your desktop for a meeting or demo
- stream supported video or audio from one Mac to another Mac
- create a temporary second-screen style setup when AirPlay and your app support it
This is a Mac to Mac screen sharing method for display handoff, not full remote control. If you need to operate the other Mac directly, Screen Sharing or a remote desktop workflow is usually the better choice.
AirPlay Mac to Mac Compatibility Check
Before you troubleshoot anything, rule out the structural blockers that stop AirPlay from working at all.
Apple's current support guidance says AirPlay to Mac requires macOS Monterey 12 or later on the receiving Mac, and the main fully supported receiver models are:
- MacBook introduced in 2018 or later
- MacBook Pro introduced in 2018 or later
- MacBook Air introduced in 2018 or later
- Mac mini introduced in 2020 or later
- iMac introduced in 2019 or later
- iMac Pro
- Mac Pro introduced in 2019 or later
- Mac Studio introduced in 2022 or later
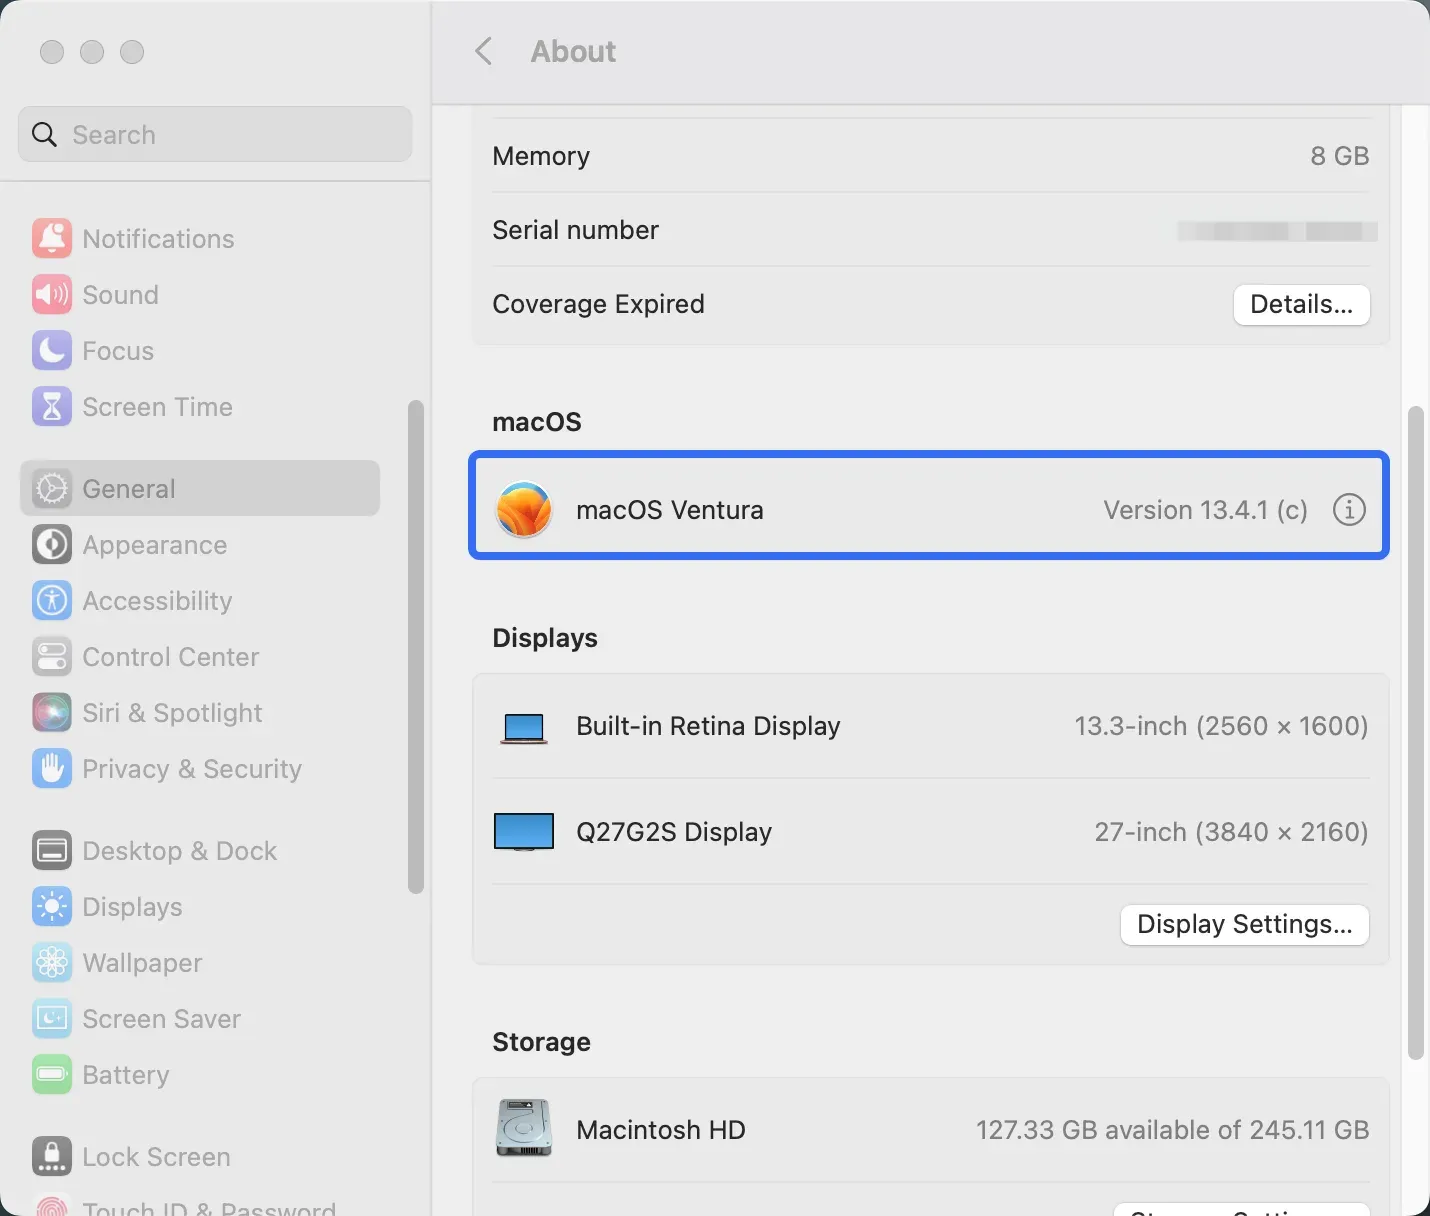
If one of the devices is an iMac, its model year and macOS version determine whether it can act as an AirPlay receiver. The available settings and supported connection modes are covered in more detail in AirPlay on iMac.
Apple also notes that some older iPhone, iPad, and Mac models can still AirPlay to Mac at lower video resolutions when AirPlay Receiver is turned on and the access setting allows Everyone or Anyone on the Same Network.
Use this quick check:
- the receiver Mac supports AirPlay to Mac
- the receiver Mac is running macOS Monterey 12 or later
- both Macs have Wi-Fi turned on
- both Macs are on the same local network for the easiest discovery path
- the receiver Mac is allowed to accept AirPlay from the sender
If any of those checks fail, the Mac may never appear in the AirPlay list.
If you want a broader Apple-focused prerequisite guide, start with where to locate AirPlay on Mac.
How to Turn On AirPlay Receiver on the Target Mac
If the receiving Mac is compatible, set it up before touching the sender Mac.
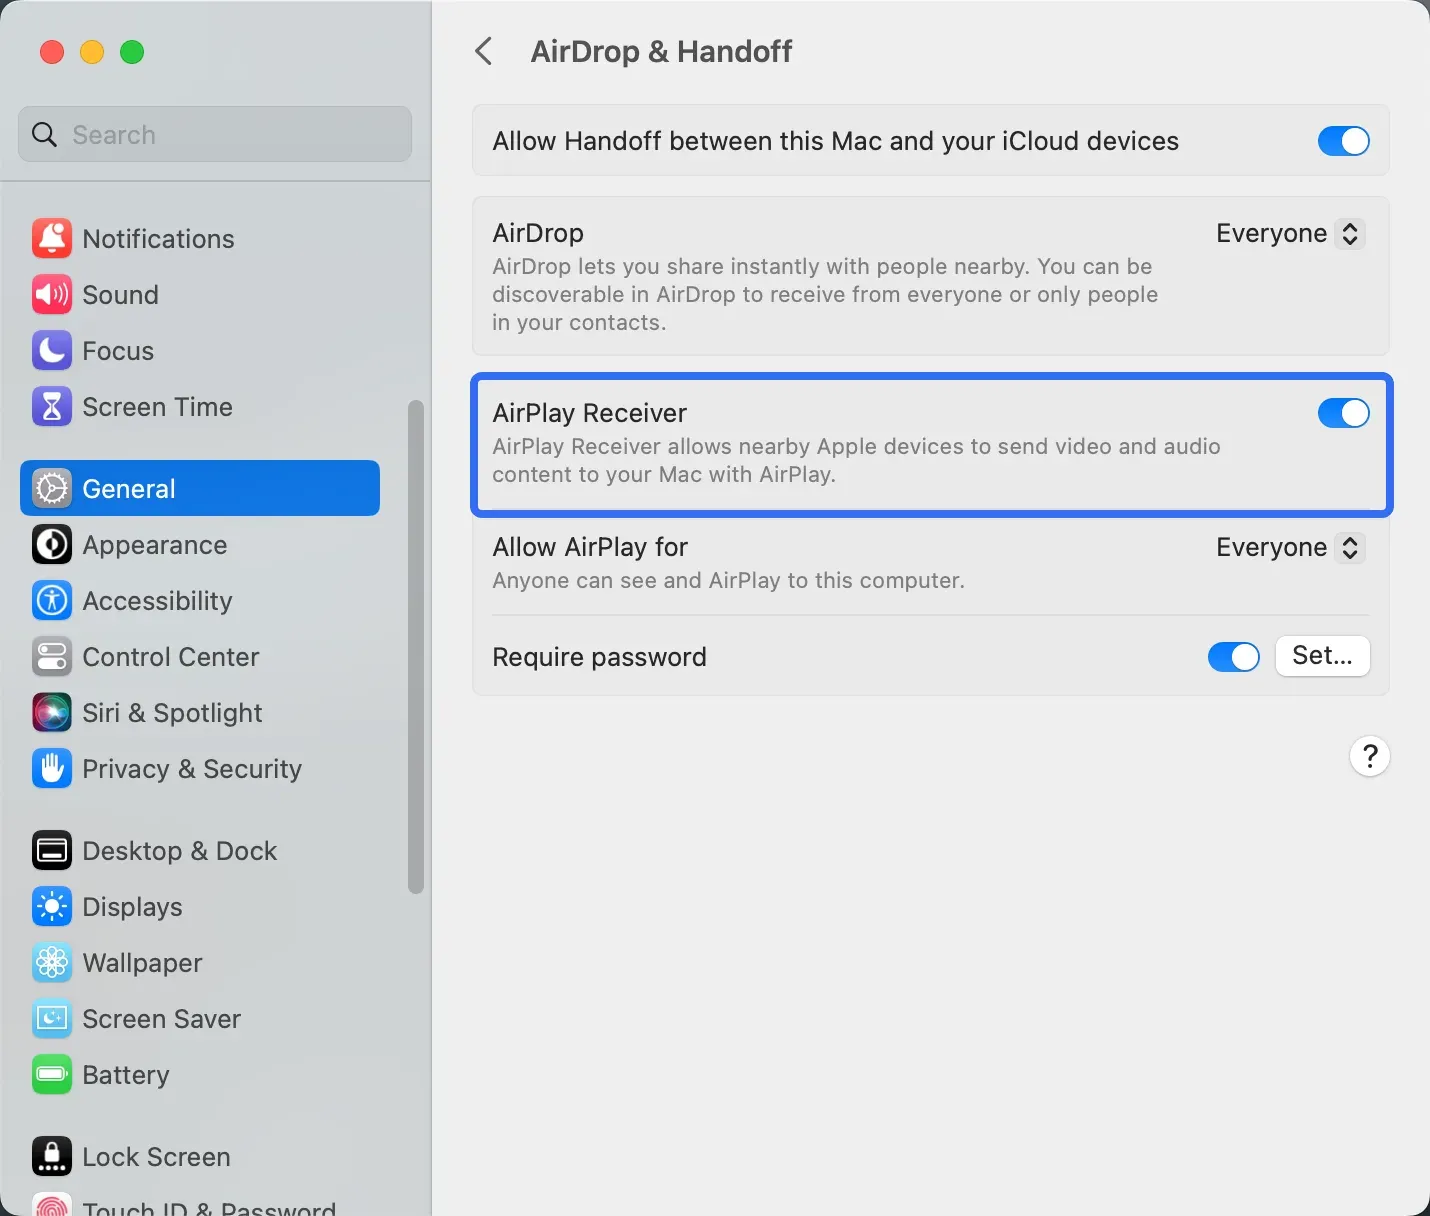
On macOS Ventura or later:
Step 1. Open System Settings.
Step 2. Select General.
Step 3. Open AirDrop & Handoff.
Step 4. Turn on AirPlay Receiver.
On macOS Monterey:
Step 1. Open System Preferences.
Step 2. Select Sharing.
Step 3. Turn on AirPlay Receiver.
Then choose the access rule that matches your situation:
- Current User if both Macs use the same Apple Account
- Anyone on the Same Network if another nearby Mac needs to discover it
- Everyone only if you really need broader visibility
If the target Mac is missing from the sender's list, this is the first setting to inspect. In many cases, the sender Mac is working normally and the problem is that the AirPlay Receiver setting on the Mac is either off or too restrictive.
Network Checks Before You Try to Connect
Apple's setup guidance says both devices should have Wi-Fi turned on and be connected to the same network. Even when both Macs can already browse the web, local discovery may still fail if the network blocks device-to-device traffic.
Check these basics before you try again:
- avoid guest Wi-Fi
- turn off VPN temporarily during setup
- avoid AP isolation or strict enterprise segmentation
- keep both Macs awake and unlocked for the first test
If you are still figuring out whether your Mac even supports the broader AirPlay workflow, you can also read does your Mac have AirPlay. For this workflow, though, local visibility matters more than raw internet speed.
How to AirPlay From Mac to Mac
Once the receiver Mac is confirmed and visible, the actual connection flow is short.
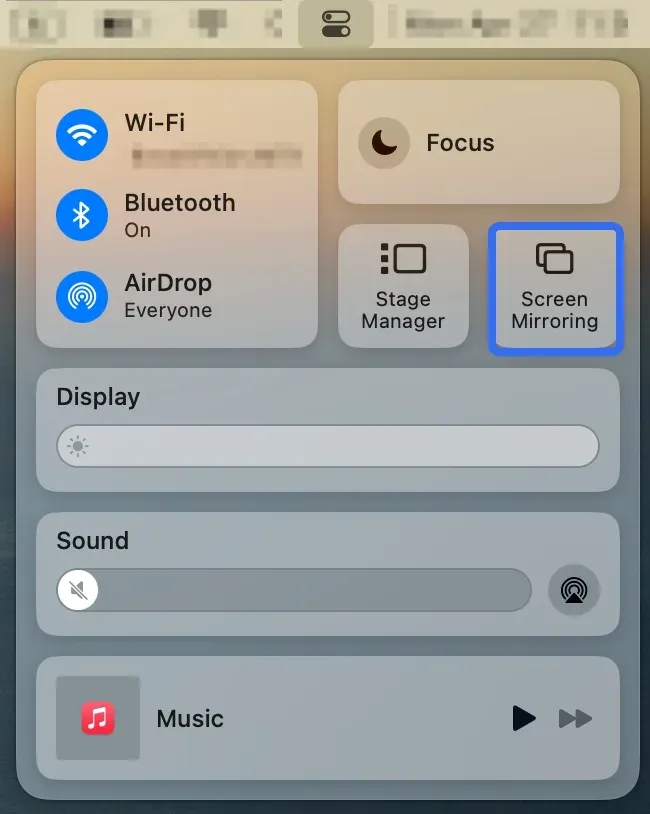
Step 1. Open Screen Mirroring on the sender Mac.
On the Mac that will send the stream, open Control Center, then open Screen Mirroring. Depending on the app and content type, you may also see an AirPlay button inside media playback controls.
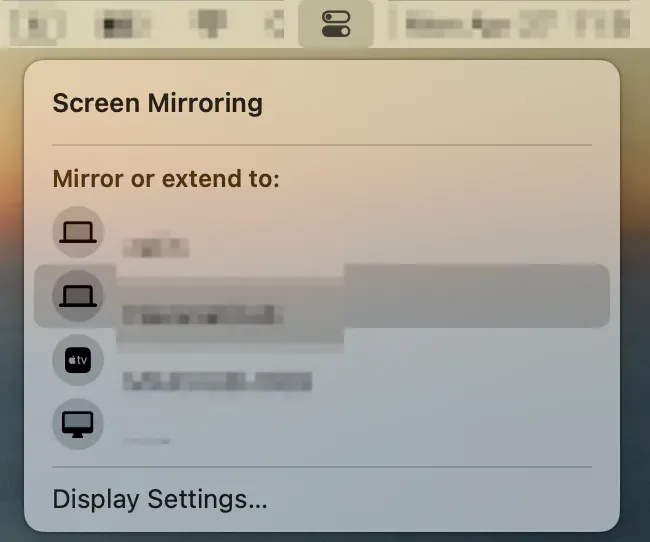
Step 2: Choose the receiver Mac.
Select the target Mac from the list of available AirPlay devices. If prompted, enter the code shown on the receiving Mac or approve the connection there.
Step 3: Choose the output style.
The exact options depend on your devices and app, but common outcomes are:
- mirror your current display
- stream audio
- stream supported video content
- use an extended-style layout where supported by the workflow
If your only goal is a fast meeting display, mirroring is usually the simplest choice.
Step 4. Confirm audio, resolution, and readability.
Before a real meeting or demo, do a short test. Make sure text is readable on the receiving Mac, verify where audio is playing, and play a short clip to check smoothness. If the connection feels delayed, close heavy background tasks before assuming the setup itself is broken.
Common AirPlay Mac to Mac Problems and Fixes
Most AirPlay Mac to Mac failures come from one of four sources: unsupported hardware, receiver settings, local discovery, or unstable Wi-Fi conditions.
For a separate troubleshooting article, see screen mirroring not working on Mac.
The Target Mac Does Not Show Up
Work through this order:
- Confirm the receiver Mac actually supports AirPlay to Mac.
- Confirm AirPlay Receiver is turned on.
- Change access from Current User to Anyone on the Same Network for testing.
- Make sure both Macs have Wi-Fi turned on and are on the same network.
- Disable VPN temporarily.
- Restart Wi-Fi or restart both Macs if discovery still looks stale.
The Connection Starts but Drops
That usually points to network quality, not a missing feature.
Try these fixes:
- move both Macs closer to the router
- pause large sync or download jobs
- reduce wireless congestion if possible
- retry after closing high-load apps
Audio or Video Feels Delayed
AirPlay is convenient, but it is still a wireless workflow. For live editing, gaming, or color-sensitive production work, the latency may be more noticeable than you want.
When delay matters, test closer to the router, reduce background load, and lower expectations for crowded Wi-Fi. If stable low latency is essential, a wired external display is still the better choice.
If your real goal is a bigger external display instead of one Mac receiving another, see mirror your MacBook to TV.
Permission Prompts Keep Reappearing
Repeated pairing prompts usually mean the receiver permissions do not match the relationship between the two Macs.
Check whether:
- both Macs use the same Apple Account
- the receiver is set to Current User when it should be Anyone on the Same Network
- a remembered connection should be removed and paired again
Is AirPlay Mac to Mac Worth Using?
Yes, when your setup matches Apple's AirPlay to Mac requirements and your goal is simple wireless sharing. It is one of the cleanest ways to move content from one Mac to another without extra hardware.
It is not the right choice for every workflow. If the receiver Mac is too old, if the network blocks local discovery, or if you need near-zero latency, you will save time by choosing a different method immediately.
Before a live session, run this 60-second check:
- confirm the receiver Mac supports AirPlay to Mac
- confirm AirPlay Receiver is on
- make sure both Macs are on the same network with Wi-Fi enabled
- open Screen Mirroring and verify the target Mac appears
- play a short test clip before the real session starts
If that quick test works cleanly, AirPlay is probably the right tool for the session. If it does not, switch methods early instead of troubleshooting live.
If you are optimizing repeat presentations, you can also borrow a broader workflow checklist from how to screen mirror on Mac.
How to Mirror Mac to Mac Without AirPlay
If AirPlay is not available on your setup, another practical method is to use a dedicated screen mirroring tool like PigeonCast that supports Mac-to-Mac sending and receiving directly.


Overall Rating:


This route makes more sense when:
- the receiving Mac does not support AirPlay to Mac
- your workflow needs a simpler cross-device pairing process
- you want a solution that is less dependent on Apple's built-in receiver requirements
One natural option is PigeonCast for Mac screen mirroring. In that workflow, you install the app on both Macs, keep both devices on the same network, choose the target Mac from the device list, and start mirroring without depending on the native AirPlay Receiver path.
Step 1. Install PigeonCast on both Macs.
Download and install PigeonCast on the sending Mac and the receiving Mac, then open the app on both devices.
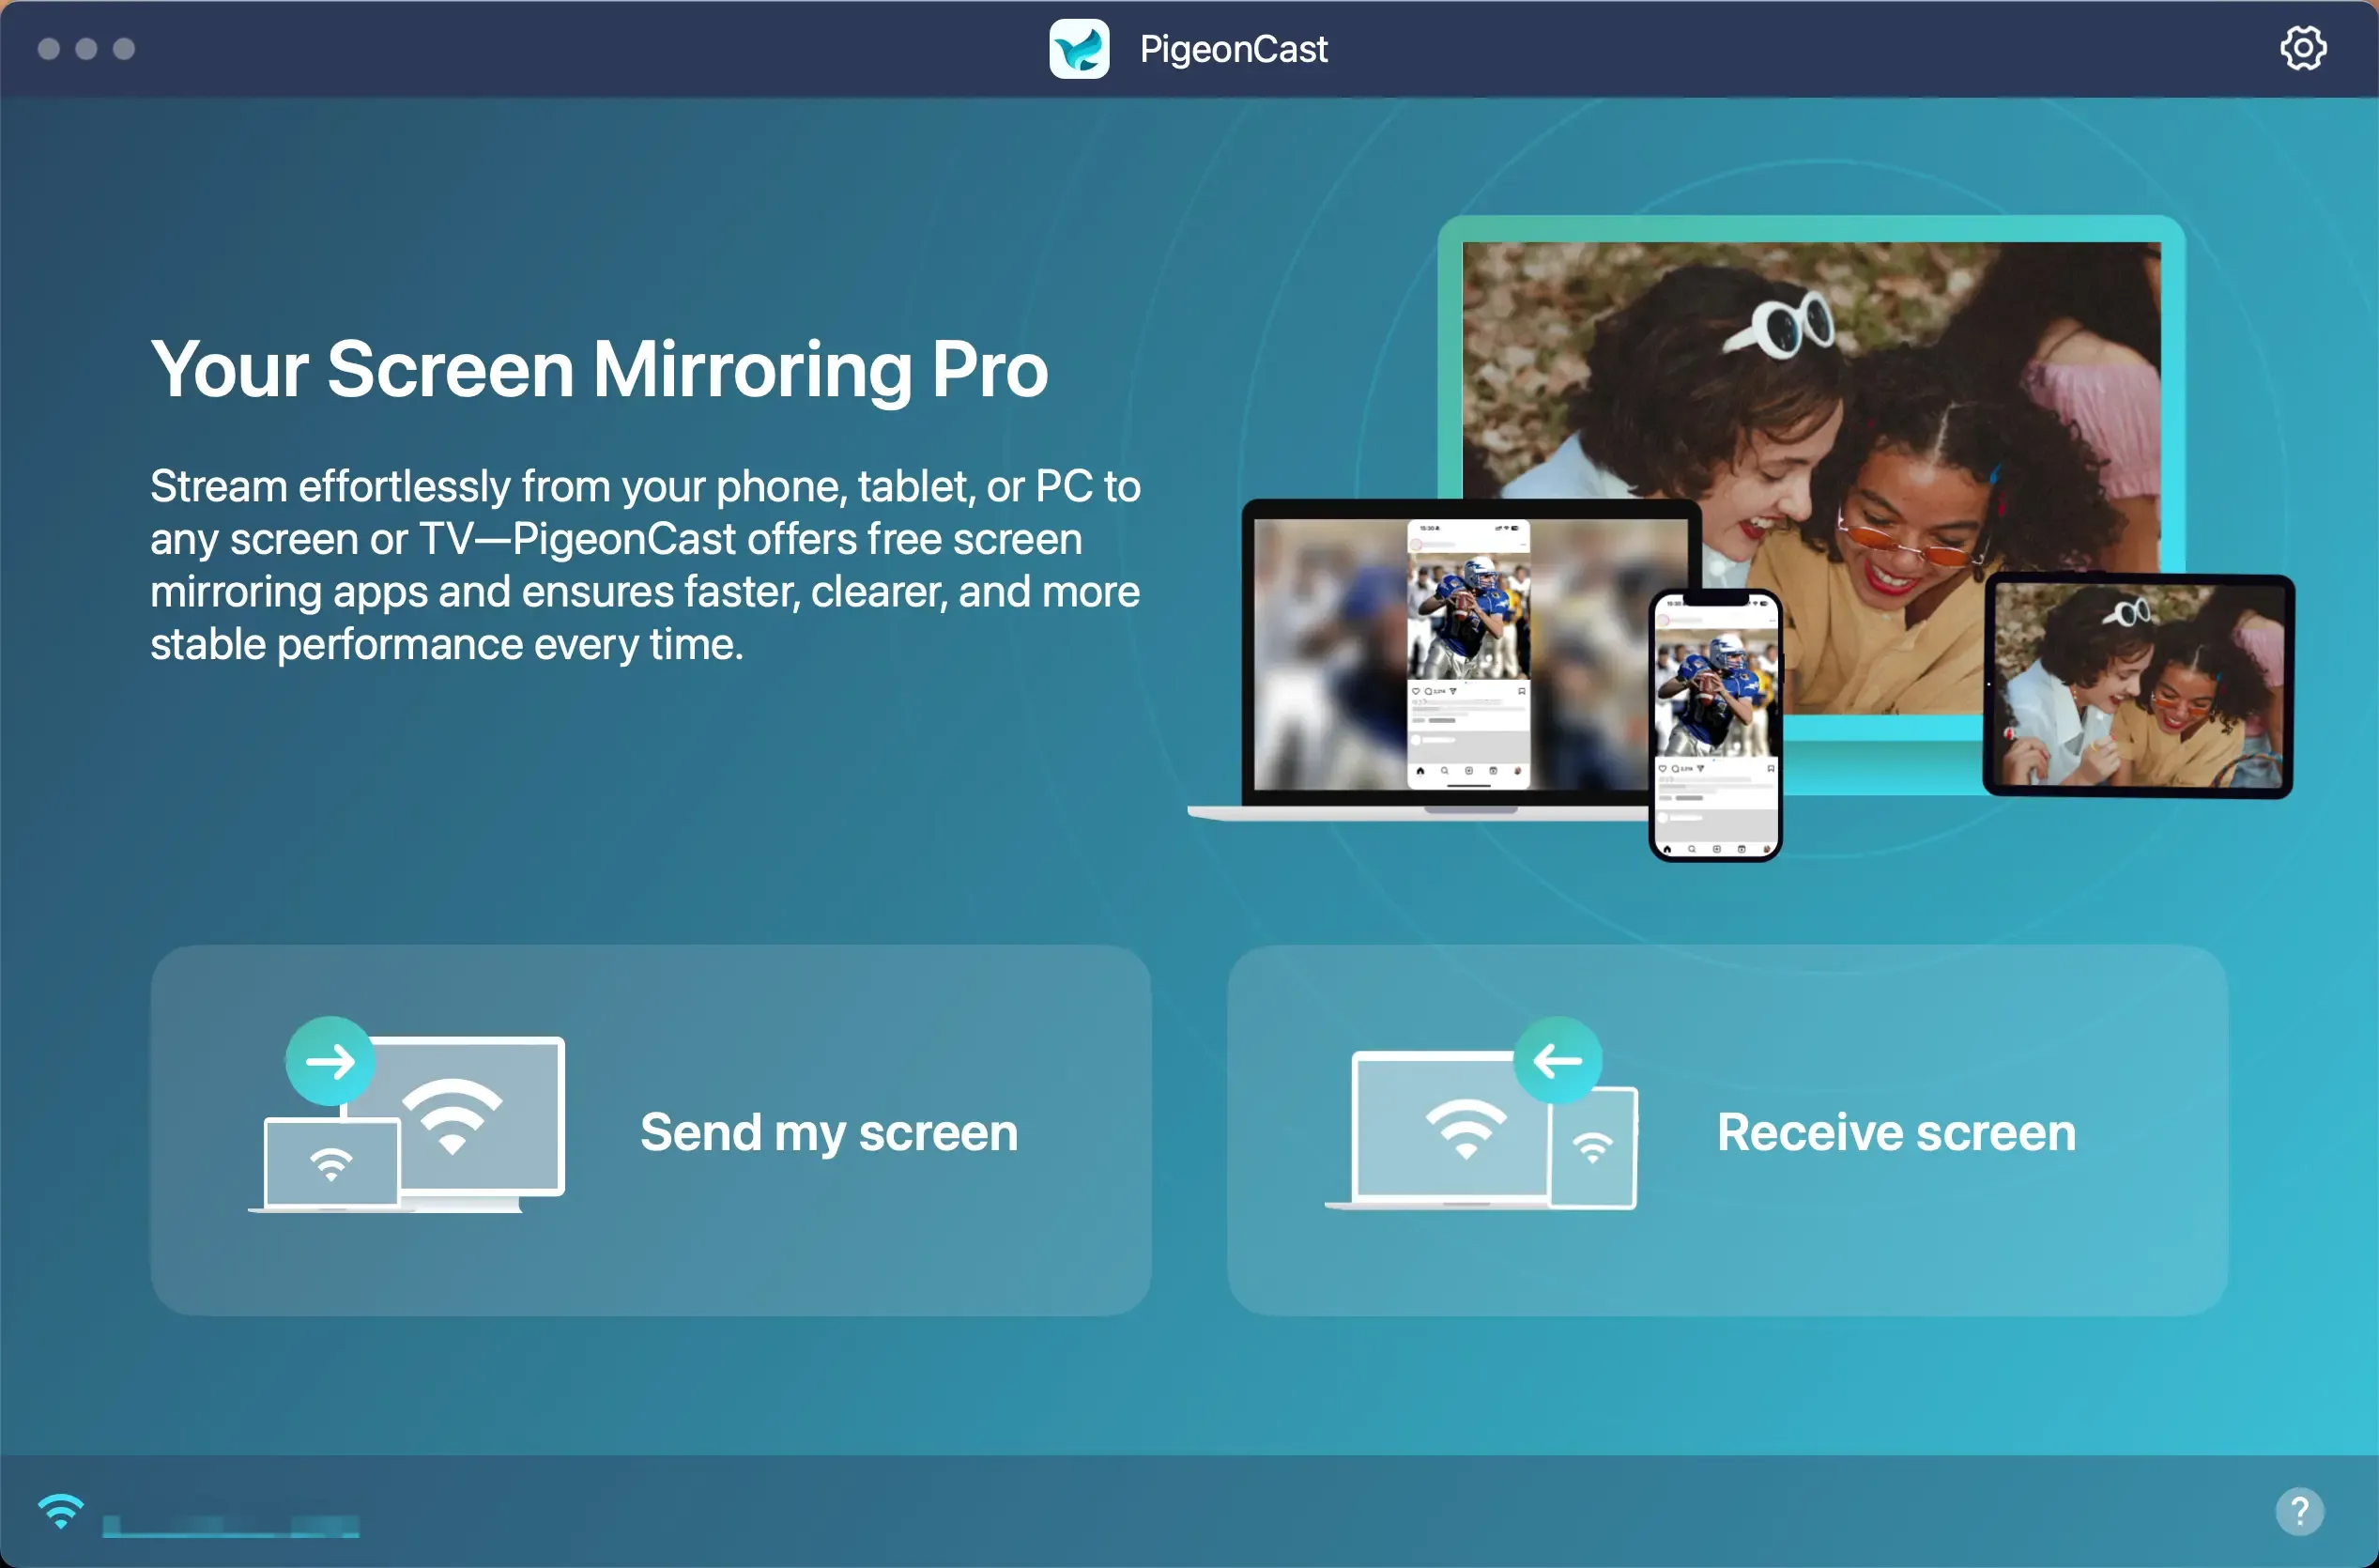
This matters because dual-side installation usually gives you:
- faster device detection
- a more direct connection flow
- easier device naming if you use multiple Macs
Step 2. Connect the two Macs.
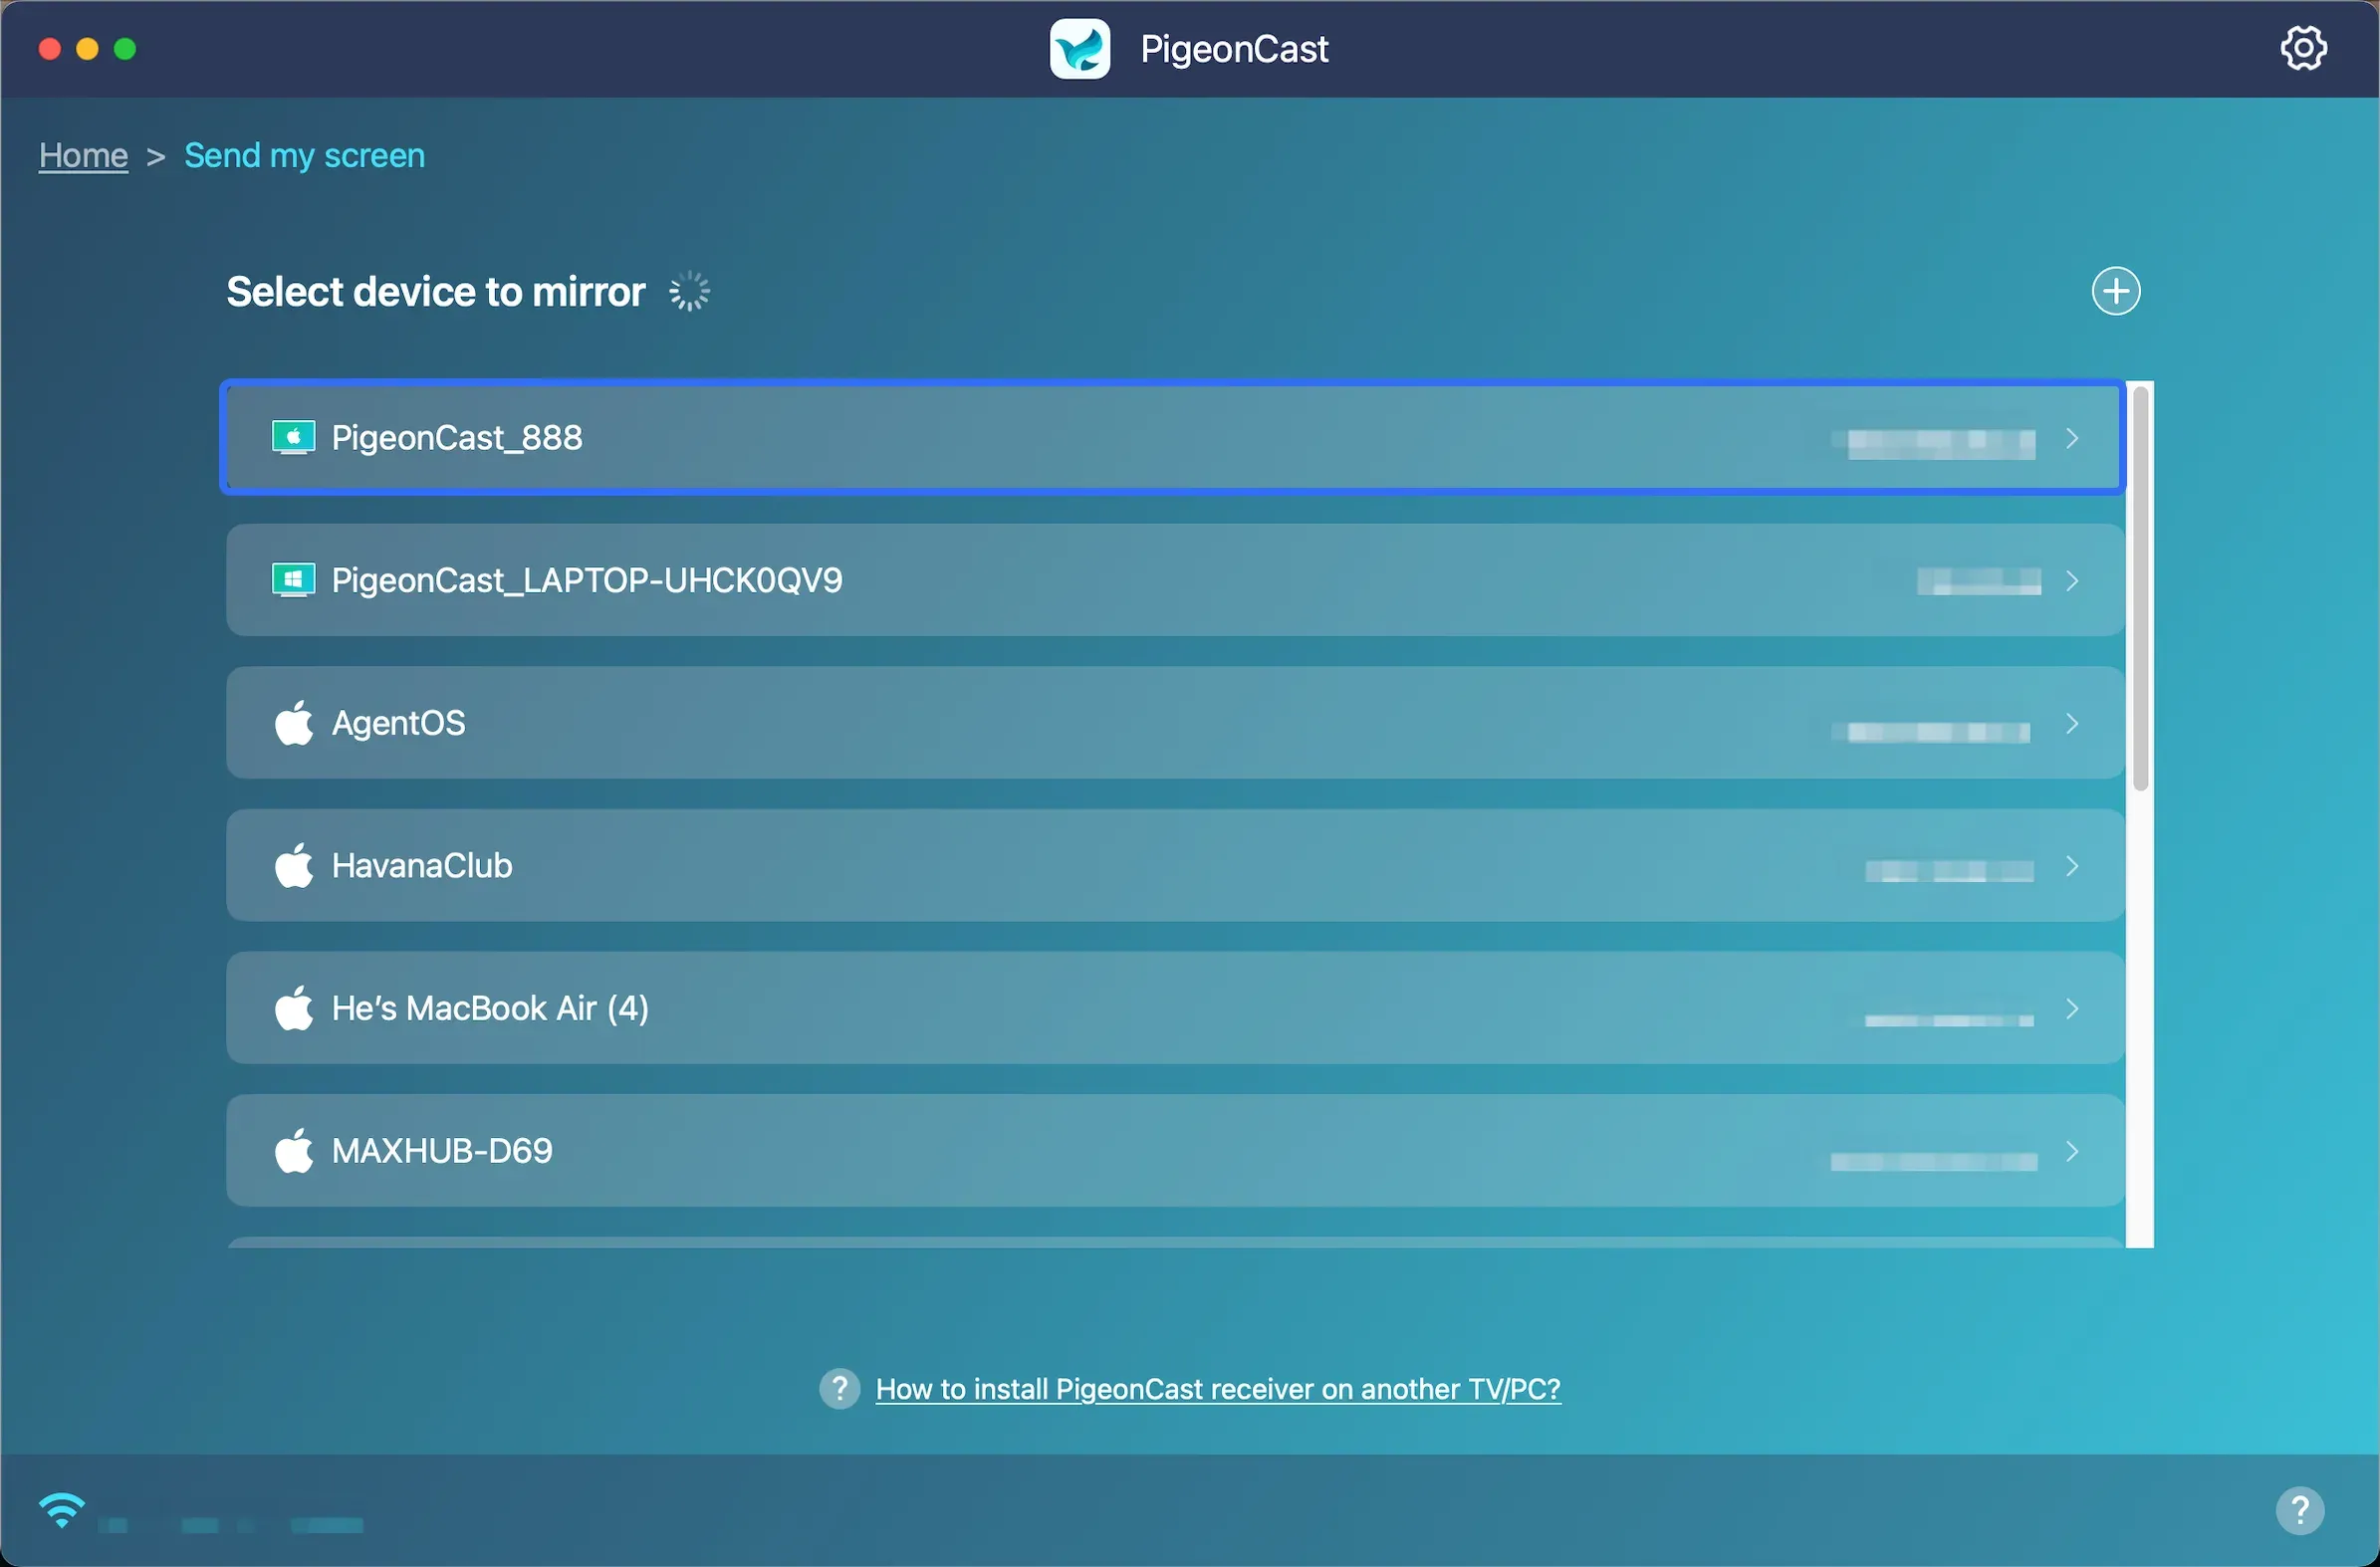
Make sure both Macs are on the same Wi-Fi network, then click Receive screen on the receiving Mac and Send my screen on the sending Mac, and select the target Mac from the detected device list.
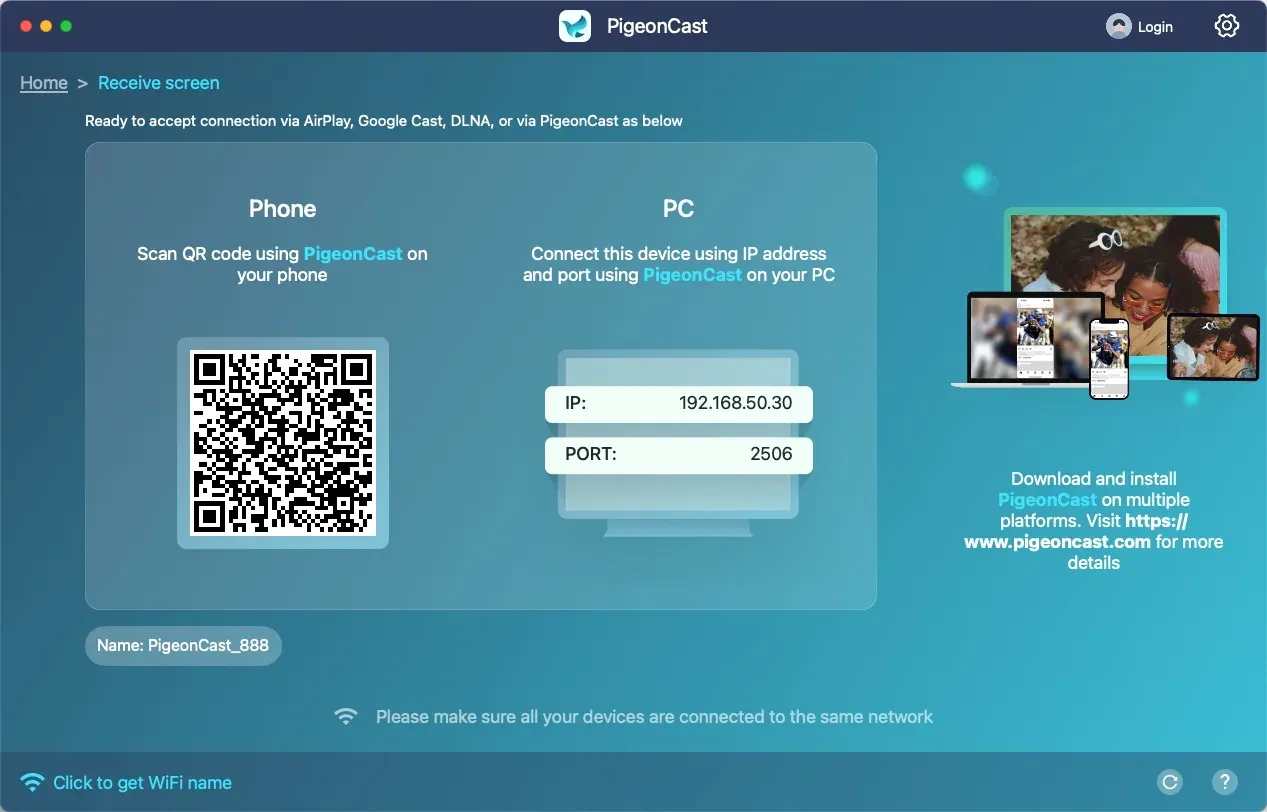
If the target device does not appear right away, try the fallback connection method:
- enter the IP address shown on the receiving Mac
- recheck that both Macs are on the same local network
- confirm that neither device is blocked by VPN or network isolation
Step 3. Start mirroring and adjust playback.
After the connection is established, start mirroring and choose the view that matches your task.
 Typical options include:
- mirroring the entire desktop
- focusing on a single app window
- adjusting resolution and frame rate for smoother playback
- mirroring with or without sound
For presentations and demos, full-screen mirroring is usually the simplest choice. For focused reviews, a single-window workflow can reduce distractions.
This approach is especially useful when your real goal is not Apple-native AirPlay itself, but simply getting one Mac screen onto another Mac quickly and reliably.
AirPlay vs PigeonCast for Mac-to-Mac Mirroring
| Feature | AirPlay | PigeonCast |
|---|---|---|
| Setup path | Built into macOS when supported | Requires app installation |
| Receiver requirements | Limited by Apple's AirPlay to Mac compatibility rules | More flexible when you need app-based Mac-to-Mac mirroring |
| Connection method | Native Screen Mirroring or in-app AirPlay controls | Device list detection and, in some cases, IP-based connection |
| Best use case | Fast built-in mirroring on supported Apple hardware | Mac-to-Mac mirroring when AirPlay is unavailable or too restrictive |
| Control over mirroring mode | Depends on native AirPlay behavior and app support | Can be better for app-based workflows such as full screen or single-window sharing |
| Cross-platform potential | Mostly Apple ecosystem | Better if you may later mirror between Mac, Windows, phones, or TVs |
Final Thoughts
AirPlay Mac to Mac is worth trying first when both Macs meet Apple's receiver requirements and you want the simplest built-in wireless option. But if the target Mac never appears, the receiver setting is unavailable, or the hardware is too old, it is better to switch methods early than keep troubleshooting the same limitation.
For most readers, the fastest path is to check compatibility first, test the built-in AirPlay route second, and move to a dedicated Mac-to-Mac mirroring app only if the native setup is blocked.
AirPlay Mac to Mac FAQ
Can I AirPlay from Mac to Mac without internet?
Usually yes. Internet access is not the main requirement. What matters more is local connectivity, Wi-Fi being turned on, and a discovery path that allows the two Macs to see each other.
Why can't I find my Mac in the AirPlay list?
The most common reasons are an unsupported receiver Mac, AirPlay Receiver being turned off, an access setting that is too restrictive, or the two Macs being separated by VPN or network isolation.
Where is the AirPlay Receiver Mac setting?
On macOS Ventura or later, go to System Settings > General > AirDrop & Handoff. On macOS Monterey, go to System Preferences > Sharing.
Can I stream audio and video from one Mac to another Mac?
Yes. Apple's current Mac help documentation says you can stream video and audio from another Mac to your Mac, which lets the receiving Mac act like a display or speaker for supported content.
Is AirPlay Mac to Mac the same as full remote control?
No. AirPlay Mac to Mac is mainly for mirroring or streaming. If you need to move files, control apps on the other Mac, or manage it remotely, use a remote-access workflow instead.
Mia Clarke is a technology editor specializing in screen mirroring and casting solutions across multiple platforms. Mia provides clear, practical guides and in-depth insights to help users seamlessly connect their devices. Passionate about enhancing digital experiences, Mia is dedicated to keeping readers updated on the latest trends and tools in cross-platform screen sharing. Whether you’re looking to mirror your smartphone, laptop, or smart TV, Mia’s content delivers reliable, user-friendly advice to simplify your tech setup.