
If you want to show photos on TV, the easiest answer is to open the pictures on the device that already has them and then send that screen or photo feed to the TV. For most people, that means AirPlay from an iPhone or iPad, Cast from an Android phone, HDMI from a laptop, or a USB drive plugged into the TV.
The right choice comes down to two things: where your photos are stored and what your TV can receive. Some TVs are good at opening a USB photo library. Others work better when the phone, tablet, or computer does the work and the TV simply shows the result.
How to Show Photos on TV: Quick Method Picker
If you want the short version, start here.
| Method | Best for | What to expect |
|---|---|---|
| AirPlay | iPhone, iPad, and some Macs | Easy if your TV supports AirPlay |
| Android Cast or screen share | Android phones and tablets | Good for albums stored on your phone |
| HDMI | Laptops and desktops | Stable and simple, especially for slideshows |
| USB drive | Smart TVs with a photo viewer | Good if you want the TV to open the photos directly |
| Screen mirroring app | Homes with mixed devices | Useful when built-in options are limited or inconsistent |
If your photos are already on your phone, start there. If they are on a computer, HDMI is often the quickest answer. If you want to hand a TV a folder full of pictures and run a slideshow, a USB drive may be the cleanest choice.
Use PigeonCast for Photo Showing Across Different Devices
Most TVs can receive photos in more than one way. iPhone users often rely on AirPlay, Android users may use Cast, and computers can connect through HDMI or wireless screen sharing.
The challenge is that these methods do not always work the same way across devices. If your household uses a mix of Apple, Android, and Windows devices, you may find yourself switching between different menus and connection methods depending on who is sharing photos.
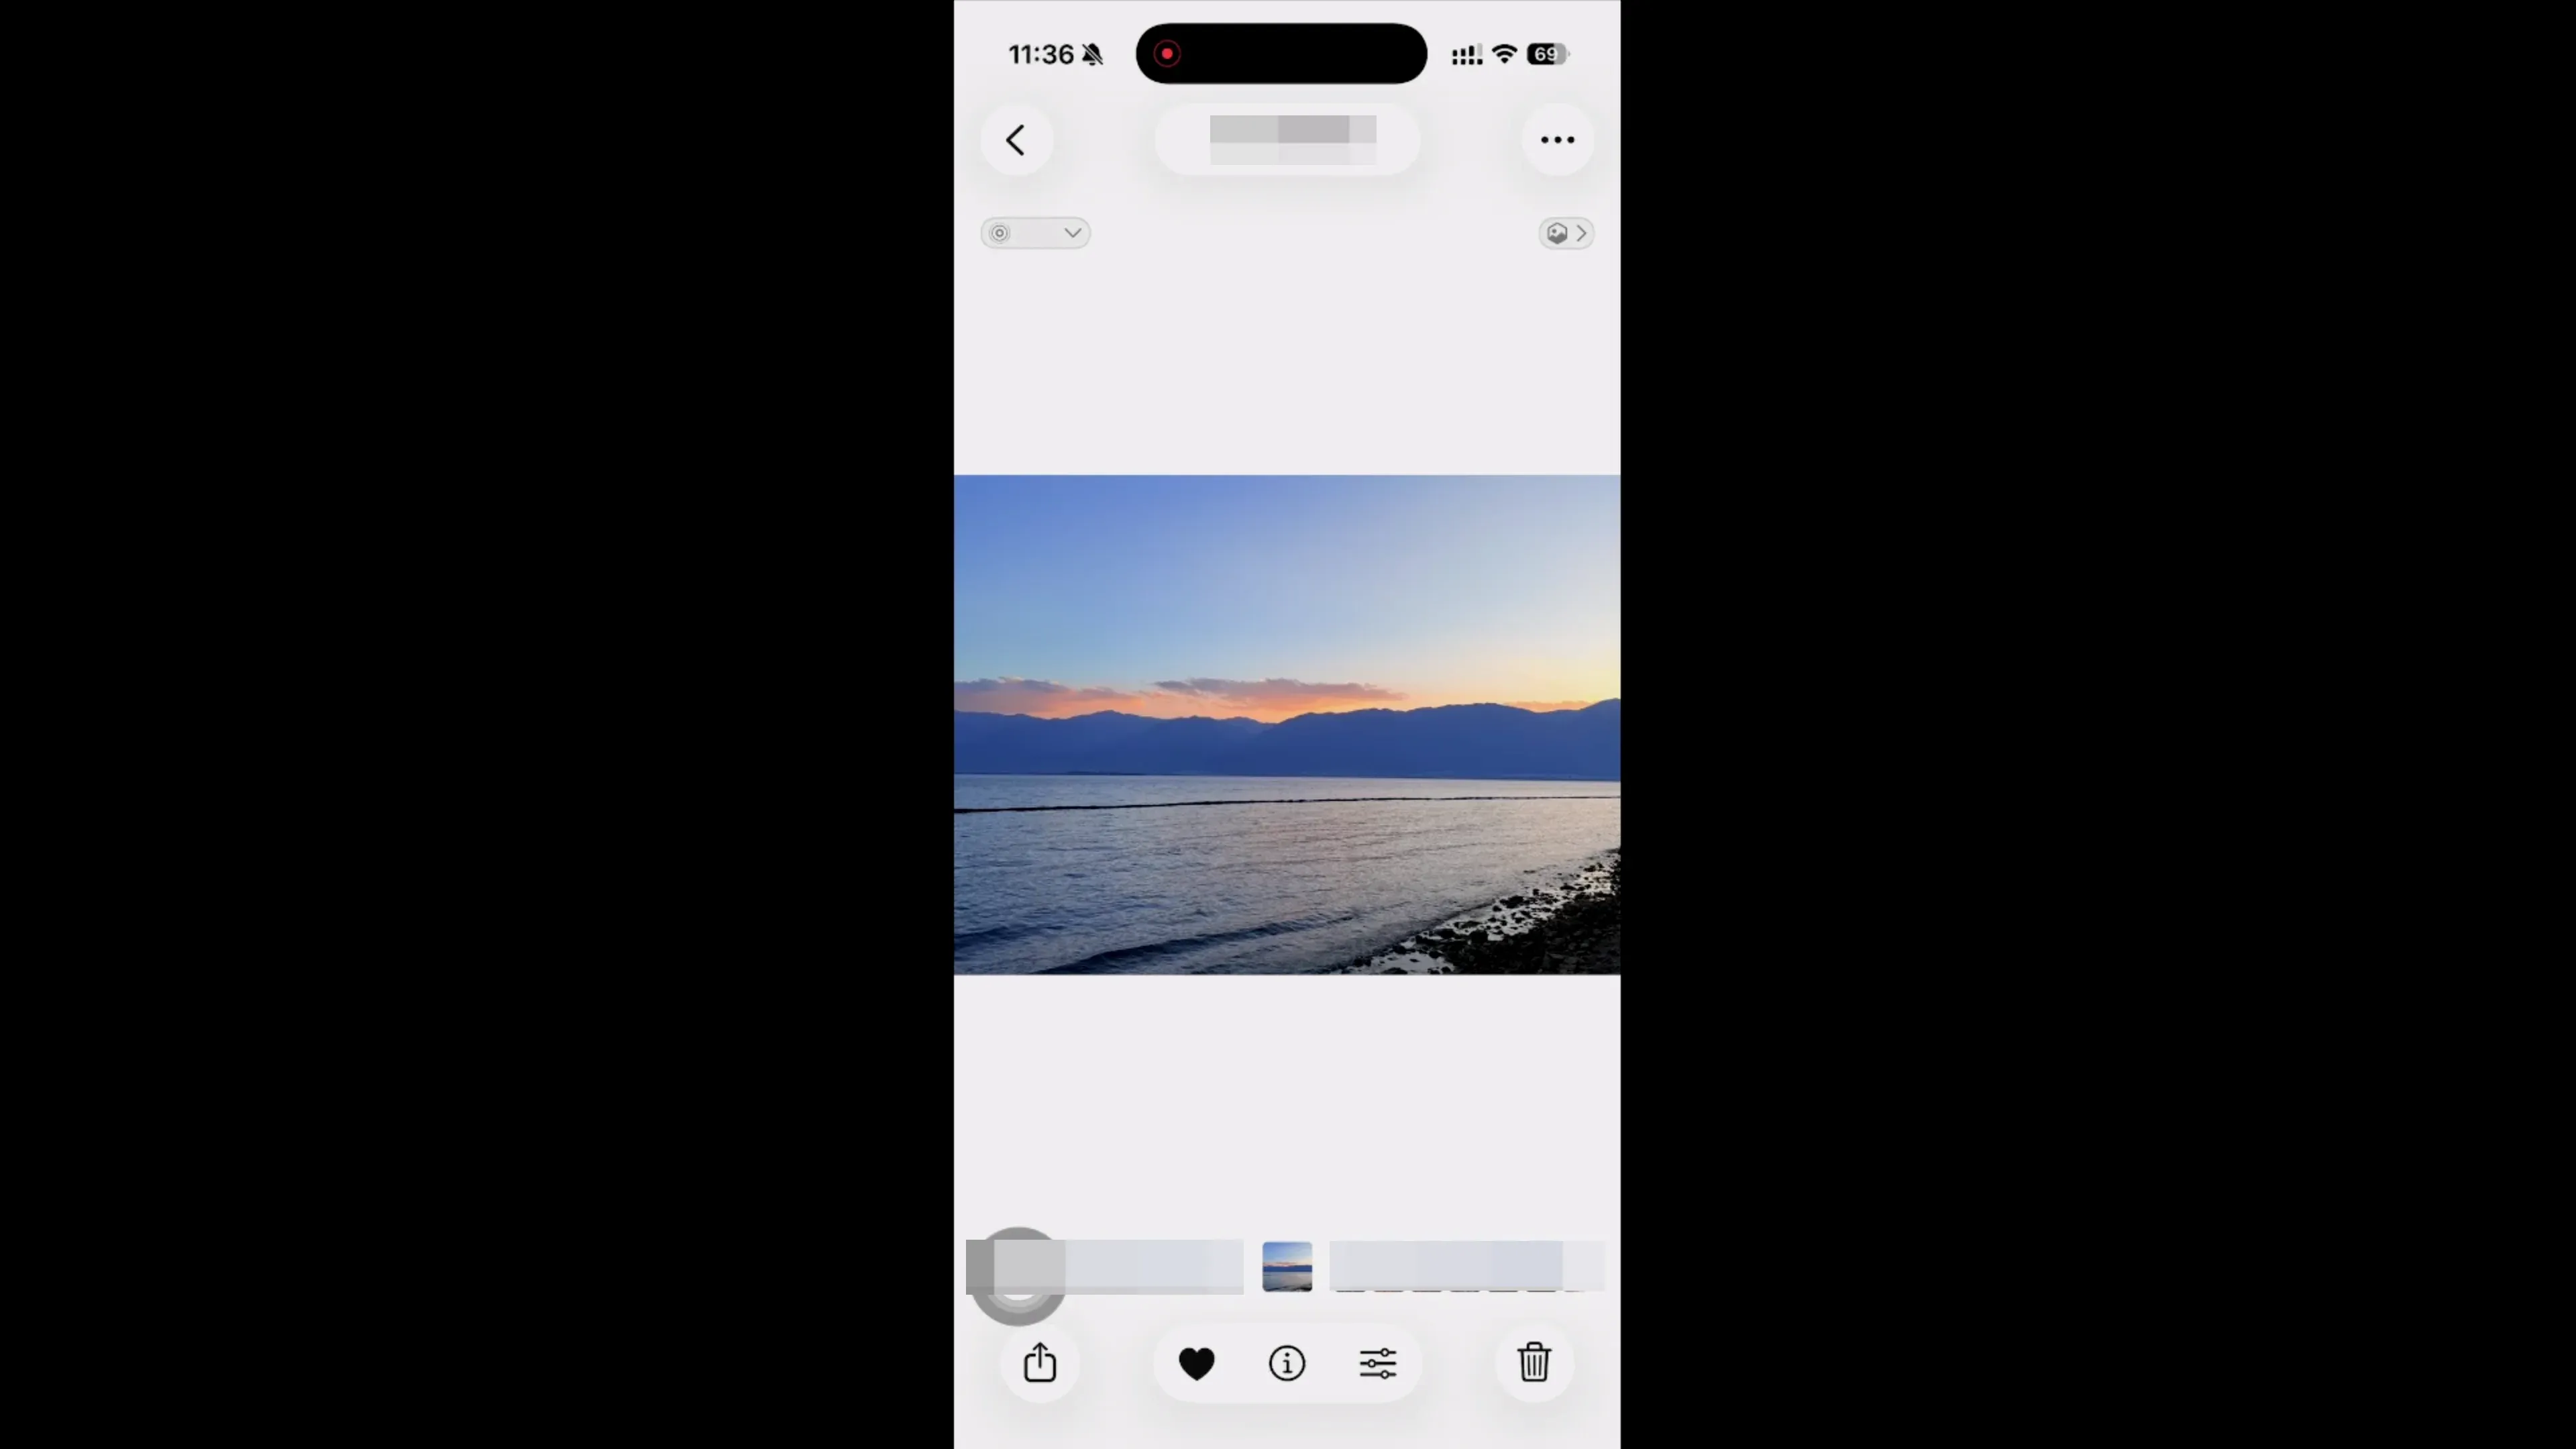
In that situation, a cross-device option such as PigeonCast can simplify the process by giving different devices a more consistent way to send photos to the TV.
Step 1. Install PigeonCast on the sending device and the receiving screen if your setup needs it.


Overall Rating:



Step 2. Connect both devices to the same local network.
Step 3. Open PigeonCast and choose the TV or receiving screen.
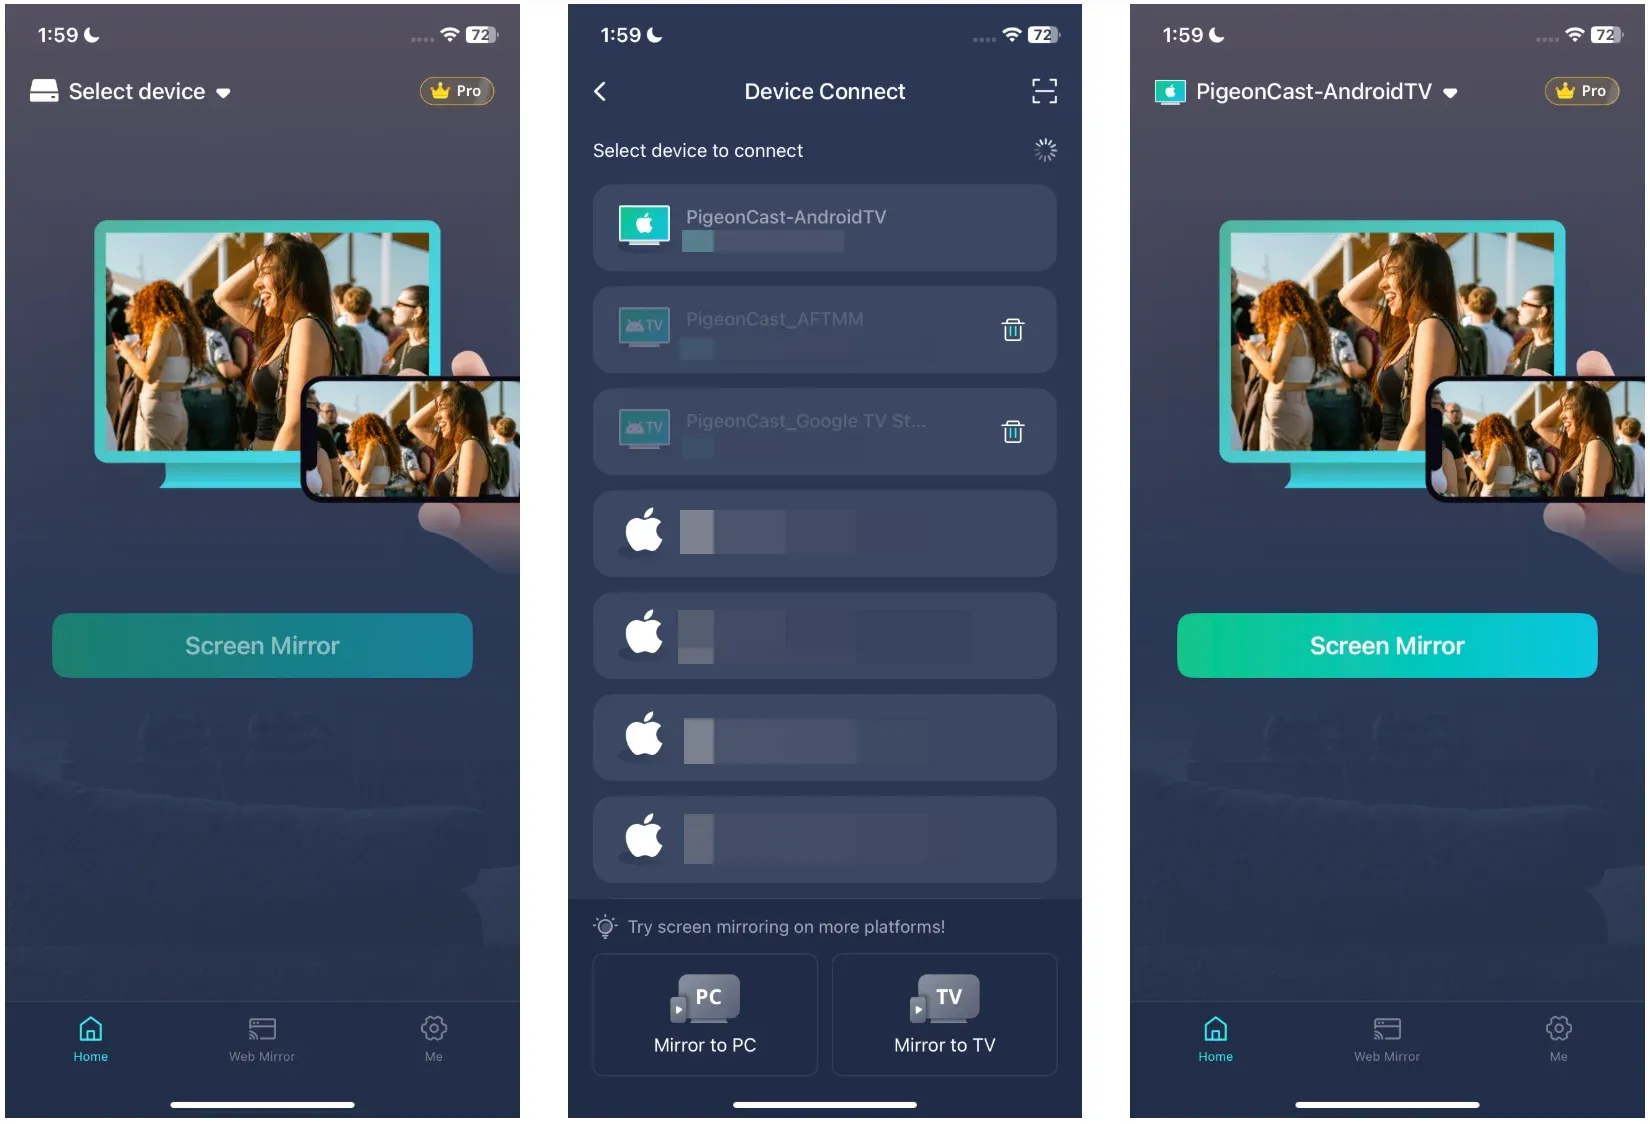
Step 4. Open your photo app, album, or folder on the sending device.
Step 5. Start showing the pictures on the TV and swipe through them normally.
This method makes sense when your home has more than one type of device and you want one routine instead of a different button for every screen.
Show Photos on TV From iPhone or iPad
If your pictures are on an iPhone or iPad, AirPlay is usually the first thing to try because it keeps the whole process close to the Photos app. For showing photos from iPhone to TV, that matters more than people think: you are not just “casting a screen,” you are often switching between single images, albums, memories, and slideshows. AirPlay tends to feel natural in this situation because you can control everything from the iPhone while the TV becomes a larger viewing screen.
In my experience, this is the best starting point when you want to show recent photos quickly, especially family photos, travel pictures, or a small album after dinner. It is not always the most universal method, because the TV must support AirPlay or connect through an Apple TV, but when it works, it is usually the least fussy option for Apple users.
Step 1. Make sure your iPhone or iPad and the TV are on the same Wi-Fi network.
Step 2. Open the Photos app and choose the photo or album you want to show.
Step 3. Tap the Share button, then choose AirPlay.
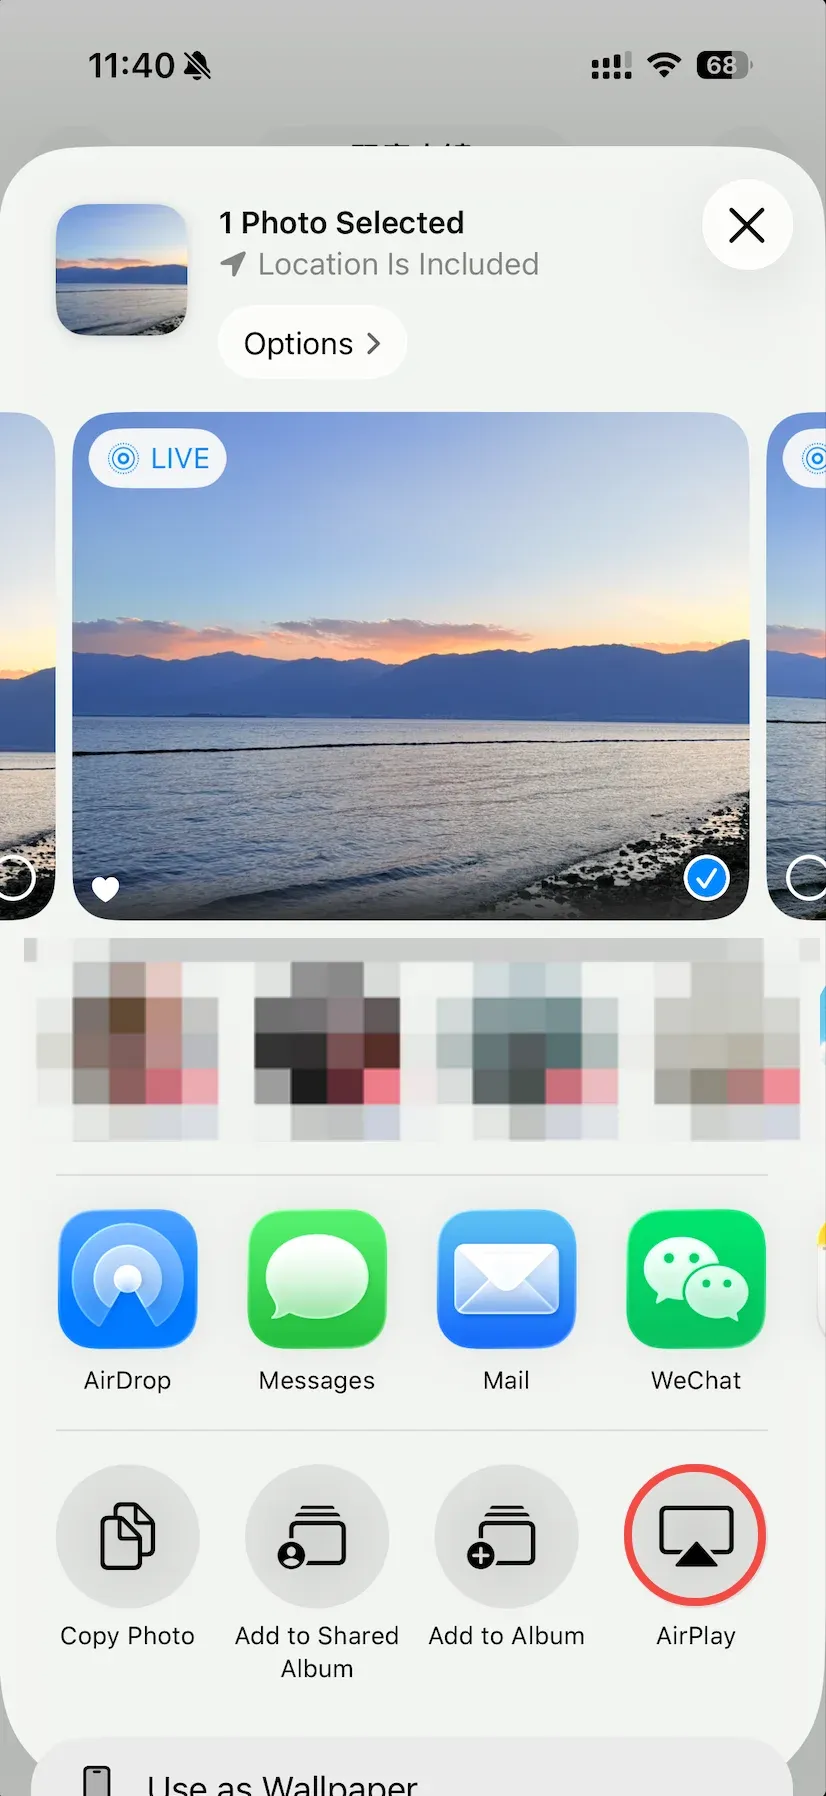
Step 4. Select your TV or Apple TV from the list.
Step 5. Swipe through photos on your device while the TV shows the same image.
Once the connection is working, the next decision is how you want to view the photos. For a handful of pictures, swiping manually gives you more control and lets you stop on specific images. For larger albums, vacation photos, or family collections, a slideshow usually creates a better viewing experience because everyone can focus on the images instead of the phone.
If you want a more polished presentation, start a slideshow from the Photos app after the TV connects. The TV feels more like a shared photo display and less like a mirrored phone screen. For more tips on using AirPlay specifically for photo viewing, see our guide on AirPlay photos to TV.
Show Photos on TV From an Android Phone
Android is a little less uniform than iPhone because different brands use different names for the same basic idea. Samsung may call it Smart View, some phones call it Cast, and others hide it under screen sharing or wireless display. For photos, the important thing is not the name of the button, but whether the phone can send the gallery view to the TV without making you move the files first.
This is a good method when the photos are still on your phone and you want to browse them casually. I would try a direct photo-cast option first if your gallery app or Google Photos offers it. If that is not available, full-screen mirroring is the practical alternative method, especially when you want to zoom in, compare shots, or show edited versions that only exist inside a certain app.
Step 1. Connect the Android phone and the TV to the same Wi-Fi network.
Step 2. Open your gallery or photo app.
Step 3. Swipe down from the top of the screen and tap Cast, Smart View, or the matching screen-share button.
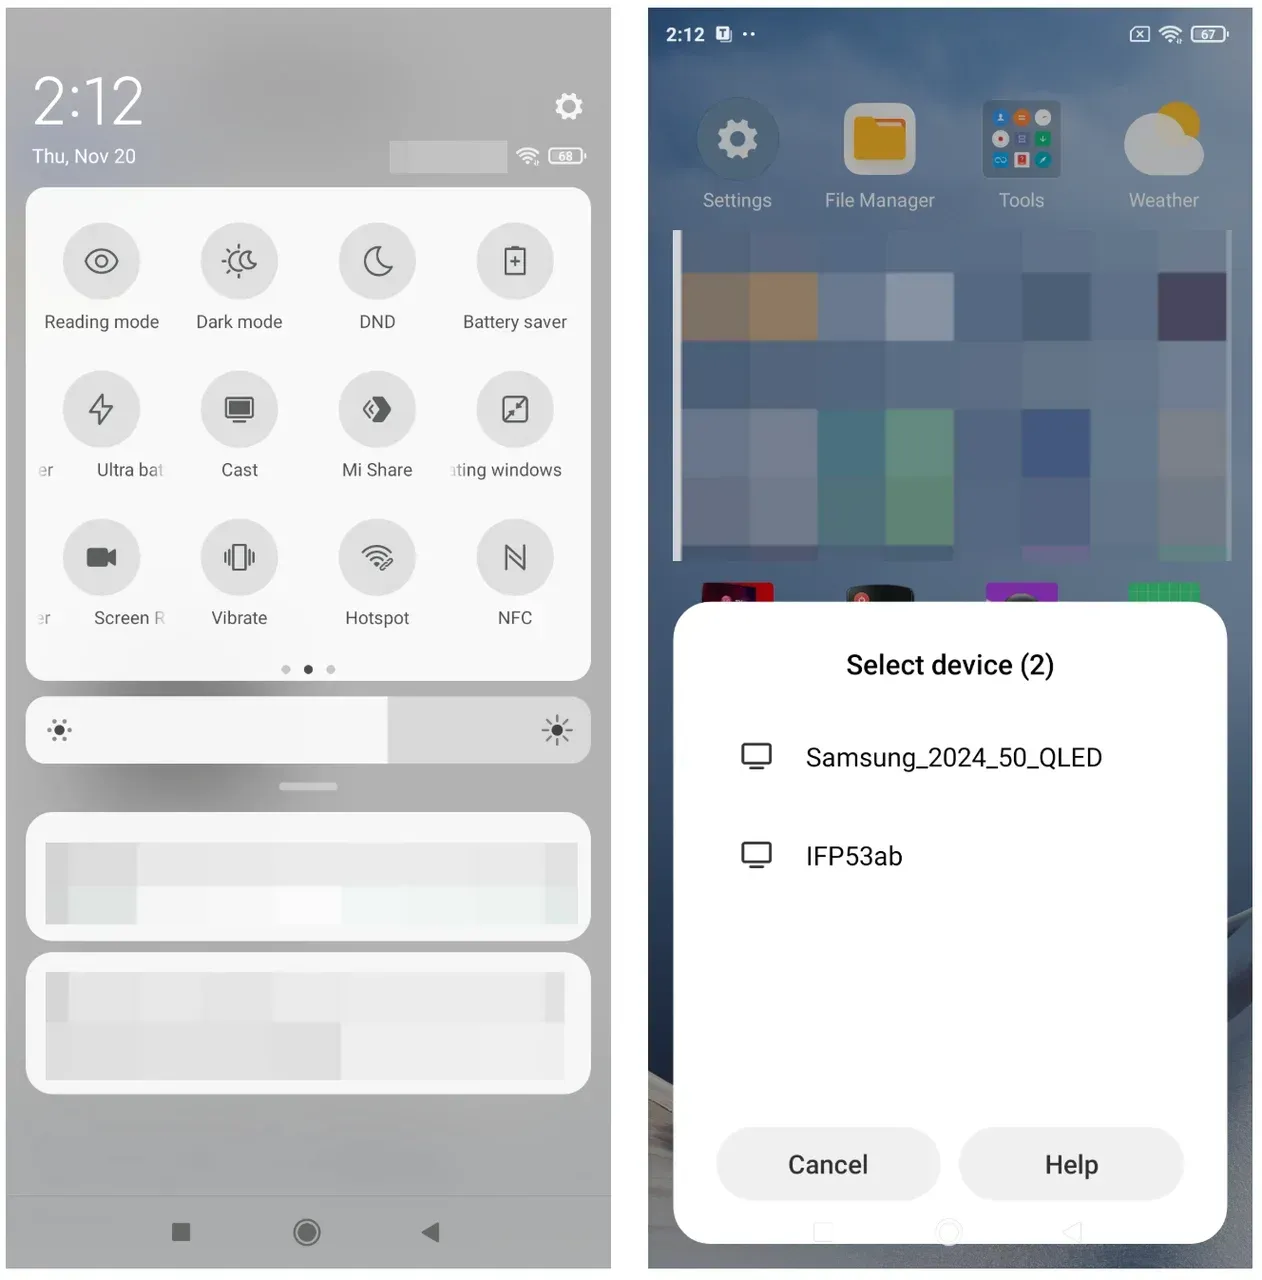
Step 4. Choose your TV.
Step 5. Open the album you want and swipe through the photos.
Some Android TVs and Google TV devices also let you cast from Google Photos. That can be handy if your pictures are backed up online instead of stored only on the phone.
Show Photos on TV From a Laptop or Desktop
A computer is often better than a phone when the photo set is large, edited, organized into folders, or prepared for a proper slideshow. You get a bigger storage space, easier file sorting, and more control over the viewing order. This is why I usually prefer a laptop for planned photo viewing, such as wedding pictures, travel albums, classroom images, or a presentation that mixes photos with notes.
The main decision is whether you want stability or convenience. HDMI is the safer choice when the slideshow needs to run smoothly. Wireless screen sharing is more comfortable when you do not want a cable across the room, but it depends more on the TV, the computer, and the network.
Use an HDMI cable or adapter
HDMI is not the most modern-looking method, but for photos it is still one of the most reliable. A photo slideshow does not need fancy wireless features; it needs a stable image, predictable controls, and no sudden disconnects. With HDMI, the TV simply becomes a second screen, so almost any photo app, folder preview, browser album, or presentation tool can work.
I would choose HDMI when the photos matter enough that you do not want to troubleshoot in front of other people. For example, if you are showing a long family slideshow, client images, or event photos, a cable is often less stressful than hoping the TV appears in a wireless device list.
Step 1. Connect the computer to the TV with an HDMI cable.
Step 2. Change the TV input to the correct HDMI port.
Step 3. Open the folder, slideshow, or photo app on your computer.
Step 4. Put the images in full screen.
Step 5. Move through the photos with your keyboard, mouse, or trackpad.
This works well because the TV behaves like a larger monitor. You do not need to worry as much about wireless discovery or app support.
Use wireless screen sharing on a computer
Wireless screen sharing from a computer is useful when the photos are on your laptop but you still want a clean, cable-free setup. It works especially well for casual viewing, where a slight delay is not a big problem. The TV mirrors or extends your computer screen, so you can open photos in Finder, File Explorer, Photos, Google Photos, or any other app you normally use.
Most modern wireless sharing solutions support both Windows PCs and Mac computers making it easier to display photos without worrying about cables or adapters.
My own rule is simple: use wireless sharing when convenience matters more than perfection. If you are just showing a few images, it is usually fine. If you are running a long slideshow for a group, HDMI is still the safer backup.
For Windows:
Step 1. Press Windows + K.
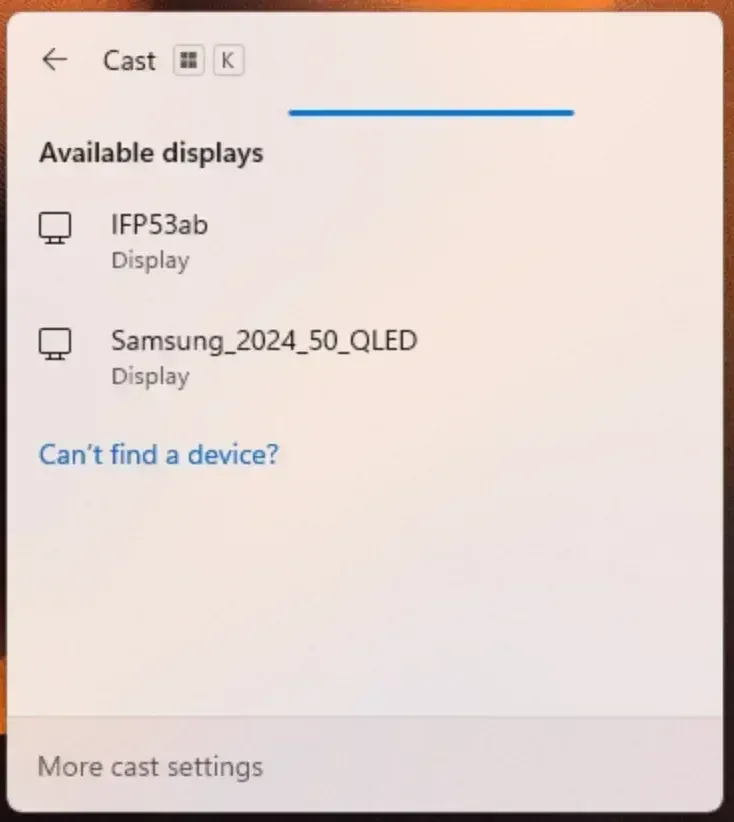
Step 2. Pick the TV from the list.
Step 3. Open your photos after the screen connects.
For Mac:
Step 1. Open Control Center.
Step 2. Choose Screen Mirroring.
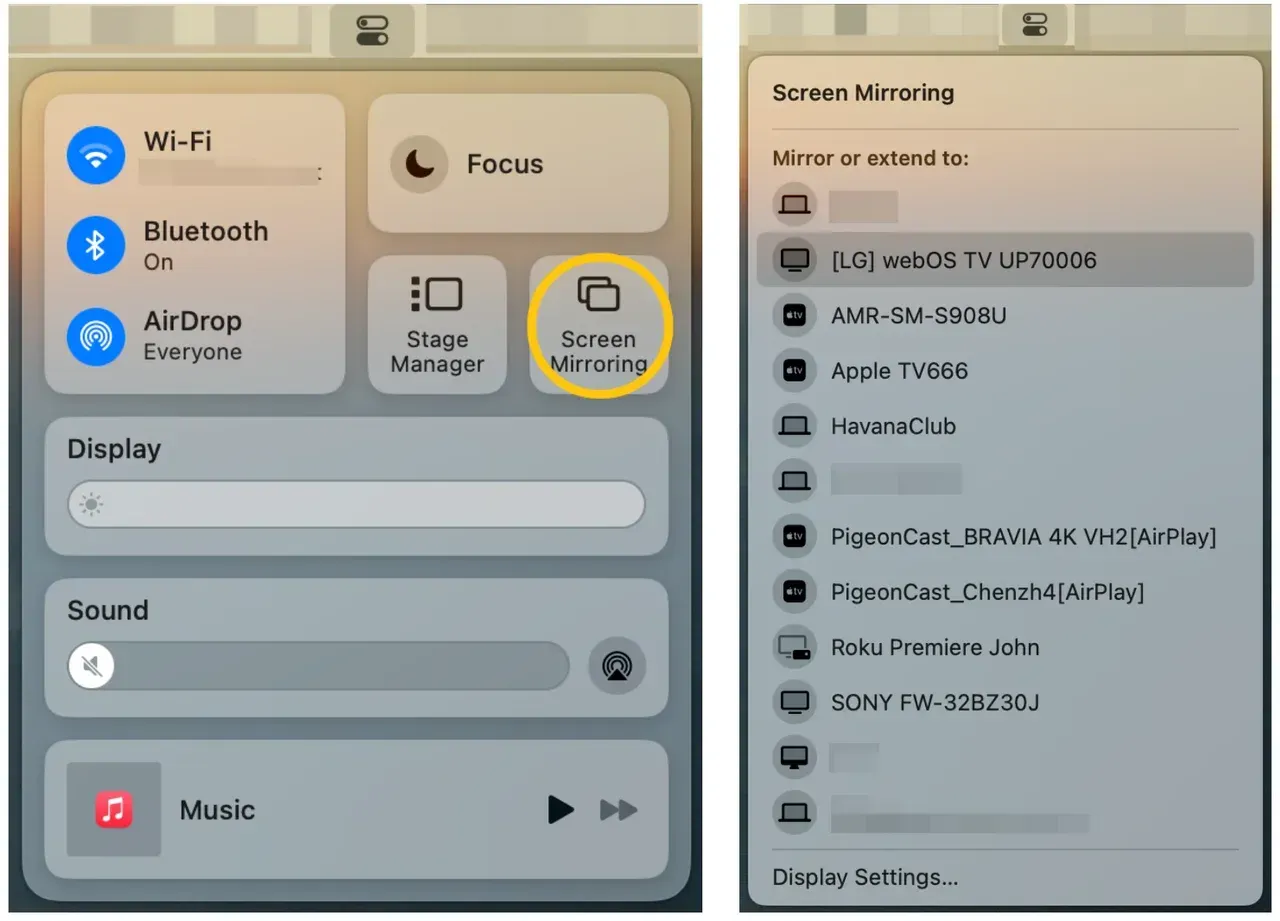
Step 3. Select your TV.
Once the screen is on the TV, open your pictures in full screen and start the slideshow if you want a more polished look.
Show Photos on TV With a USB Drive
A USB drive works differently from AirPlay, Cast, or HDMI because the TV handles the photos by itself. That can be a big advantage. You do not need to keep your phone unlocked, you do not need a laptop nearby, and you do not depend on a wireless connection once the files are on the drive. For photo viewing, this makes USB especially useful when the TV needs to keep showing pictures for a while.
I would use USB for prepared photo sets rather than spontaneous sharing. It is great when you already know which pictures you want to show and can copy them into a clean folder first. The trade-off is that TVs are not as flexible as phones or computers, so simple file formats and a tidy folder structure matter more here.
Step 1. Copy your photos to a USB drive.
Step 2. Safely eject the drive from your computer.
Step 3. Plug the USB drive into the TV.
Step 4. Open the TV's media player, gallery, or photo viewer.
Step 5. Choose the folder and start the slideshow.
Before you do this, make sure the TV can read the photo format. JPG and PNG are usually the safest choices. Very large image files, uncommon formats, or deeply nested folders can make the TV slow or cause files to disappear from the list.
Why Photos Are Not Showing Correctly on TV
If the photos do not appear, the problem is usually simple. In most cases, it comes down to the connection, the file type, or the way the TV handles images.
The phone or computer cannot find the TV
This is one of the most common problems, and it is often less mysterious than it looks. In many homes, the phone joins one Wi-Fi band while the TV is still on another, or the TV wakes from sleep without fully reopening its cast or AirPlay receiver.
I usually check the TV first, not the phone. Make sure the TV is fully on, not half-idle in a low-power mode, then confirm both devices are on the same network. After that, close the photo app, reopen it, and refresh the device list.
The TV shows a black screen or the wrong image
Screen mirroring black screen usually happens after the connection starts, which makes it more annoying because it looks like everything should be working. Sometimes the TV is connected, but the photo app did not hand over the image properly. Other times, the phone locks, the app shifts to the background, or the TV freezes on an earlier frame.
A good test is to stop trying with a whole album and open one single photo instead. If that works, the issue is often the slideshow view, not the connection itself.
The TV does not read the USB drive
This is very common with older TVs and even some newer smart TVs. The USB port may work fine, but the TV still may not like the drive format, folder structure, or image type. JPG usually works best, while HEIC, RAW, or very high-resolution files can cause trouble.
I have also seen TVs ignore a drive simply because there were too many folders inside it. If the USB does not appear, try a smaller drive, a simpler folder layout, and a test batch of just five or ten photos first.
The photos look stretched or cropped
This often has nothing to do with the photos themselves. The TV may be zooming the image, forcing it to fill the screen, or applying a picture mode that was meant for video instead of still images. Family photos are where this becomes obvious because faces look wider and edges get cut off.
Open the TV picture settings and look for options such as Fit to Screen, Just Scan, or Original Size. On the sending device, try both portrait and landscape photos to see whether the issue is scaling or the original image shape.
The slideshow is choppy
If a slideshow stutters, pauses, or takes too long between images, the problem is usually the size of the files or the wireless connection. This happens a lot with modern phone photos because the images are much larger than people expect, especially after editing. The TV may be trying to load each one on the fly, which creates a stop-and-start effect.
If that happens, reduce the number of open apps, move closer to the router, or test a smaller photo set. For an event or longer slideshow, HDMI or USB is often smoother.
Best Way to Show Pictures on TV for Different Situations
At this point, you may have noticed that there is no single "best" way to show photos on a TV. The right choice depends more on the situation than the technology itself. A quick family album, a vacation slideshow, and a long-running display in a living room all benefit from different approaches.
Here are the methods I would choose for the most common photo-viewing scenarios.
| Situation | Best method |
|---|---|
| Show recent photos from your phone | AirPlay or Android Cast |
| Show a full slideshow from a laptop | HDMI |
| Let the TV run photos by itself | USB drive |
| Use one wireless option across several devices | PigeonCast |
| Show pictures where Wi-Fi is unstable | HDMI or USB drive |
If I had to simplify the decision:
- Use AirPlay when your photos are on an iPhone or iPad and the TV supports it.
- Use Cast or Smart View when the photos are stored on an Android device.
- Use HDMI when reliability matters more than convenience.
- Use USB when the TV needs to run the slideshow by itself.
- Use PigeonCast when multiple device types need a single sharing method.
Conclusion
To show photos on TV, you do not need anything complicated. Start with the device that already has the pictures, then choose the easiest way to get that image onto the TV. For phones, that often means AirPlay or Cast. For computers, HDMI is still one of the easiest answers. For direct playback on the TV, a USB drive works well.
If your devices do not cooperate with the built-in options, PigeonCast is another solid way to put your photos on a larger screen without changing your habits every time.
How to Show Photos on TV FAQ
Can I show HEIC photos on a TV?
Usually, but not always. Many TVs can display JPG and PNG files without issues, while HEIC support varies by brand and model. If photos copied from an iPhone do not appear on a USB drive, converting them to JPG is often the quickest fix.
Do photos lose quality when displayed on a TV?
Not necessarily. HDMI typically preserves image quality best because the computer sends the original image directly to the TV. Wireless methods can sometimes compress content slightly, but most modern TVs still display photos clearly enough for normal viewing.
What is the best way to show a large photo slideshow?
HDMI or USB is usually the best choice for long slideshows. Both methods avoid many of the interruptions that can happen with wireless connections. For events, family gatherings, or presentations, a wired or direct-playback setup tends to be more reliable.
Can I show cloud photos on my TV without downloading them?
Yes. Services such as Google Photos, iCloud Photos, and OneDrive often allow you to access images directly through an app or casting feature. This can save storage space and make it easier to display large photo libraries.
Why do some photos look different on a TV than on my phone?
TVs and phones use different screen sizes, resolutions, and image processing settings. A TV may apply sharpening, color enhancement, or cropping that was not visible on the phone. Adjusting the TV picture mode often improves the result.
Can multiple people share photos to the same TV?
Yes. The easiest method depends on the devices involved. AirPlay and Cast work well when everyone uses a similar ecosystem, while cross-device solutions can be more convenient when Apple, Android, and Windows devices are all being used.
How many photos can a TV display from a USB drive?
That depends on the TV model, storage format, and folder structure. Most modern smart TVs can handle hundreds or thousands of images, but performance may slow down when folders become very large or contain high-resolution files.
Do I need a smart TV to show photos on a TV?
No. A smart TV makes wireless sharing easier, but it is not required. HDMI cables, streaming devices, media players, and USB photo playback can all work on many older televisions as well.
Mia Clarke is a technology editor specializing in screen mirroring and casting solutions across multiple platforms. Mia provides clear, practical guides and in-depth insights to help users seamlessly connect their devices. Passionate about enhancing digital experiences, Mia is dedicated to keeping readers updated on the latest trends and tools in cross-platform screen sharing. Whether you’re looking to mirror your smartphone, laptop, or smart TV, Mia’s content delivers reliable, user-friendly advice to simplify your tech setup.